A Few Good Measuring Tips
By Tony Bingelis (originally published in EAA Sport Aviation, July 1986)
Those of us who were born and raised in the good of U. S. of A. grew up using the common ruler as our standard unit of measurement. We learned to judge sizes in relation to the 12 inch ruler (one foot) and the yardstick (3 feet). It is, therefore, easy for most of us to immediately visualize the approximate size of a 2 inch square piece but not so easy for us to get a mental image of how large a 50 millimeter square would be (both are approximately the same size . . . two inches).
It is not surprising then, that we prefer our aircraft plans to be depicted in the standard inches and feet units that we grew up with. On the other hand, our European friends and others living in almost any other part of the world, would much rather build their airplanes using the metric system. Frankly, I, too, prefer plans dimensioned in the metric system because I detest working with fractions. Whole millimeter numbers are much easier to work with.
Really, it doesn't matter what unit of measurement is used in the plans you have, provided you have the correctly dimensioned measuring tools to work with. What does matter is the ability to accurately measure your work with the tools (scales and rulers) you are using. Measuring accuracy can, in many instances, be improved by learning how to properly use your basic measuring tools and by improvising whenever necessary to obtain the measurement you need with the minimum of effort. Let me pass on a few good measuring tips to make my point.
How To Use The Basic Measuring Tools
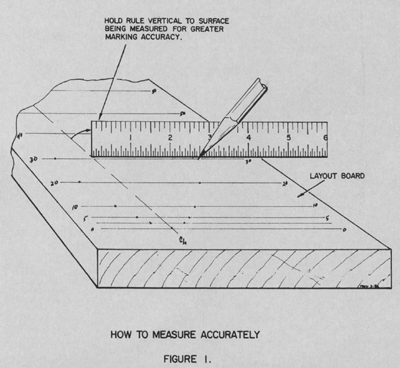
The basic measuring tool is the ruler, or as it is known in engineering circles, the rule. Most builders use a flexible steel rule for making their small measurements. The handiest of these are the steel 6 inch rule and the 12 inch rule. Steel rules can be purchased calibrated in a variety of measurement units . . . in inches and fractions, or in decimals instead of halves, quarters, eights or 16ths of an inch, and also in millimeters and centimeters. The accuracy of measurement lies not in the calibration standard of the scale as much as it does in how you transfer the measurement from the plans to your work. Let's take using a steel rule for example. Many builders don't realize that the greatest measuring accuracy is obtained when the steel rule is stood on edge against the material being measured and marked. This technique can help eliminate even the slight errors that result when your eye is not directly over the scale when marking the point of measurement.
A steel tape is used a bit differently.
It is used to measure larger dimensions and to establish aircraft alignment of wings and landing gear, by triangulation. A 50 foot steel tape is used for this purpose because a steel tape will not stretch measurably, and an accurate reading is possible provided the tape is pulled tight to remove the slack. Accuracy will generally be better if you can get someone to hold the tape at one end against a specific mark or point while you read the dimension at the other end. An example of this is measuring the distance from the rudder post to a wing tip and comparing the readings for each side.
A smaller steel tape, 8 feet to 14 feet long, may be handier for most other large measurements for the same reason . . . it does not stretch. Here's another tip.
Fitting Fuselage Crossmembers
Anyone building a wood aircraft will be confronted with many opportunities to accurately cut and fit crossmembers.
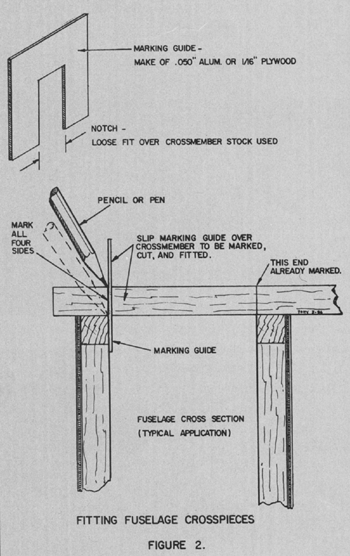
These wood strips must be cut at the correct angle and to the correct length for fitting into a specific location. Sometimes you will get the angle and length right the first time, but often, when you have to correct the angle to obtain a better fit, you learn to your chagrin that the piece is too short. A clever little marking aid can solve this vexing situation and speed up your progress as well.
I first learned about this gadget many years ago from a long time EAA friend, Gene Darst of Beaumont, TX. Gene called it a Preacher's Helper, if I remember correctly. The significance of that label escapes me unless its use helps deter one from having to voice his frustration with profane expletives.
Anyway, the simple little device really works. It permits you to mark a cross-member on all four sides. This alone insures that you will be able to make the cut to the exact angle needed. Another benefit is gained because the line marked for the cut will be made slightly outboard, thereby minimizing the risk of cutting the piece too short. That brings up an important point.
Don't Cut On The Line
A common mistake a new builder may make is to cut right on the line he has marked. This may be all right for the first cut if he remeasures the length and remarks the opposite end of the piece before cutting it off. However, it is absolutely wrong to allow yourself to get in the habit of cutting through the marked line. All saw blades have width . . . most of them are much wider than a marked line. It is easy to see, therefore, that when a cut is made down the center of the line you will be losing at least 1/32" of the measured material length. Multiply this error by two cuts and your piece will be too short.
Here's a good rule to follow. Always make your saw cut so that at least some of the marked line remains on the part you intend to use.
Dividing Any Dimension Into Equal Spaces
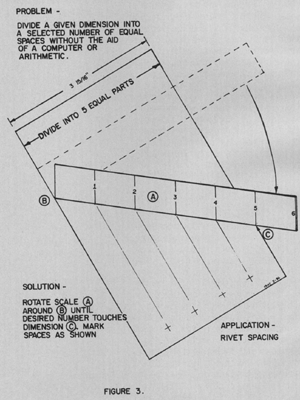
Often there is a need to divide a given length of material into equal spaces for the installation of screws or rivets, for example. This is easily accomplished without help from your computer or finger counting arithmetic. Place one end of a ruler on one edge and swing the free end of the ruler down until the number you want touches the opposite edge of the space you want divided. Using a ruler and slanting it so that the number 7 touches the far edge you will automatically have 7 equal spaces after you make a mark at each inch interval. The example shown in Figure 3 has the number 5 contacting the right hand margin. This will give you 5 equal spaces as shown. You don't have to use a ruler for this system. You could use a strip of wood or a piece of cardboard marked every two inches, for example, and numbered in sequence from one through whatever length is necessary. Look at the drawing again and think it through. It should be easier to understand than all these words.
Measuring Round Stock and Tubing
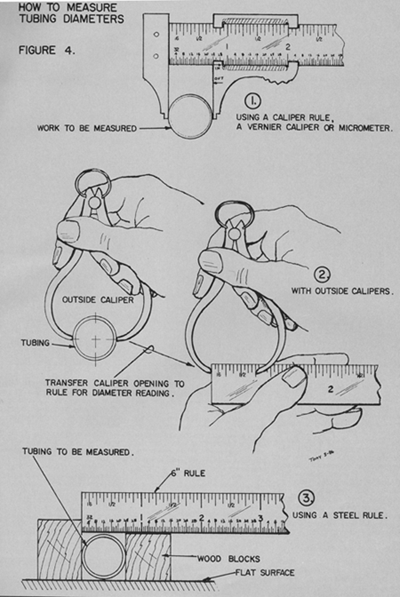
This one should be a snap to understand. If you have a good eye (figuratively speaking, of course) you can generally do a good job of estimating the diameter of common tubing sizes. Sometimes, however, you can be fooled. Obviously, when the tube diameter is quite large, or has some uncommon diameter, you had better measure it to be sure. There are a number of ways to measure the outside diameter of round stock. Figure 4 shows three of the simplest ways to do this. Of course, if the tubing diameter must be measured accurately to the nearest thousandth of an inch, a micrometer or vernier caliper should be used instead.
Determining Bolt Lengths Required
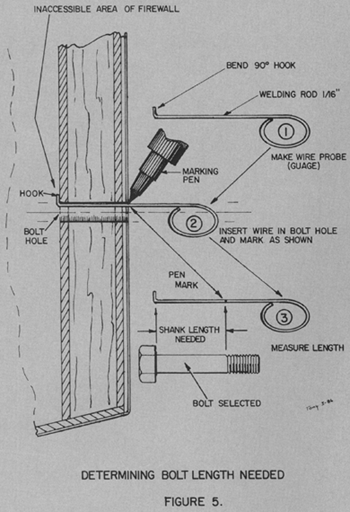
There are areas in an airplane where it is very difficult to determine the correct bolt length to use. Nevertheless, there is a way to do this without having to resort to that time wasting "trial and error" technique we are all so familiar with. One troublesome location that comes to mind is the firewall area. You often forget the thickness of the section through which the bolt must go . . . especially in a composite or wood aircraft. Then, too, trying to figure out how much extra length will be taken up by some bracket or fitting adds to the problem. Some folks solve this problem the easy way. That way is illustrated in Figure 5. Simple, isn't it?
Making Large Inside Measurements
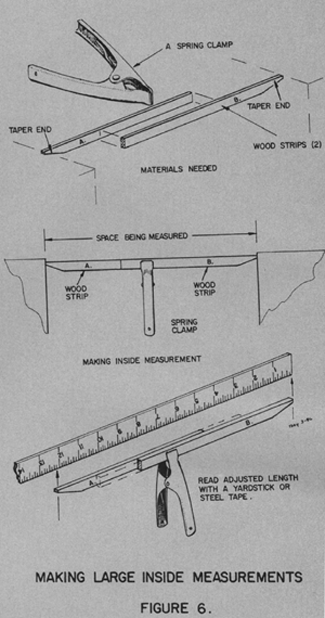
It is hard to obtain an accurate dimension for an inside measurement with a steel tape. You really can't use a yard stick as it may be too long to fit in the space to be measured. At other times access is a problem. I'll bet if you thought about it long enough you would come up with the same solution as that shown in Figure 6.
All you need are a couple of sticks and a spring clamp. Slide the sticks outward to contact the sides of the space you want measured and then clamp the sticks together with a spring clamp. Remove your super measuring tool and measure the length from one end to the other with a yardstick or steel tape. Voila! Instant success with a high degree of accuracy, too.
Mental Mutterings
Most aircraft designers go by the book when they dimension their plans for the builders. In many instances this highly professional rendition really creates unnecessary confusion, anxiety and work for the amateur builder. I will cite a few examples.
Let's say the design of the spar shown in the plans provides for a 5 degree dihedral angle. How many builders can accurately measure a 5 degree angle twice and get the same figure? Wouldn't it be more kindly for the designer to give the dihedral dimension in both inches and degrees? A builder would then have two ways to check his work.
The same complaint can be raised for control surface travel limits. When rudder travel is typically given as 25 degrees left and 25 degrees right, how do you measure that (don't scale the drawings, they say)? Measuring flap travel is equally awkward (read that as difficult) . . . especially when Fowler flaps are installed. But then, since most builders didn't flunk readin' 'n 'rithmetic in school maybe this problem is no problem for them . . . time consuming, perhaps??
