Part 1 Working With Composites
By Ron Alexander(originally published in EAA Sport Aviation, May 1999)
During the fall of 1997, I wrote a series of three articles on composite aircraft construction. These articles provide an overview of composites as they relate to aircraft building. The articles began with the October 1997 issue of Sport Aviation. I am going to again focus attention on this popular method of aircraft construction by discussing in more detail each step involved in building a composite aircraft. A certain amount of review will be necessary to achieve the goal of explaining the steps involved in this type of building.
Once you have made the decision to build a composite aircraft, either a kit aircraft or a plans built, the first step is to set up your workshop space, purchase the necessary tools and organize materials and parts.
Workshop Space
To begin this discussion it is important to note that you do not need a pristine laboratory to build a composite airplane. Like most aircraft building projects, if you have a two-car garage you have what is needed. It has been my experience that having your workshop in or near your home solves two problems. First of all, you will be much more likely to spend time on the project after getting home from work versus having to drive 30 minutes to another location. This equates to more hours on the actual project. Secondly, your family is more likely to become involved. This is very important if you are to successfully complete the project.
If you had an ideal composite shop you would have a "clean room" for doing layups, cutting cloth, etc. and a "dirty room" for sanding operations. Most of us do not have a partition in our garage so we must be careful during our sanding operations not to contaminate our work. Sanding should be accomplished after completed parts are cured and covered - not just after doing a fresh layup. You will need a table on which to cut your reinforcement fabrics (usually fiberglass). Since most of your fabric will be cut on a 45-degree bias, it may be handy to have a table set up just for that. You can shape the table by cutting one end at a 45-degree angle to facilitate cutting on a bias. The table should be wide enough to handle the fabric you will be using (60 inches should be enough). You should be able to unroll about 4-5 feet of fabric on the table. You will want to place a hard plastic cutting surface on the top of the table to allow you to cut the fabric with a cutting blade. (More about cutting fiberglass later.) This material can be 1/8-inch thick high-density polyethylene or something similar. Another table can be constructed to do your resin mixing and basic layups. This table should be roughly 3 feet by 8 feet depending upon the amount of space available. The length of the table needed will also vary with the aircraft you are building. The table should be placed in an area that will allow you to walk completely around it. In addition, some builders prefer to have another smaller table dedicated to mixing resins. After completing a part you should remove it from the area if at all possible or hang it from the ceiling.
A large thermometer should be placed where you can view it along with a humidity indicator. As you will learn, temperature and humidity control is very important when mixing and working with resins. Ideally, you should be able to control the temperature of your workshop. This, of course, is not always practical. Place a large clock with a sweep second hand on the wall where you can see it while working. The clock is always running on your resins after they have been mixed. You will have only a certain amount of time with which to apply the resin before it begins to gel. Of course, you need a first aid kit and an eye wash station. The eye wash station must be easily accessible. Proper ventilation of the work area is necessary. When working with resins or when sanding you will want to move the air through the workshop space. A fan can be set up to move the air outside the workshop. If you really want to do it right, mount an exhaust hood over your layup table. This is not that difficult to do and is very effective in removing fumes created from the resins when you are working with them. Storage of materials, parts, etc. must be addressed. If you are building a composite kit aircraft the pre-molded parts must be carefully stored. Wing panels, as an example, can bend and adapt to any shape to which they are subjected. Warping can result from improper storage. The best way to store parts is to simply leave them in the shipping crate in which they arrived. You may also want to save the shipping materials from the crate to use as padding, etc. for completed parts.
Resins should be stored in a warm area if at all possible. When the temperature is less than about 65 degrees resins become thick. The colder the temperature the thicker the resin. That means you will have difficulty pouring the resins from their containers. Several builders have designed heated areas within their shops to store resins if the shop itself is not maintained at a normal temperature. If resins are stored in extremely cold temperatures they are susceptible to crystallizing. This is not a major problem and can be corrected by placing the resin container in a pan of water and heating the water to about 160 degrees F or so until the crystals dissolve. Resins may be stored for several years prior to being used. This is termed their "shelf-life." However, with epoxy resins the accompanying hardener usually has a shelf life of less than one year. Vinylester resins often have even less time for shelf life especially if they have been promoted prior to shipment.
Composite Tools
Most of the tools you will need to build a composite airplane are readily available and somewhat inexpensive. The following is a partial list of tools you will need:
- Scales, mixing pump or balance scales to mix resin
- Sanding blocks
- Saws - hacksaw, coping saw, and pad saw
- Carpenter's level
- Carpenter's square
- Clamps
- Electric hand drill
- Fabric scissors
- Rotary cutter
- Grooved laminate rollers
- Knives - including utility knife and large serrated knife
- Respirator
- Rubber squeegees
- Straight edge
- Vacuum cleaner
- Hair dryer
Other tools that are nice to have consist of a Dremel tool with bits for shaping and cutting, a die grinder, drill press, band saw, rotary or orbital sander and the list can go on. The tools I have mentioned are specific to composite construction. You will also need basic tools and usually some sheet metal tools for a small amount of riveting, etc. The best way to determine the exact tools you will need is to read the kit manufacturer's assembly manual or the designer's plans. They will almost always provide you with a list of basic tools needed to construct their airplane. Now that we have established what kind of workshop space you will need along with several of the tools that are required let's get down to the basics of construction. I will talk about each type of material used in composite construction and how to work with each separate one. After we have established a foundation, in upcoming issues I will discuss the proper methods of doing a composite layup, methods of bonding and tape glassing, forming hardpoints, post curing, and most of the activities you will become involved in if you decide to build a composite airplane. If you want a complete review of basic composites I invite you to read the previous articles I mentioned in the beginning of this article. I do want to briefly review some of the materials used in composite construction with an emphasis on how to work with each one.
Core Materials
Let's begin with the core materials that usually consist of some type of foam. Polystyrene is the first core material that will be discussed.
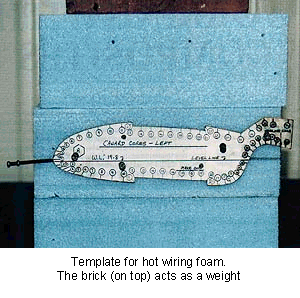
Polystyrene comes in large blocks and is normally used to form large structures such as wings, control surfaces, etc. If you are building a plans built airplane you will build a large portion of the airplane out of this material. Polystyrene can be cut with a knife, saw or it can be hot-wired into the shape of an airfoil. Usually the latter will be called for in the plans. You can find plans for a hot-wire device in the Rutan booklet called Moldless Composite Sandwich Homebuilt Aircraft Construction available from supply companies. This device is easily constructed from common materials. Templates are made from the aircraft plans you receive and are used as a guide in cutting the foam to proper shape. One thing in particular when working with all foams and especially with polystyrene foam, the cells or voids in the foam must be filled prior to applying the reinforcement material. This is accomplished by mixing a slurry compound or using a commercial filler manufactured by Poly-Fiber called SuperFil. This is the first step in the layup process that will be discussed in detail later. It should also be noted that vinylester resins will dissolve polystyrene foams, therefore, they are not used with this type of core material.
Most of the kit aircraft use either polyurethane (urethane) or polyvinyl chloride (PVC) foam. These foams come in different densities and thickness. Usually the thickness will be from about one-quarter inch to two inches or so. With most kit aircraft the large airfoils will be partially completed and you will simply be required to construct ribs, bulkheads, etc. and glue them in place. These foams are easily cut with a knife or saw. DO NOT HOT-WIRE URETHANE FOAMS. They will emit poisonous gases if hot-wired. They are also flammable. Do not burn the scraps of material left over as the same gases are emitted. Sanding blocks are used to shape foams. Band saws and routers may also be used to cut and shape. Honeycomb cores are used in several kit aircraft. You will usually not be required to work with this material, as the kit manufacturer will supply the completed parts that use a honeycomb core.

Reinforcement Materials
This is a term used for the fabric materials found in composite construction. We will find three different types of materials used in most composite aircraft. They are fiberglass, Kevlar, and carbon fiber (graphite). Fiberglass is the most commonly used material. It has the best physical characteristics at the lowest price. Without going into great detail, there are a few basic things you really should know about fabrics. Fiberglass is made up of filaments of glass that are twisted together to form a yarn. This yarn, or fiber as it is often called, is then woven into certain styles of fiberglass. When the weaver looms fiberglass they use terms such as "warp", "fill", and "selvage edge" (see Figure 1). Warp defines the fibers that run the length of the fabric as it comes off the roll. The warp direction is designated as 0 degrees. Fill fibers run perpendicular to the warp fibers. They are designated as 90 degrees. The fill fibers or threads interweave with the warp fibers. Selvage edge is the woven edge produced by the weaver to prevent the edges from fraying. Some of the new fabrics today appear to not have a selvage edge. The edges have been stitched with a lightweight thread.
Unidirectional Fiberglass
With unidirectional fiberglass, all of the major fibers run in one direction. All of the strength of the fabric is found in that one direction. The fill often consists of threads designed to hold together the glass fibers. A common term for this glass is "uni." It is manufactured in both glass cloth and in tapes. A common style number used by many composite airplanes is designated as 7715. This cloth is typically used where the primary loads are in one direction such as a spar cap.
Bi-directional Fiberglass
In this glass, the major fibers run in two directions, both the warp and the fill. In other words, instead of using threads as a fill, glass fibers are used. Thus we have glass fibers in both 0 degrees and 90 degrees. In other words, the cloth has half of the fibers in one direction and half in the other direction at right angles. This means that the cloth has the same strength in both directions. This type of cloth is commonly called "bid." Of course, there are many different styles and weaves that are available. 7725 and 7781 are two very common cloths used in amateur-built aircraft. In your plans they will often be referred to as bid cloth.
Bid cloth can be stitched together in more than one layer to form what is known as biax cloth or triax cloth depending upon the number of layers involved. The most important thing for you to understand is that you must use the type and style of cloth called for in your plans. Do not experiment with cloths. The designer has specified the cloth to use based upon structural analysis. Use what they tell you to use.
Keeping it simple. I am not going to discuss all of the different weaves of cloth, etc. that are available. You can read Andrew Marshall's book, Composite Basics, for a good discussion of this. I want to concentrate on the basics you need to know to safely build your airplane.
Handling and Cutting Fiberglass
First of all, you must be careful when handling fiberglass. Remember to cut the glass in a clean area. Do not drop fiberglass on the floor. It will be contaminated with dirt and debris. If your fiberglass gets wet do not use it in the structure. Be careful when handling fiberglass as its shape can be easily distorted. Mark the cloth using a Sharpie marker. These marks will not show through the final finish. Your plans will usually require you to cut your cloth at a 45-degree angle. This is done to achieve maximum strength in the final structure. So we will usually be cutting the glass on what is referred to as a 45-degree bias. You need a Sharpie marker, a straight edge, a measuring device, and a good pair of scissors or a rotary cutter. When you make a cut, allowance for small deviations is usually built into the dimensions. If you are within one-half inch or so that should be good. As you make a cut the cloth may slightly distort. If so, it can be carefully pulled back into its proper shape by pulling on an edge. Cutting can be done using a good pair of scissors or a rotary cutter or they are sometimes referred to as a roller blade. Many people call this a pizza cutter - which is a term for the rotary cutter – it is not a real pizza cutter. Get a rotary cutter from one of the supply companies.
After you have cut the cloth to the proper dimensions, carefully roll it into a fairly large roll. In other words, do not roll it tight. This is the best
way to transport the fabric to your structure. We will see how to apply it later. If you pick it up by the ends it will distort and not fit the area of the part correctly. It is also important to note that the selvage edge must be removed prior to applying it to the structure. (Note: this will not apply when using the type of fiberglass without a selvage edge.) Cutting on a 45-degree bias will cause a certain amount of waste. However, it is necessary that you cut this way to achieve maximum strength. By the way, the angle is not critical. You do not have to measure it accurately. Eying it will work fine. Let me emphasize that you must cut the fabric in the orientation called for by your plans.
Resins
To emphasize the importance of the resin matrix I would like to quote Andrew Marshall from his book Composite Basics. "Basically, the resin matrix is the key to the whole operation of producing composite structures. It was noted earlier that the resin matrix is the mass in which the fibers exist, but the resin does much more than just contain the fibers. Its primary job is to carry the load from one fiber to the next, and from the bundles of fibers or groups of reinforcements into an adjacent structure which may either be embedded in the composite during manufacture, or adhesively bonded to it at a later stage. The resin material thus distributes and transfers the load within the structure so that each reinforcing fiber carries a proportional share of the load."
There are two types of resins that are most commonly used on composite aircraft. They are vinylester resins and epoxy resins. I am not going to discuss polyester resins, as they should not be applied on aircraft except for very limited non-structural use.
Vinylester Resin
This type of resin is used by several of the kit manufacturers. Vinylesters are low in viscosity making them easy to use. The cure time can also be easily affected simply by adding more hardener thus speeding up the cure time. Despite the cure time, hardened vinylester usually exhibits consistent properties of strength and flexibility. Working time with this resin is dependent upon the ambient temperature and the amount of catalyst that is added. Vinylester resin is less expensive than epoxy and it will withstand high temperatures without post curing. The negative side of it results from the mixing process. Vinylester resin must be "promoted" prior to mixing the catalyst. It is promoted using a chemical called cobalt napthenate (CONAP). This chemical must be added into the resin before catalyzing. Vinylester resin is catalyzed using a chemical called methyl ethyl ketone peroxide (MEKP). CONAP and MEKP mixed together prior to being placed in the resin can cause a fire or explosion. You will not encounter this hazard as long as you remember to place the CONAP into the vinylester resin prior to adding MEKP. Extreme care must also be taken when using MEKP. This chemical is very dangerous to the eye.
Overall, vinylester resins provide an easy to use, strong, high temperature, and inexpensive resin. Skin irritation problems are also less likely to occur than with epoxy resin. Just remember to take proper precautions when you are mixing vinylester resins. Be sure not to mix CONAP with MEKP and always wear a face shield when using MEKP.
Epoxy Resin
Epoxy resin has come to dominate the aerospace industry and it is widely used on custom-built aircraft. Epoxy resins differ from vinylester resins in that they harden through a process known as "crosslinking." Epoxies are packaged in two parts: a resin and a hardener. Unlike vinylester resin, the mixing ratio of resin to hardener is critical. Adding more hardener will not accelerate the cure time. In fact, it may seriously impede the curing of the resin resulting in less strength of the final cured part. Different types of epoxy resins are available. Again, use the type of epoxy called for by the designer. Working time may be varied using different types of epoxies. A 5-minute epoxy is commonly used to simply hold two pieces together for further bonding. These epoxies set up within five minutes and should not be used for structural purposes. Structural epoxies will have a working time of approximately 45 minutes depending upon the type of epoxy and the ambient temperature. Proper skin protection is a must with epoxies due to skin dermatitis that can be caused by the chemical. In the next issue I will discuss how to properly protect your skin from this problem. How to mix fillers and the actual process of completing a composite layup will also be presented.
