Aircraft Welding and Steel Tube Fabrication Part 6
A Primer for the Novice Aircraft Builder
By Budd Davisson (originally published in EAA Experimenter, January 1988)
Although the majority of the steel fuselage and tail is made of tubing, most of those areas where stress is transferred by fittings is composed of a series of flat sheets or plates bent and welded to accept bolts and transfer loads into the tubing. Once you've learned to effectively weld and work tubing, welding sheet stock is no problem, although there are several little nuances to each joint that must be accounted for.
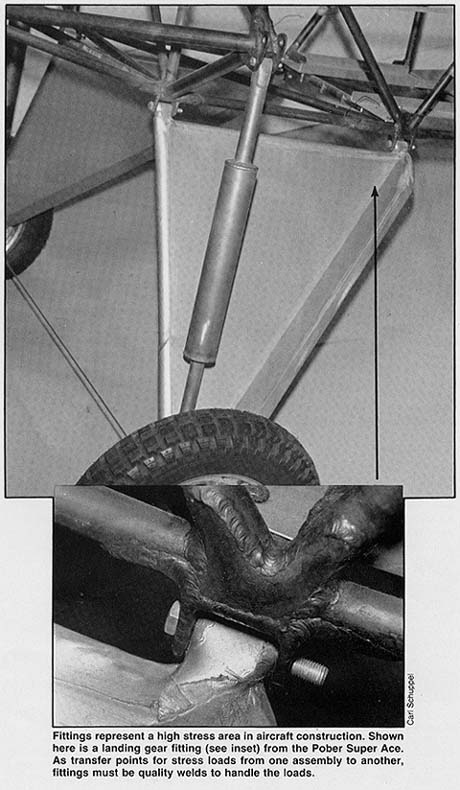
In welding fittings (See Figure 1), one has to keep in mind that a fitting almost always sees more stress than the tubing structure. The fitting is there to accept the load from another assembly, like the wing, so a lot of load is concentrated in one spot. If you're ever going to do good welding, this should be the place you do it. That's one of the primary reasons why fittings should be the last thing welded onto your fuselage. By the time you get around to doing the fittings, you've already welded your brains out on the fuselage and should be about as good as you're ever going to get.
One subtle difference in welding sheet stock and fittings is that you are usually going to be working with much thicker material than you ever worked with on the tubing. Where most of the tubing is .035 and .049, it's not unusual to find fittings running as thick as an eighth to three-sixteenths of an inch (.125 to .187). Because of this, it's sometimes possible to revert to traditional welding concepts, i.e., the parent metal on both pieces is melted and flowed together at the joint, something that's all but impossible to do in tubing. Also, when working thicker plates (eighth inch and thicker) the edges to be joined on certain types of joints can be ground to a slight bevel which gives the heat more area to work on, and the puddle/bead can penetrate deeper into the work pieces.
"T" Joint
When practicing welding plate, it is instructive to do "T" joints even though it's seldom that you'll find a classic "T" joint anywhere in an airplane. Most of the plate joints will be variations of the "T" in which one of the legs is a piece of tubing rather than a piece of flat stock. We'll get into the specifics of plate-to-tube welding in a minute.
As a general rule, when you're welding up sheet stock, and this is especially true in a "T" fitting, the tighter the fit the better the weld. Ideally there should be little or no gap in the two pieces, so when you start the puddle at the intersection of the two pieces, you will find that the puddle is forming on both parts of the material and it really is flowing together. This, of course, requires that the surface of both pieces of material reach melting temperature at the same time, which may be a problem, because the vertical piece of metal in the "T" is intersecting the other plate in the middle. This means the edge of one plate rests across the surface of another, and edges will always pick up heat and melt quicker than the surface of another piece of material.
The obvious cure for the problem of dissimilar melting characteristics is exactly the same as working with steel tube . . . direct most of the heat toward the heavier piece or the one that requires the most heat to get it saturated, i.e., not the edge of the vertical part of the "T," but the surface of the flat part of the "T" (See Figure 2 and Figure 3).
In setting up a fitting for welding or practicing a "T" joint, make it a firm rule that you will tack weld the pieces together in such a way that they are unlikely to move or warp when you are doing the finished weld. To tack weld a piece such as this, little or no preheating will be done, because to do so in a structure just for tacking would introduce some distortions that would be impossible to get out once you'd welded the joint. Using either more heat or a larger tip than you would use to weld the actual joint, heat a very small point at the end of the joint, bring it up to melting, and then make a small weld approximately a quarter of an inch in length. You will notice that the joint tries to open up as the weld cools off, and you will have to force the piece back down into position, possibly even warming up the original tack so as to allow it to relax. Then do the same thing at the other end of the joint. If it is a particularly long area to be welded, you may have to put a tack in the middle, as well. In the "T" joint you will see that, as the tack welds cool, they try to pull the vertical portion of the "T" toward the tack-welded side. Pull it back into alignment and repeat the process of tack welding on the other side. These small welds will hold it in alignment until you have finished welding the piece.
In actual practice, the type of part that will utilize a joint closely resembling the "T" joint will involve some sort of a U-shaped fitting or some other type of unit in which there is an "inside" and an "outside" to the assembly. When welding a "T" or "L" shaped joint in which there is a "box" effect, always weld the inside of the unit first. The first welds to be made on any kind of an assembly always require the least heat and are therefore the easiest to do. If you wait until you have already welded the pieces together and made them into a highly effective heat sink, you will find yourself using a large tip and a lot of heat to weld the inside and still may not get the kind of penetration you want. If, however, you weld the inside first, you avoid nearly all of those problems. Keep this in mind when making practice joints . . . always weld the side that has the worst access first.
In beginning the T-weld in plate stock, preheat an area an inch to an inch-and-a-half up the weld, paying special attention to getting heat into the thicker of the pieces or the flat plate area that the "T" joins. Begin the weld at the edge of "T", and remember that the edges of plate stock melt very quickly, so be careful not to overheat that area. However, be sure to completely melt the tack-weld at that junction as you move through it. You will find it quite easy to play the heat into the joint and keep the puddle moving down into the intersection of the "T" to melt the two pieces of material together. You should also find it easy, after a little practice, to make a very nice looking bead, and at the same time get more-than-adequate penetration. It's simply a matter of practice (tired of hearing that yet??)
On an assembly which requires a weld on both sides of the "T," you will find that the second weld requires more heat and is more difficult to keep moving smoothly. This is because the weld on the other side, that you just completed, effectively increases the metal at the intersection and has joined the two pieces together into a (here it is again) heat sink.
Before beginning a weld on the back side of an existing weld, it's important that the surface be cleaned of all scale or residual debris. Scale is the flaky-looking, burned material that boils off the surface of the material being welded. Sometimes it is hard to get off, but just sweeping your torch across it before welding will cause most of it to pop loose, and you can scrape it off with a wire brush or gently dislodge it with a screwdriver. Do not preheat the area with the scale still attached to the material, because the scale will melt into small, hard balls that not only act as contaminants to the weld itself, but they disrupt the flow of the puddle and make it more difficult to get a smooth, uniform bead.
When you come to the end of the weld and you're starting to run off the edge of the sheet, be careful how much heat you allow the sheet to take at that point. The same thing is true in welding next to the edge of any material, tubing, plate or otherwise. It requires that you repeatedly pull the torch away from the material for a brief instant while you weld off the edge, so as not to allow the heat to build up and melt away the edge of the sheet.
Edge Welding
An extremely common type of weld involving plate or sheet stock is the so-called "edge" weld. The edge weld occurs when two materials are placed side-by-side and are laminated together by welding the edges (See Figure 4). There is no easier weld on an airplane; however, a certain amount of care is necessary so as to ensure adequate penetration and bead buildup.
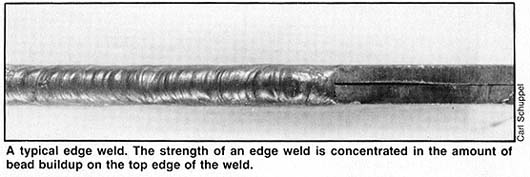
As you practice edge welding, you will find that it is quite easy to melt the edges together and often accomplish a nice-appearing weld, having melted down a sixteenth of an inch or so of the edge, using no welding rod at all. However, the strength of an edge weld comes from the amount of bead buildup on top of the edge, because there is no lateral connection. Therefore, it is good practice to use a welding rod and to build up a normal bead around the edge. Incidentally, you will find that the edge weld often requires a smaller amount of heat than the size of the material would indicate. This is because the corners of the material concentrate the heat, and the heat sink effect is not as pronounced. Therefore, the corners can be brought up to temperature and melted quickly.
Butt Welds
Butt welds, in which two pieces of material are placed edge to edge and then welded so as to form a single sheet, are very, very seldom used in aircraft. They are, however, useful in other types of applications. They are also extremely easy, after having been through "T" welds and cluster joints.
Depending on the thickness of the material, the edges may or may not be beveled and, although no exact thickness can be designated as that which requires beveling, a good rule of thumb is that a butt weld using material of 3/32nd or bigger should have the edges beveled, so as to ensure adequate penetration and weld strength.
Lap Joints
The lap joint exists in aircraft primarily in the form of slip fittings and tubing. The area where you primarily see it in using sheet stock would be in the form of gussets. In this type of welding, the technique is little or no different than doing a slip joint in tubing and presents the least amount of problems of any type of joint. However, attention must be paid to directing most of the heat into the parent structure, because the outer part of the lap, which is normally a gusset, represents an edge which is easily melted, so the surface to which it is to be attached must be preheated and the puddle formed there first.
In actual practice, most gusset/lap joints are welded by running a bead along the surface of the parent material, with the edge of the bead touching the edge of the gusset stock, melting it down into the bead. This is one type of joint which often requires judicious playing of the torch tip away from the weld, so as to keep from melting away the edge of the gusset too quickly.
In doing practice lap joints, it would be instructive to take some fairly heavy-walled tubing (.065 to .090) and try welding .035 or .049 to it. This will show you the type of problems one encounters in welding light material to heavier material, and the proper way to handle the torch in keeping the heat from building up in the gusset stock.
One technique which must be mastered and consciously worked on in welding gusset/lap joints is to be able to run the bead off the edge of the flat stock and not melt it away. This requires the technique of momentarily removing the torch from the immediate weld area, then returning it quickly, repeating the process several times as you weld the last quarter of an inch or so.
PLATE-TO-TUBE JOINTS
Once you've made all the foregoing joints and practiced, you will find that welding plate fittings to tubes is really nothing more than applying the skills you have acquired while practicing other joints.
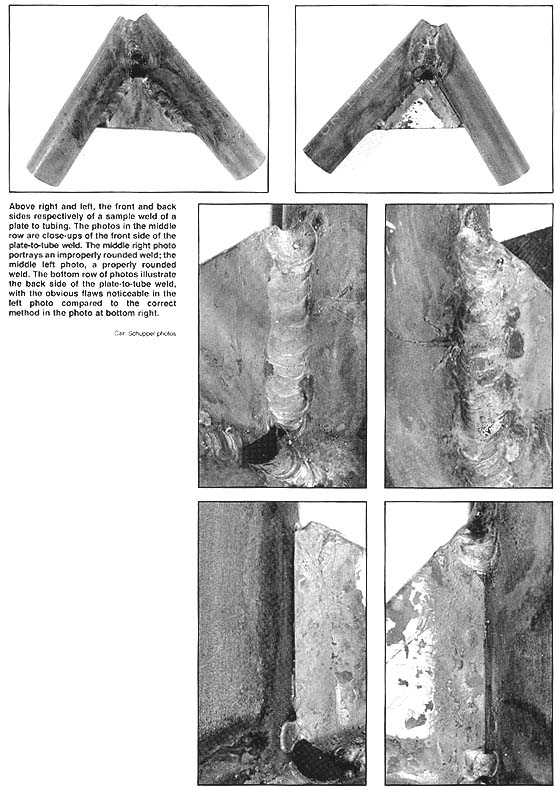
The primary points to be remembered in welding plate to tube in the form of fitting is to weld the inside of the fittings first, i.e., weld the hard side first, while guarding to ensure that there is adequate penetration of both materials. Also, it is absolutely necessary that great care be taken in finishing the welds at the edge so that there is no undercutting or burning away of the edge of the plate.