Laminating and Bending Wood
By Tony Bingelis (originally published in EAA Sport Aviation, June 1986)
A laminated wood component is a marvel of lightness and strength and it will conform to the required shape better than a similar bend made in a solid wood piece.
Bent aircraft structural components such as frames, bulkheads, longerons, control surface trailing edges, wing tip bows and windshield bows, when made of wood, are almost always laminated because solid wood pieces are difficult to bend.
What Is Laminating?
A laminated wood part is much like a plywood part with this shade of difference. Plywood is a glued up sandwich consisting of three (or more) veneer layers in which the grain of the center layer is oriented approximately 90 degrees to that of the two outside layers. A laminated wood part, on the other hand, is a glued piece consisting of multiple thin layers of wood with the grain of all the adjacent layers running approximately parallel.
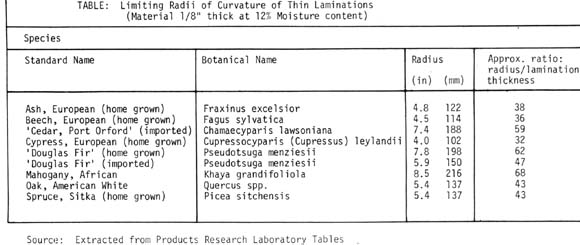
The thickness of the individual wood strips to be used in a lamination is governed by the degree of curvature (radius) to which the lamination must be fabricated. Essentially, you should select a single strip thickness that allows it to be easily flexed around the required bend without fracturing (see Table). If you find that single strip hard to bend around the required bending form, think how much harder it will be to bend the total number of strips, making up the lamination, at the same time. Obviously then, the fewer the number of. lamination layers, the easier the layup will be. On the other hand, such a lamination (two or three layers) will also have a greater degree of "spring back" than one made of many layers. But worth considering too is the fact that the more lamination layers used (due to thinner strips, for example) the greater the amount of glue and wood that will be required to complete the lamination.
Glues
There are many glues that can be used for laminating wood parts. However, without researching specifications and data for various glues it would be better to stay with one of the proven glues used in aircraft construction.
In the category of preferred glues for fabricating laminated bends, we have the urea formaldehyde adhesives (resistant to moisture) and the phenolics or recorcinols considered to be waterproof and known for their strength and longevity. They also perform well in high temperatures.
Use a glue that will allow you a reasonable length of work time before you have to close and clamp the bundle. In this respect, recorcinol is an excellent glue for laminating. Plastic resin isn't bad either, but it is classified as water resistant and not, technically, waterproof. This is, however, nothing to worry about unless you intend to have your airplane double as a submarine, too.
I would not use, or attempt to use, Aerolite glue for laminating work. It is a good two part glue system but it requires extremely fast work because it "grabs" immediately when the two surfaces are joined. When assembling a bent lamination, the strips tend to slide as the clamping and bending proceeds. This sliding action, while of no concern with most other glues, will tend to destroy integrity of the glue line already setting up in the Aerolite.
Laminating Bent Parts
I like to use the blocked-up type of jig (Figure 1) for laminating bulkhead rings, frames, wing tips and similar parts. The small blocks raise your laminating work up off the workbench so that the squeezed out glue has some place to go without sticking the whole works to the workbench. This raised up jig also makes it easier to center the clamps along the length of the lamination.
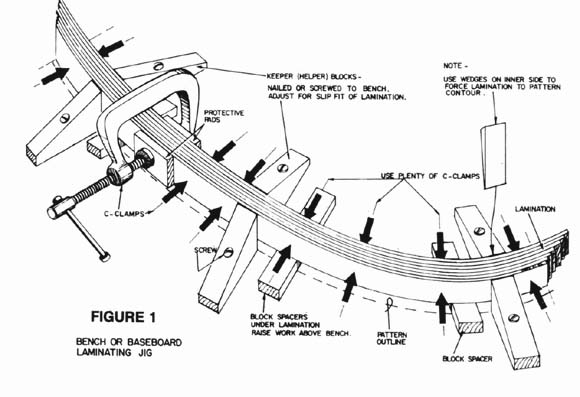
Here's how to go about it. First, trace the shape for the proposed lamination on the bench full size. The drawn layout is then covered with plastic or wax paper to protect the bench from dripped glue.
Next a few helper blocks are nailed or screwed along the drawn outside perimeter of the lamination pattern. A matching set of facing blocks is then positioned along the inside of the curve. Position these opposite blocks so that the lamination stack will slip in easily. The initial function of these blocks is not to clamp but to merely orient the laminated bundle to conform with the curve while the wedges and clamps are being installed. This means that the helper blocks can be few in number and spaced far enough apart so that you can interspace a sufficient number of C-clamps between them to exert the required uniform pressure on the lamination. Thin wedges are used to force the lamination out to the correct outside pattern contour.
A Dry Run Is Recommended
After checking your jig for accuracy, you are ready to load it with the laminate strips: First, do this without any glue to assure yourself that you can bend the whole batch at one time and still slip it into the bending jig.
As part of the dry run preparations you should position plenty of clamps along the length of the jig where you think you will need them. Don't forget to open up each clamp to the approximate opening required for quick installation.
Also as part of the preparations, include a persuader kit consisting of a hammer and a short 2 by 4 wood block approximately six inches long to use in leveling the lamination during the initial light clamping. Invariably, one or two strips will have an aggravating tendency to rise above the others. These can be brought into line by beating them down (gently, of course) with the hammer backed by the block persuader. Be on the alert for this problem as you gradually apply clamping pressure to the lamination layup.
Clamping Pressures
The amount of clamping pressure that you have to apply will depend primarily on the type of adhesive you use. Recorcinol glues require considerable clamping pressure to achieve a good bond. Epoxies, on the other hand, require a minimum of pressure and a mere intimate contact of the adjacent pieces should be enough. Be especially careful not to apply too much pressure when using thicker epoxies because you may squeeze out most of the adhesive and leave a starved joint that is lacking in strength.
After the initial light clamping is completed (always start in the middle) allow the lamination to set for about 10 minutes and then go back and retighten the clamps lightly as needed. This is necessary because the glue line will take that long to level itself and seep out along the edges.
Making Laminated Bends Using the Insert Method
That is a rather long title but it just about explains the whole process (see Figure 2): This is a good method to use for bending a long, rather straight, wood part that only requires one or both ends to be curved.
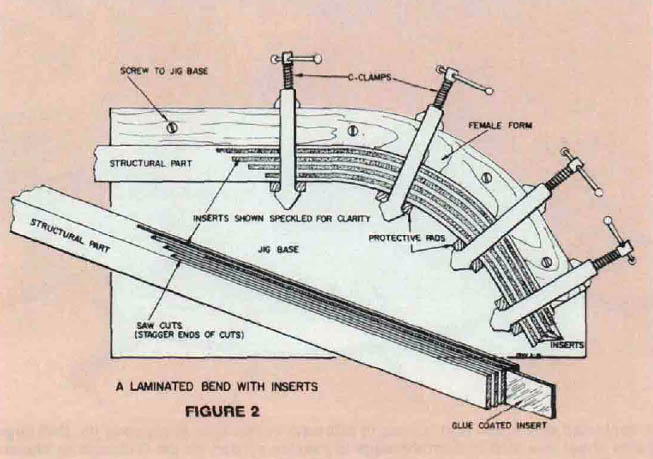
The method requires the making of saw cuts in the end to be bent, and so spaced that the wood tongue left between the slots is not apt to break during the bending process. Insert wood strips should be cut to length, coated with glue and inserted into each of the slots. The bend is then completed, as for a normal lamination, in a suitable bending form or jig where it can be clamped until the glue has cured. You can avoid weakening the section to be bent by cutting the slots to varying lengths in order that the insert terminations will be staggered.
Cleaning and Dimensioning the Lamination
After the glue has dried, and before you remove the completed lamination from its jig, clean away the dried glue from the top surface. Use a disc sander, or coarse file, to level the glue globs. Follow this with a final clean up using a sharp block plane. Plane away only enough material to clean and level the surface.
Inspect the lamination to see that you have uniform glue lines with no open spaces. If a gap or two is found, these can be filled with epoxy provided they are not extensive or involve several laminations. However, gaps should not be a problem if your clamps were centered and you obtained the recommended light glue squeeze-out during clamping. If you find that you do have an unsatisfactory lamination, discard it. Determine where you went wrong and correct your procedure before attempting to make any more laminations.
Finally, remove the lamination from the jig and then clean the bottom surface as you did the top side. Be careful when using a sanding disc as it can be hard to control. Trim your lamination to the correct width with the block plane or with a long sanding block.
A well made lamination is a pretty piece of work and you, like many builders, will hate to see such good work hidden from view in the completed airplane.
An Alternative To Laminating and Bending?
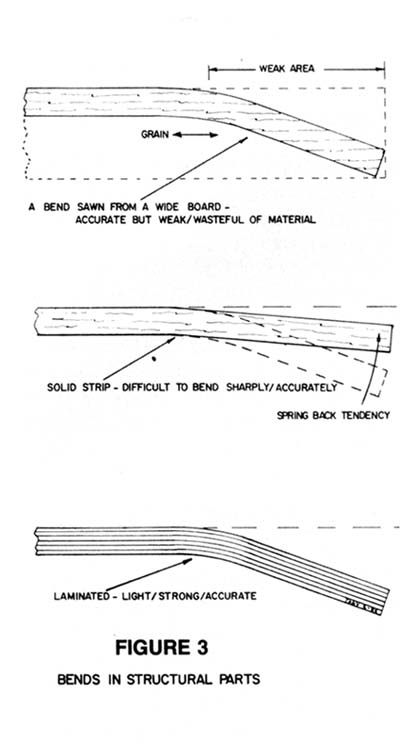
If a wood part is hard to bend why not cut out the required curve from a wider board? It is sometimes possible to avoid the bend problem that way, but it will result in a part that is more expensive and weaker than a similar bent part. The reason, of course, is that the grain in the area of curvature is taking a "short cut" across, and any load imposed across the curve will be where the grain is the shortest and the weakest. Reinforcing this area with plywood gussets will help improve its strength, but what will that do? Add extra weight and bulk! (See Figure 3)
Minimum Bend Radius For Wood
The minimum bend radius will vary from one wood species to another, and also with the moisture content of the wood. The Table accompanying this article will give you a rough idea of what the comparative minimum bend radii are for the selected woods used in aircraft construction.
Studies and tests conducted by the Forest Products Research Laboratory show that out of twenty test pieces bent to the minimum radius indicated, no more than one piece should result in a fracture. The test results are based on the premise that good wood free from defects will be used. So much for the scientific stuff.
Softening Wood For Bending
Solid wood parts like longerons -and especially wing tip bows-are very difficult to bend without fracturing if the bend radius is comparatively small. A dry solid piece of wood will offer considerable resistance to bending and even when successfully installed in a forcedly flexed condition, it will continue to resist that imposed bend for a long time to come. This forced conformance imposes very definite stress loads on the installed member and on the adjacent structure as well. A most undesirable condition.
Any wood can be softened for bending. That is, the plasticity and compressibility of a species can be improved by subjecting it to heat and increasing its moisture content. Wood can best be softened to a semi-plastic state for bending purposes by steaming it. Actually, immersing the wood in boiling water for approximately 15-30 minutes may be considered to be the ultimate softening treatment for the homebuilder. This softening method may be fine for wing rib. capstrips but such an accommodation for larger pieces of wood will require a more functional container than a pot. A large diameter steel pipe with one end capped would do. Just add water and heat it and you will have a fine steamer for longer wood parts.
Fuselage longerons requiring a rather severe bend will have to get a localized wood softening treatment. Wrap the longerons where they will be bent with wet towels. Pour on boiling water and allow the towel wrapped wood to soak overnight. Repeat the hot water treatment just before making the bend. Usually, the bends in longerons are fairly gentle so this treatment should be sufficient in most cases.
Pre-Bending and Spring-Back
Most likely the most common wood bending requirement that a builder will encounter is that of pre-bending of capstrips for wing rib construction.
Pre-bending, as the term implies, is a procedure for imparting a permanent set to a bent wood part before it is used in an assembly. For wood components where the bend radius is severe, this is accomplished by steaming or soaking the wood before loading it in a bending jig where it is allowed to dry.
A part that has been allowed to dry in the jig will, when removed, retain most of its bend . . . most but not all. This relaxation of the bend is due to the natural memory factor in the wood which results in this "spring-back" characteristic.
There is no reliable way to figure how much spring-back to expect. A wood's resistance to bending and its reluctance to maintain a bend once obtained in a solid piece are largely affected by the dimensions of the piece and by its latent moisture content.
Capstrip Bending Forms
Elsewhere one photo shows a very easy-to-make bending form for prebending capstrips. Its open design allows the wood to dry much quicker than it would in a male/female pressing form (see Figure 4). The illustrated male/female pressing form is, perhaps, easier to make as it requires only a single curved cut on a bandsaw. Either type of bending form can be made from a 2 by 4 block of wood. This size permits you to load the form with two capstrips at a time.
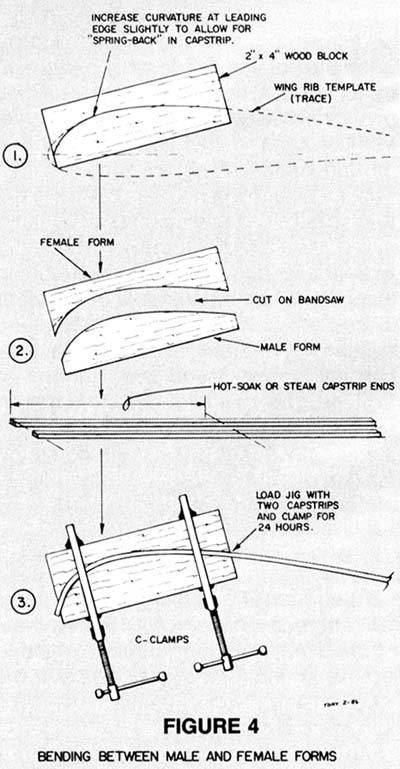
As for any pre-bending, procedure, soak your capstrips thoroughly in hot water or, preferably, immerse the ends in a container of boiling water for about 15 minutes before bending and clamping them in the jig. Allow an overnight to 24 hours drying time before removing the capstrips from the jig.
The pre-bent capstrips will be much easier to install in the wing rib jig and the threat of having one break is eliminated.
