Plywood Skinning Part 1
By Tony Bingelis (originally published in EAA Sport Aviation, May 1987)
Skinning a wing, or some other part of an aircraft structure, is really not difficult. It is, however, a very work intensive process that involves a number of preparatory steps. Carry out these preparatory steps properly, and you can generally be assured of excellent results.
Plywood has two characteristics which, if ignored, could affect the excellence of your skinning job.
- Plywood cannot be laid successfully over surfaces that have a double curvature (compound curves). In other words, if a sheet of paper or posterboard, when laid on a surface, will not make contact with it around the edges without developing ripples and bulges - neither will the plywood sheet. Compound curves are present. A slight amount of double curvature can be accommodated but not without special preparations.
- The plywood's sensitivity to changes in humidity affects its external appearance more than any other single factor.
The normal moisture content of plywood (like aircraft wood) is approximately 12%. When exposed to extremely dry, or extremely humid, conditions the surface layers of the plywood react rapidly by shedding moisture, or absorbing it, as the existing conditions dictate.
Builders who do their plywood skinning in the winter time in a heated workshop are generally appalled to see what happens months later when the air temperature and the humidity increase considerably from those existing in the winter time. The plywood swells as it absorbs the more abundant moisture, but since the skin is glued down along the ribs, spars and leading edges, it can do nothing more than bulge, or warp, to relieve the strain.
If you must do your plywood skinning in a dry heated shop in the dead of winter, try to increase the humidity of the air. Boil water, get a humidifier, take a hot shower (if there is one), put water in your spray gun and spray the air, but do something!
A more practical something you can do is to moisten the outside layer of the plywood before you glue it to the structure. Then keep the surface moist the best you can until the glue cures. Be careful not to get the glue surfaces wet.
The sad part about skinning in dry conditions is that you think you are getting excellent results. . . and you may be. But the results will remain excellent only as long as the humidity is no higher than it was that day you skinned the wing in your shop.
The reverse situation can occur also. A builder who skins his airplane in Beaumont, Texas in July but later moves to Arizona will be surprised to see how gaunt his airplane has begun to look. The plywood covering, because of the dry climate, will have shrunk between the frames and the airplane now has that hungry look with its bones bulging out.
Laying the plywood at a 45 degree angle to the frames can help reduce the effects of humidity changes and increase the structure's torsional rigidity as well. However, I would recommend that you do your skinning when the humidity is typical for the climatic conditions under which your airplane will most likely be operating.
Preparing the Structure For Skinning
Before you encase that beautiful woodwork in its plywood cocoon, you must reassure yourself that you haven’t forgotten some important detail. Although your particular project might have a unique requirement or two in this regard, I believe the following reminders cover the essentials that should be checked:
1. Verify that the structure is complete and that all the parts have been made and are properly installed.
2. All the wood has been sealed with at least 2 protective coats of polyurethane varnish or epoxy.
3. The pitot/static lines are installed and the ends taped over or connected to the instruments.
4. Check the strobe/navigation light wiring for security and continuity – or the lights for operation.
5. Are the aileron and flap controls inside the wing properly securing and operate freely without rubbing on the structure?
6. Check that every nut and bolt is installed and is TORQUED – and safetied, if necessary.
7. have you provided for tie-downs and jack points?
8. Buried antennas, if any are installed.
9. Access plate framing is installed for locations where internal access will be required (bell cranks, rod ends, cable connections, etc.).
10. Did you sand or file all rib and bulkhead edges lightly? The plywood edges of the cantilever spar have been chamfered?
11. The wing has been line sanded and the wood surfaces to which plywood is to be glued have been freshly dusted and cleaned?
12. Finally, is the structure still rigidly jigged and aligned?
NOTE: The sanding block used to line sand your wing should be a couple of feet long, or longer if necessary, so that it can span at least two ribs or frames. Do not become so preoccupied with the sanding block bit that you sand away a lot of essential structure. You can true the broad uneven expanse of a cantilever spar quicker with a sharp block plane, and do it without the risk of inadvertently sanding away adjacent areas.
Sealing the Structure
As for sealing the wood structure, varnish has been the traditional means for accomplishing this. More recently, the application of two or three coats of polyurethane (exterior gloss) has been the favorite sealant with homebuilders.
Lately though, more and more builders are switching to the West System. This is an epoxy coating system long used by boat builders to seal the wood against the severe humidity and moisture conditions to which boats are exposed. As you know, it is essential to protect wood from its insidious enemy - trapped moisture. Trapped moisture can ultimately lead to the development of dry rot, and dry rot can cause wood structures to fail prematurely.
When using varnish as a sealant, be careful not to get any on the wood parts that will have to be glued. If you do contaminate the gluing surface anywhere, scrape the varnish off with a single edge razor blade, or a sharp plane blade held vertically while scraping the surface.
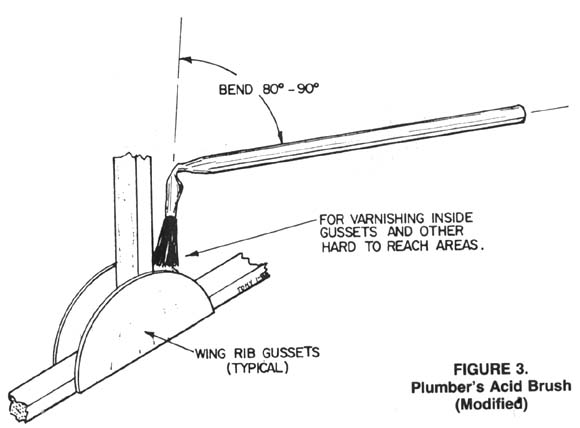
For hard to reach places, like the inside of wing rib gussets, use a small plumber's acid brush (see Figure 3) bent to a 90 degree angle near the bristles.
Fitting Plywood Skins
Large plywood sheets are awkward to manage and are difficult to cut to size without help. This is especially true when you try to make the cuts alone with a bandsaw or on a tablesaw. Working alone, it is easier to cut a large sheet laid over a couple of sawhorses with a saber saw, but at the risk of producing badly splintered edges and crooked cuts. The crooked cuts can be cured with a sharp block plane, but it would be too late to do anything about the splintered edges. You can, however, eliminate the inevitability of splintered edges by lightly scribing along the cut line with the point of a sharp knife. Here's another way. Stick masking tape down along the drawn line and saw right through it. You'll find, though, that the smoothest cuts are those made on a table saw with a plywood blade (plywood cutting blade, that is).
After cutting your plywood panel to size, lay it on the structure so that the edges are aligned.
Next, and this is extremely important, drive a one inch headless nail into each end of the panel to fix the sheet's alignment. These two locator nails will remain in the structure to insure that the plywood panel will always go on correctly, no matter how many times you remove and replace it during your preparatory work.
NOTE: The nail heads should be filed round, and two nail holes in the plywood should be enlarged slightly with an awl to make it easier for you to slip the panel on over the nails.
It is assumed that you will install the bottom wing skin first. And, needless to say, it would be easier for you to remain right side up, and for the wing to be turned upside down while working on the bottom of the wing.
With the help of a soft lead pencil (No. 2), trace around each part of the structure. Remove the plywood skin and duplicate the lines on the outside of the sheet. This means you will have to resort to some careful measurements using a steel tape, dividers and a flexible straight edge. The outlines of the internal structure duplicated on the outside of the skin will be essential when you start positioning the nailing strips for the application of pressure to the glue joints underneath.
Scarfing the Plywood
This is the next logical step. The plywood sheets are too short to cover the entire semi-span of the wing without splicing them . . . unless you are building a micro midget something or other. The splices (joints) in plywood are made by scarfing the adjoining edges to increase the glue area in the joint. Both sheets must have the same scarf slope.
First, let me emphatically state that butt joints have no place in wing construction unless called for by the designer - a most unlikely thing. An aircraft engineer designer may, on rare occasion, show a butt joint in a fuselage design, for example, but he would incorporate a plywood splice plate to reinforce it. A simple butt joint made directly over a solid wood upright or frame would never do because a solid wood piece could easily split and fail the joint.
On the other hand, a good scarf joint will transmit just about 100% of the load from one panel to the other.
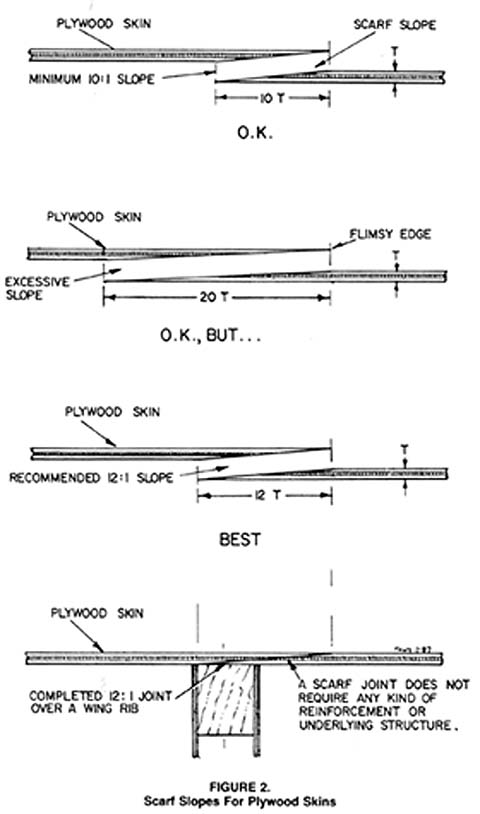
Your plywood scarf splices (see Figure 2) should have a minimum slope of 10:1, preferably, 12:1 for wing skins on spars. A few builders may go overboard and try to make scarf splices using 16:1 and shallower scarf slopes. This is unnecessary and results in a very flimsy feathered edge that is easily damaged.
Over the years, a variety of scarfing methods and tips have been described and illustrated in Sport Aviation and in other EAA publications. These methods embraced a variety of approaches limited only by the builder's ingenuity. For instance, you can use your table saw, radial arm saw, a motor fitted with a large sanding drum, a small sharp block plane, and even a sanding disc chucked in a hand held electric drill.
Whenever you can, scarf your plywood sheets before installing them permanently. However, there will be occasions when you may have to scarf a plywood edge after it is already glued in. Before doing so, draw a line to delineate the width of the scarf.
My favorite means for cutting such a scarf is with an electric drill motor fitted with a 6 inch disc sander. It is risky to use but is fast cutting - especially when the sanding disc is fitted with a piece of that black sandpaper (about 60 grit) used by contractors to sand wood floors.
A properly completed scarf should reveal straight alternating lines of wood and glue. When these lamination lines all become uniform and run parallel to your drawn line, the scarf will be perfect. Remember, the joining panel must be scarfed to the same angle and checked for fit.
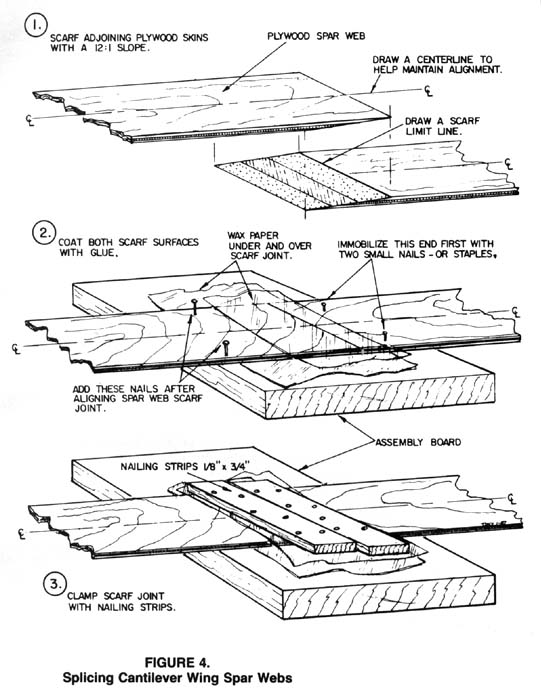
At this point you could remove the plywood panel and turn it over for the next preparatory chore (see Figure 4).
All of the internal areas of the skin to which glue is to be applied must be lightly scuff-sanded. This step is especially important when birch plywood is used. Birch plywood has a very hard, smooth, wax-like - almost glossy -surface. Unless this glaze is abraded slightly by sanding or by scraping it with a sharp wood chisel, your glue joint may not be as strong as you expect it to be.
Normally you would, at this time, seal all the internal areas of the skin with polyurethane varnish or epoxy. However, since this is the bottom skin we are discussing, it would be more practical to apply the sealing coats after the skin has been glued on and the wing is turned back right side up.
With the plywood panel reinstalled over the locator nails, check its alignment one more time. This would be a good time to estimate how many nailing strips you will need to securely clamp all of the skins for the entire project. Might as well cut them all at one time, right?
More next month.
