Plywood Skinning Part 2
By Tony Bingelis (originally published in EAA Sport Aviation, June 1987)
Gluing the plywood skins to the aircraft structure will seem anticlimactic after having made the rather extensive preparations detailed last month.
Remember, for the best results, you should do all your skinning under humidity conditions considered normal for your area - and preferably in the summertime if you can arrange it.
Now, before you mix up that batch of glue, be sure you have plenty of prepared nailing strips at hand.
Nailing Strips
The term "nailing strips" is somewhat of a misnomer because nailing strips nowadays are more commonly installed with staples rather than with nails. The reason, of course, is the ready availability of inexpensive electric and pneumatic staplers.
As you know, nailing strips are used to apply clamping pressure to freshly glued plywood skins over large surfaces where clamps cannot reach.
Sometimes heavy shot bags are used to exert the necessary clamping pressure on the glue line. But shot bags are bulky and difficult to position effectively because of the unpredictable and uneven pressures they impose on the skin. Nailing strips, on the other hand, produce a uniform pressure along the glue line, regardless of whether nails or staples are employed.
NOTE: Never drive nails or staples directly into plywood skins unless you intend for them to remain permanently imbedded . . . not a good idea. So driven, nails and staples would be extremely difficult to remove without inflicting considerable damage to the plywood surface.
You will need a lot of nailing strips to skin a wing, fuselage and tail surfaces. A lot more than you will prepare initially, I'll bet.
Use any old boards you have around the shop and rip them into 1/8" thick strips. Soft, easily split wood makes the best nailing strips because it can be more easily splintered away when you have to remove them. For exerting pressure over wing ribs, the nailing strips could be as narrow as 1/2". However, there is no reason why all of your strips cannot be a full 3/4" in width.
The strips can be of random lengths except for those to be installed over the wing ribs - these should be long enough to reach from the leading edge to the trailing edge for the best results.
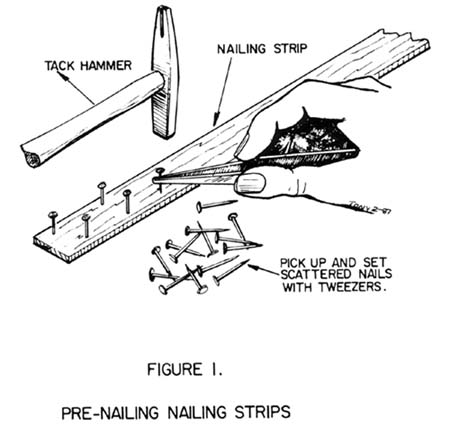
If you don't have access to a pneumatic or electric stapler, you may have to revert to the old classical nailing strip practice. That is, you will have to laboriously pre-set every nail in every nailing strip beforehand. The reason for this pre-nailing, of course, is to speed up the installation. Unless you prepare the nailing strips in advance, you would not otherwise be able to set and drive all those nails, one by one, before the glue starts to set up (see Figure 1).
Staples (and nails, when used) can be spaced as needed - approximately 1" to 1-1/2" apart - closer wherever more pressure must be applied. The staples and nails selected should be long enough to penetrate the thickness of the plywood and 3/8" into the wood structure. This means that the staples ought to be at least 1/2" to 5/8" long for most applications.
I believe the common .050" staples are too fat and tend to destroy too much wood in their penetration. The more slender .030" (plus or minus) staples are the ones to use. This means that an ordinary stapler will not handle the thinner staples. Check your Yellow Pages (phone book) under "Staples, Staplers and Tackers" for local sources of supply.
As for nails, the same length requirement applies. Incidentally, any kind of flathead nails can be used because their use is not permanent as they will be removed later anyway. However, do not use nails larger than 20 gauge in diameter because they, too, can do much damage to the wood.
Installing A Plywood Skin
Once again, verify that the wing (or whatever structure you are working on) is rigidly jigged and aligned before installing the plywood skin. Attention to this detail is important enough when installing the skin on one side of the wing, but becomes critical when gluing the closing skin in place. Once the closing skin is glued on, there is no way on earth you can correct a warped wing other than by tearing off the skin from one side and re-jigging.
Since you may be rushed for time, be sure you mix enough glue to coat the entire plywood panel - and the framework, too. Applying glue to both surfaces is recommended.
NOTE: It might be a good idea to set an alarm clock to go off about 5 minutes before the glue's working limit is reached. You'll be surprised how time flies. Remember, too, that the higher the temperature, the quicker the glue will set and you will be left with even less time for piddling.
Apply the glue to the plywood first, especially if it is birch. Birch grain is dense, and the glue will not soak in as quickly as it would if you applied it to the spruce structure first. Don't dally -it will take longer than you think to coat both the plywood skin and the frame. Having a helping hand to speed the glue application is advisable.
As the adhesive will be fairly thick, a regular paintbrush with long bristles is an ineffective means for spreading the glue. A better way is with a popsicle stick or a wood tongue depressor. The straight edges and rounded ends enable you to spread the glue quickly and uniformly.
Be sure you haven't overlooked some area. Every square inch that should be must be coated with glue.
Set the glue coated panel on the frame, taking care that the two locator nails slip into the original alignment holes in the plywood skin. These two locator nails will correctly align the panel with the structure and will also insure that the panel does not slip out of alignment while the nailing strips are being nailed or stapled down. A glue-coated surface is very slippery, and the risk is great that a plywood panel can slide out of alignment without the security of the two alignment nails.
Next, place a nailing strip in the middle of the panel and drive the nails or staples home firmly, working from the middle of the strip toward each end. Now, you can appreciate having had the foresight to mark the topside of the plywood to indicate where the underlying frames are located. Add nailing strips as you go until all the underlying joints are clamped. Always work from the center toward the ends. Usually it is better to secure the leading edge of the wing skin last to minimize the possibility of developing buckles or ripples in the skin.
Wherever there is a wide underlying beam (like a wing spar), use multiple nailing strips laid side by side to apply a uniform pressure over the entire area.
Don't forget to lay down wax paper under any nailing strip that is positioned adjacent to, or directly over, a freshly glued scarf joint. The oozed glue will otherwise make the nailing strip a permanent part of the airplane or, at the very least, make its removal without damaging the plywood a miserable experience. Keep a roll of ordinary household wax paper located close to your work so you won't be tempted to do without it.
Over areas of considerable curvature, as along the leading edges for example, nailing strips secured with nails usually hold better than those installed with staples alone. In some stubborn areas you may have to augment nail strip pressures with the addition of several strategically placed C-clamps.
When you have completed the panel installation, inspect it closely along the edges to see that you have a uniform squeeze out of glue . . . a sign of a good joint.
While you are at it, clean up along the joints to remove the seeped out glue. Do this by sliding a small puffy knife along the surface next to the nailing strip edges to scoop up the excess glue. Follow up with a moist rag or sponge to reduce the clean up work you will have to do later- after the nailing strips have been removed.
Nail Strip Removal
Allow the glue to cure overnight before you remove the nailing strips or do any other work on the freshly skinned surfaces. You will need the respite anyway, because removing nailing strips is a lot of work.
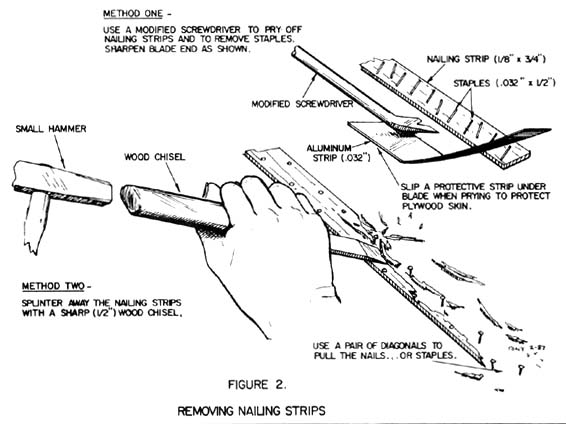
There may be other ways to do it, but most builders simply split and splinter the nailing strips away with a sharp wood chisel leaving the staples and nails still imbedded (see Figure 2). The protruding nails or staples are then laboriously pulled out, one by one, with a pair of diagonal pliers. Take care that you don't dent and mar the plywood surface with the diagonals while prying out the fasteners.
Staples can also be pried out with a screwdriver blade that has been bent and sharpened to a knife edge (see Figure 2).
Unfortunately, when a staple is pried out, quite often only one leg pulls loose and the other remains imbedded. That means you will still have to finish pulling it out with the diagonals. Anyway, use whatever technique you find easiest for you.
When you have finished this blister producing work, you will find hundreds of bent nails and staples, as well as piles of splintered wood, all over the place . . . all with no earthly use. Well, maybe the splinters would make good barbeque kindling.
Surface Clean Up
With the nailing strips removed, you will see areas of oozed out glue that have hardened into glass-like splotches. These dried glue areas are difficult to remove by sanding. Anyhow, sanding puts the adjacent wood areas to risk as they tend to be inadvertently sanded away - leaving the dried glue globs virtually unscathed.
A more effective means for removing dried glue is to abrade it away with a file. A 10" bastard cut file will do an excellent job in most areas. It works particularly good when you tilt it on edge while working over the glazed area.
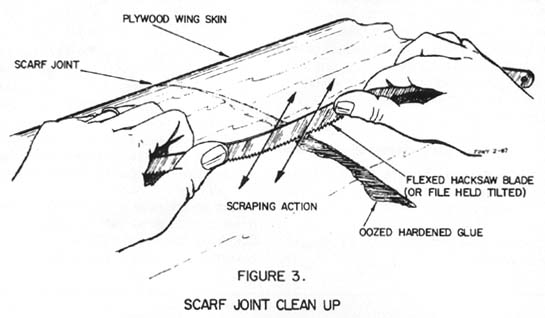
My favorite means for cleaning up glued joints and oozed out glue is with a fine tooth hacksaw blade. It makes an excellent scraper when used as illustrated in the accompanying sketch (see Figure 3).
Another way to whisk off the offending glue glaze is with a disc sander. As I have pointed out from time to time, it is an effective tool but very, very risky to use . . . not to you bodily so much as it is for the surface to which it is applied.
Don't try to chisel off dried globs with a sharp wood chisel. Believe me, when the glue comes off so will some of the top layer of the plywood. Incidentally, trying to use a small block plane to remove the glue will yield the same disastrous results.
Well, there you have it, a nicely skinned sturdy plywood structure. But what about all those little nail and staple holes in the plywood? Actually, they should not present a serious finishing problem at all. However, if they do bother you, you could reduce their size by wiping over the plywood with a sloppy wet rag. The water will cause the wood fibers to swell and, consequently, reduces the size of the holes somewhat. Allow the plywood surface to dry thoroughly before undertaking any kind of finishing work.
Other useful SPORT AVIATION references:
Building One-Piece Cantilever Box Spars - January 1981, pg. 34
Aircraft Plywood - How To Use It -September 1978, pg. 35
