Gary’s 140
By Gary Wallace, EAA 1246064
September 2017
Editor’s note: We were thrilled to have this beautiful aircraft on the EAA Canada Tent display area at EAA AirVenture Oshkosh this year and quite surprised to learn that this was Gary’s first Oshkosh with this beautifully restored Cessna 140. Here is Gary’s account of his restoration.
In 1996, my father purchased a 1964 Corben Baby Ace that was in need of a major restoration. My father, Keith, brother Grant, and I tackled this project from start to finish, with the help of Bob Revell of The Tiger Boys’ Aeroplane Works & Flying Museum in Guelph, Ontario. Bob helped to apply the sprayed coats of dope to the fabric and finish for the remaining components of the airplane. I had been flying this airplane, powered by a Continental A65, from completion in 1999 to the day I decided I needed another project.
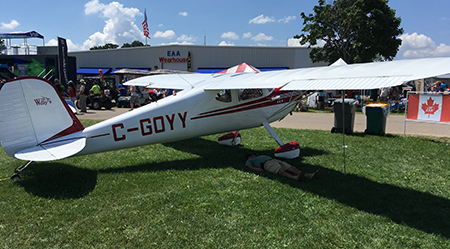
A certain aircraft restorer enjoying some shade at EAA AirVenture Oshkosh.
I thought that I would like to upgrade my current ultralight pilot permit to a private pilot licence and have the opportunity to let others enjoy the gift of flight with me, so the contemplating started. Will I consider an advanced ultralight kitbuilt project or another restoration project? I enjoyed the taildragger configuration of the Baby Ace and thought I would continue with this. I was considering Taylorcraft or Luscombe, and after researching for some time, I came across the International Cessna 120-140 Association accidentally. I spent some time on its forums and had an occasional look at the classified ads as well.
A 1947 Cessna 140, Continental C85-12F project was available for sale near Sarnia, Ontario, so in 2005 after some consideration and research, I thought it might be the project for me. My father and I decided to go for a drive and have a look at it. The plane was stripped of paint and fabric, and the fuselage was on its gear and in the early stages of its restoration. I thought it could use a bit more cleaning up, fabric on the wings, and a check-over of the engine, and it would be flying in a couple of years. I decided to buy it.
Delivery was through Hemingway Aviation, as the company had a large trailer and could deliver the entire project in one trip. The project was unpacked and distributed throughout my 20-by-20-foot heated garage, which was to become my workshop. I soon realized that, in the limited space, a rebuild project of that size would be a very challenging task. Fortunately, the higher-than-average ceiling and 20-by-9 mezzanine were a real saviour to get some open area to work on the aircraft itself. After unpacking and having a closer look at the entire project, I realized this was going to be a lot more work than I originally anticipated. With the help of my father, brother, and a few co-workers, this thing would be flying in eight years! At the time of purchase, I originally thought that I would rebuild the plane and keep it as a certified aircraft. After having a further look at the condition of the entire project and realizing that there was going to be a lot more work to do here than I originally anticipated, I decided to go the amateur-built route as I was definitely going to be dismantling and rebuilding a large percentage of the plane. After all, the Baby Ace was in the amateur-built category and was a treat to keep mechanically airworthy. My 140 was sure to be similar, and this way I would be able to maintain this airplane on my own. This was definitely the way to go.
Fuselage
I found a lot of repairs, dents, patches, and poor workmanship on 60 percent of the fuselage. The parts to be replaced included the skylight panel, the top rear fuselage skin, the D-window skin behind the skylight, the right fuselage strip from doorpost down the entire length of the tail cone, the complete boot cowl, door skins, and gearbox panels. I bought a new nosebowl from Univair Aircraft Corporation and made new upper and lower engine cowlings. All skins and panels were hand cut and fitted from 4-by-8 sheets of 2024-T3 aluminum sheeting. The panels were formed as sections and all parts were solid riveted. Other than the panels that I replaced due to cosmetic issues, the gearboxes, carry-through spars, door posts, bulkheads, and floors were all free of any significant corrosion and defects. The entire fuselage and remaining components were treated with Alumiprep and Alodine, then epoxy primed inside and out.
I removed the entire electrical system and relocated the new Concorde battery to the engine side of the firewall. The generator was upgraded to a 50-amp Plane-Power alternator, the fuses have been replaced with circuit breakers, and all wiring was replaced with new wiring. I used the existing Grimes swing-down landing light after rebuilding it, added new Whelen navigation lights and strobes for the wingtips and rudder, and added a Whelen anti-collision strobe on fuselage top skin. The original project was missing all glove box and radio panels and instrument bezels. I managed to purchase all these components from the United States, and they certainly dress up the instrument panel. And the glove box gives a large area for storage. I stripped the yokes and painted them gloss black, then covered with custom leather yoke covers with built-in push-to-talk switches in both the pilot and copilot yokes.
The airplane’s pivot bearings had little to no play in them, and the linkages, turnbuckles, and cables were all inspected and deemed airworthy and in excellent condition. The rudder pedal assemblies were all stripped and repainted, the rudder pedals were polished, and new bearing blocks were installed for the pedal assembly. The master cylinders were dismantled, cleaned internally, and stripped and painted externally. I installed new O-rings and thread sealed all flare adapter fittings to the master cylinders. The original Goodyear wheels and brakes were replaced with Cleveland wheels and brakes, all-new brake lines were fabricated, and new flex hoses were installed on both sides. All windows were replaced with LP Aero products that were purchased from Leavens Aviation. Most did fit quite well, but the windshield itself did require a fair bit of trimming for proper fit.
The original panel was a six-pack with a vacuum heading indicator powered by a venturi. I utilized all existing gauges and made no changes in this area. The original lap-only seat belts were replaced with Hooker Harness products with shoulder belts. The new carpeting is a very lightweight automotive carpet. I made templates for all floor areas and cut pieces and had their edges bound. The luggage area is the stock 80-pound max luggage capacity. There are no tiedowns installed at this time, but there is provision under floor mats. The seat frames and foam are all original, with new upholstery completed by a friend of mine at P K Upholstery in Waterloo, Ontario. He did a fantastic job on the seats as well as the interior door panels and panels for luggage area. I purchased and installed headliner material from Aircraft Spruce, which was a time-consuming, tedious job, but the outcome was worth it. Dual cabin heat already had been installed, and the duct on the pilot’s side went through the glare shield for windshield defrost, which works great. A new fuel selector was fitted with new fuel lines from the wing tanks right through to the original gascolator on the firewall. The original wing root fuel gauges were extremely seized, but with a lot of time and scrubbing, they came out like new. New floats were installed and the gauges were reinstalled with new gaskets.
Tail cone
The tail cone itself was in generally great condition except for the most rearward top fuselage skin. It had a few dents in it from what seemed to me to be hangar rash, so rather than repair the damage, I decided to remove and fabricate a replacement panel. Thanks to Grant, we got this panel installed and riveted. He is a professional air rivet operator now! He was my rivet driver for 80 percent of the rivets on this whole project, while I was the rivet bucker throughout, especially down inside the tail cone. The tail wheel is from the original Scott 2000; I repainted, greased, and installed new rubber and tail wheel springs. I am very happy with the performance of the Scott tail wheel on this aircraft.
Wings
The fuel tanks were removed from the wings and I found a little corrosion beneath the tanks. There was minimal corrosion on other wing areas, which was removed; these areas were treated with Alumiprep and Alodine. The original felt pads beneath the fuel tanks were replaced with a rubber component as the original felt was a real moisture holder, causing these tanks to corrode through and leak. Both fuel tanks were leaking, so brand-new 140A fuel tanks were located and purchased. One wingtip previously had been patched and repaired and was replaced with another wingtip that I purchased. There were a few repairs needed in the rib areas, especially at the top nose where they attach to the front main spar. Both leading edges had previous repairs and these were not to my liking. They were both removed and replaced with new .016-inch 2024-T3 leading edge sheets, which were preformed in a homemade press. This step made them a lot easier to install with less stress at all attach points. These skins were riveted to the nose ribs with 1/8-inch solid rivets.
The entire wing was then prepared and sprayed with epoxy primer. After priming, the new fuel tanks were installed, as well as new wiring through the wings for the Whelen nav/strobes, and the left Grimes swing-down landing light. The lift struts previously had been stripped and zinc chromated. This chromate was removed and the struts were internally treated with linseed oil. The exterior of the struts was epoxy primed to ready them for paint. The end fittings previously had been removed for inspection and they were replaced. I covered the wings with medium-weight fabric and used the Poly-Fiber process from start to finish. The original fabric clips were removed, and all the holes were drilled out for the Dip Davis mechanical rivet fabric attach process. I am pleased with the resulting look of these rivets under the fabric.
I followed the Poly-Fiber book faithfully for the number of coats of each step. A final three coats of the Poly-Fiber Aero-Thane Insignia White was applied to the fabric for completion of the wings. Some existing main spars were replaced with replacement spars from other surfaces that I had purchased. I replaced all the corrugated skins on all the moving tail surfaces and the ailerons and flaps with new material from a fellow in Prince Edward Island who manufactures the material to the original specification. I built jigs from MDF to hold everything flat and true. The corrugated skins were first attached to their main spars using 1/8-inch rivets along all trailing edges of each surface. Prior to assembly, all these surfaces were epoxy primed internally and finally prepared and primed externally to prepare for paint.
Tail group
The tail group was sound, so it was corrosion-proofed inside, prepared for paint externally with epoxy primer, and finished with Aero-Thane Insignia White.
Gear legs
When I got the project, the landing gear legs were clean of all paint. There was no rust on the gear legs and they were in very good condition as far as corrosion and pitting. To prepare the gear legs for paint, I applied about five coats of epoxy primer, sanding between coats to fill in the minor flaws. A final two coats of Poly-Fiber Aero-Thane Insignia White were used to finish them off.
Cowlings
These were in the worst possible condition, and the existing cowl was used for patterns. I used all the reinforcing channels to keep the shape of the panels. The nosebowl was replaced with a new nosebowl from Univair, and the rest of the cowling was fabricated from flat sheet. This was a very tedious and time-consuming part of the project, but I am very happy with the result. The original cowl latches were removed and new cowl latches from Aircraft Spruce were installed. The original firewall was used again as it was in good condition with no reason to replace it. It was painted the same as the rest of the airplane. The motor mount was replaced with a new mount, and all engine mount rubbers were replaced with new ones from Aircraft Spruce.
Engine
The engine was completely stripped down; all bearings, journals, and cylinders were found to be within limits. Top ends were overhauled on the four cylinders. And the engine is still using the oil screen at this time, but I may install a spin on the oil filter adapter in the future. Compressions are all in the high 70s. The Stromberg carburetor was completely rebuilt, the float set and jets were checked, and I also rebuilt the original carb heat box. The 15-amp generator was replaced with the 50-amp Plane Power alternator. The original pull-start starter assembly was rebuilt and reused at this time. The engine already had a C150 exhaust with heat muffs, and they were inspected, cleaned, and reinstalled on the engine. The original McCauley 7148 aluminum propeller was overhauled and reinstalled on the engine. The first engine start after rebuilding was done at my home and it was found to run smoothly with no problems. There was only a small oil leak at a push rod tube and this was easily resolved.
Weight and balance
The weight and balance was finally completed. Empty weight came out at 1,001 pounds, a little higher than I was hoping. Calculations were done at all loading conditions as far as nose-heavy and tail-heavy scenarios, and in each configuration, the airplane does not fall out of the envelope.
Performance
The performance is typical for a Cessna 140 and is comparable to many of the new-generation light-sport aircraft. Cruise is a constant 108 mph at 2,300 rpm, and climb at full gross of 1,450 pounds is 470 fpm on a 75°F day. My strip is 1,500 feet of grass, and getting out with two on board does not present any issues. For landing, I use 40 degrees of flap and am over the fence at 60 knots solo and 65 to 70 dual. Engine oil temperatures run between 160°F and 180°F, with oil pressure at 45 pounds per square inch (psi) in cruise and 15 psi in idle. First flight was July 18, 2013; I quickly flew off the 25 hours without any snags and had the restrictions removed. In August I had a total time of 54 hours and have taken a lot of passengers for rides. I am enjoying the flying characteristics and performance (or lack of it as some might think) more than I had anticipated. I am finding it difficult to tame my flying itch — I can’t get enough time in the Cessna and I smile and enjoy every flight! It may be that the flights are made more enjoyable because at times I had thought that this day would never arrive. The gift of flight is one thing, but the gift of flying your own project after all those hours and hours of work is really something else.
Thanks to my dad, Grant, Bob, fellow co-workers, and most importantly, to my wife, Lucinda, who was unbelievably understanding throughout this whole project. As for the itch for another project, well, my wife is holding that thought for me. It will not be in the near future, but only time will tell!
