Safety Wiring and Other Failsafe Precautions
By Tony Bingelis (originally published in EAA Sport Aviation, September 1994)
When completed, your aircraft will be subjected to many stresses in flight and on the ground; any of which can abnormally affect the integrity of the many assemblies making up your aircraft structure . . . and your safety.
These stresses are induced, for the most part, by engine vibrations, in-flight turbulence, in-flight maneuvers, and landing loads.
What keeps an aircraft from coming apart in spite of these unrelenting ever present stresses in flight, and on the ground, are the countless nuts, bolts, and other fasteners and devices used to hold the airplane together. The unique thing about almost all these aircraft quality fasteners is their fail-safe nature.
Most builders know that using ordinary hardware nuts and bolts in aircraft structures is a dangerous practice. This type of hardware is made of mild steel and, for the most part, lacks the structural strength and corrosion resistance of aircraft hardware. Furthermore, the hardware store varieties are generally recognizable by their coarse threads and nuts that lack the self-locking features common to aircraft hardware. Although these hardware store nuts and bolts are plated and look nice and shiny, they are not very corrosion resistant, nor are they very strong. In short, don't use them in any aircraft areas where structural integrity is an important consideration.
It is embarrassing enough to have someone point out a missing screw on your aircraft, but think how embarrassing it would be to have something come loose in flight and fall off.
Look most any store-bought airplane over closely and you will probably find at least one screw or some kind of fastener missing from its prop spinner, cowling, or landing gear fairings . . . makes you wonder what else you would see under the cowling.
This need not be typical of your aircraft if you take the time to ensure that every assembly you make, initially, is a fail-safe installation.
And just what is a "fail-safe" installation? Webster's Dictionary says it is "incorporating some feature for automatically counteracting the effect of an anticipated possible source of failure."
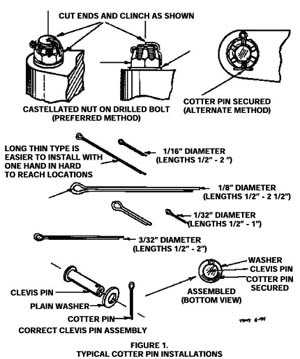
To me this means that a fail-safe installation is one where each bolt, screw or pin is of aircraft quality, and is secured by a self-locking nut, a castellated nut properly locked with a cotter pin, or is correctly safety wired, as the need may be.
However, all the fail-safe devices in the world will do you no good unless they are installed, and installed correctly, too!
I know of one homebuilder who made a shocking discovery during his first annual inspection, one year after his aircraft was duly certified, test flown and thereafter operated safely for more than 100 hours. He found the clevis pin connecting the control cable to his right rudder pedal did not have a washer or cotter pin to secure the installation. How lucky can you get?
Another individual was equally as lucky. One day, coming in to land, he routinely reached down to apply about 10 degrees of flaps for landing, but the instant he pulled up on the flap handle the airplane violently lurched into a left bank. Startled as he was he had the presence of mind to quickly release the flap handle quickly, and the aircraft resumed level flight. Every time he tried to apply flaps the airplane would bank violently. It finally dawned on him that his left flap had somehow become disconnected. A no-flap landing was safely completed. Inspection of the left flap assembly revealed that the bolt connecting the flap actuator lever was missing. It was found in the bottom of the aircraft . . . there was no sign of a nut.
Common fasteners can loosen and fall off, but even fail-safe hardware won't do you any good unless it is installed - and installed correctly!
Consider this - every bolt, screw, rivet, or fastener of any type is important to the structural integrity of your airplane or it wouldn't have been installed in the first place!
Here are a number of standard aircraft quality hardware items of proven reliability commonly used to produce assemblies that are virtually fail-safe:
• Aircraft bolts with a drilled head (secure by safety wiring).
• Aircraft bolts with a drilled shank (install with castle nut and cotter pin).
• Self-locking nuts (many varieties - use only high temperature type lock nuts in the engine compartment).
• Lock washers (split type or shake proof varieties).
• ESNA Roll pins.
• Safety Wire - corrosion resistant (stainless) steel.
• Cotter pins.
• Double nut installations.
One FAA old timer once told me that whenever he saw a bolt or screw with a drilled head he expected it to be safety wired. This is, of course, understandable where a blind installation is made, one where the bolt is threaded into a housing and no nut is needed.
A typical example may be seen in the two AN4H bolts securing the back plate to the brake cylinder assembly on some Cleveland brakes. However, what if a nut, a self-locking nut, is used in an installation with a drilled bolt head? Must the bolt head, too, be safety wired, somehow?
My suggestion is why ask why. Simply use a bolt that is correct for the application.
Turnbuckle Installations
Most homebuilts will utilize at least two turnbuckles to connect the rudder cables to the rudder pedals. Some biplanes, of course, have many more in other locations.
A turnbuckle is a nifty device as it allows you to easily adjust the length and tension of a cable assembly without disconnecting the entire installation. However, this implies, too, that it is extremely important to safety wire this type of device so it doesn't loosen . . . or come apart.
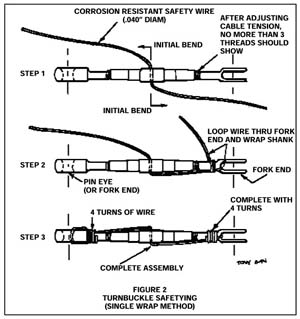
To ensure that a turnbuckle is capable of developing its maximum strength, no more than three threads should extend beyond either end of the barrel after it has been adjusted to the correct cable tension for the system. Then, and only then, will it be ready for safety wiring.
Safety wiring a turnbuckle can become a study in complexity . . . if you permit it. I've seen some unusual ways to safety a turnbuckle, some of which, in my estimations, are ridiculously complex.
For our part, we should, of course, abide by the FAA recommendations which apply to all civil aircraft. But, even the FAA offers a simple method of safetying, so why not use it?
Actually, the different safetying techniques boil down to two basic methods. The so called single wrap and the double wrap turnbuckle safetying methods.
Turnbuckles can loosen allowing the control system to become unreliable, or loosen to the extent that slack in the cable might lead to the development of control surface flutter.
The simple single wrap system of safetying a turnbuckle is considered to be adequate for most homebuilt applications and is illustrated in Figure 2.
Use of Safety Wire
First, here are a few pointers regarding the use of safety wire. Safety wire is made of a variety of metals such as soft iron, brass, copper corrosion-resistant steel, Monel metal and even aluminum. For all practical purposes, I would suggest you use only the corrosion resistant (stainless) steel lock wire as it is fairly economical and is readily available from homebuilt supply sources.
In general, safety wire comes in an annealed state, and the most frequently used size is .032" in diameter. However, 0.040" diameter wire is the recommended size wire to use for safetying turnbuckles.
In some nonstructural applications, like securing switches and cover plates, a smaller size wire may be necessary where the hole for the safety wire is too small to accept the .032" size.
Actually, in these applications the use of a finer safety wire is O.K. and is more to serve as an indication that the unit has been opened or, perhaps, otherwise tampered with than it may be for structural security.
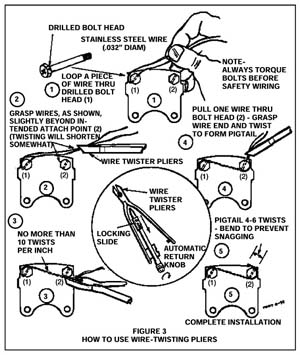
Safety wire can be twisted by hand, with a pair of pliers (tape the jaws to protect the wire) or, preferably, with a safety-wiring tool.
Always install the safety wire so that the tension on the wire will be increased if the turnbuckle nut, bolt or screw starts to loosen. Complete twisting the locking wire by forming a pigtail that will be about 4 to 6 twists long after the wire ends have been cut off.
Do not over-twist the wires or they may become over-stressed and break.
Bend the sharp cut ends of the pigtail in, out of harm's way, so it will not stick out and snag on something - something like the delicate flesh of your arms and hands as you attempt to work on something else.
Finally, don't attempt to reuse safety wire. The money thus saved won't even buy you a chunk of bubble gum.
Torque It First
The first step to obtaining a fail-safe installation is to be absolutely positively sure that every bolt, nut, and screw you install is properly torqued before you safety wire it or otherwise secure it.
You can see where this is critical when installing a propeller, but isn't it equally important when installing your crankcase oil drain plug and oil filter?
In each of these cases the torque applied must be within prescribed limits - especially when installing the propeller. Torque values are measured in either inch pounds, or foot pounds.
For example, let's say you are using an 8" wrench on a 3/8" bolt installation. If you apply a 20 pound force to turn the nut with that wrench, you would be applying a torque value of 20 x 8", or 160 inch pounds. If you want to express the torque value in foot pounds, divide the 160 inch pounds figure by 12 and you will get 13-1/3 foot pounds.
Obviously, to obtain accurate torque values you should use a torque wrench rather than trust to your own built-in "armpit sensor."
Final Reminder
It is not enough to use aircraft quality fail-safe hardware and devices; they must also be installed correctly to be effective.


