What Your Drill Can Do For You!
By Tony Bingelis (originally published in EAA Sport Aviation, February 1995)
Your drill can do much more than just drill holes. This makes a good drill as essential to your project as any other tool or piece of equipment you have or may hope to acquire.
Because a drill can be fitted with a variety of accessories, builders find it to be equally useful in building a composite, wood, or a tube and fabric project as it is in constructing an all-metal project. This is fortunate because most of us already own an electric drill - and have been using one around the house for years. Up to now, though, its use was probably limited to nothing more intriguing than drilling a hole here and there, now and then.
Well, What Else Can You Do With A Drill?
I have at least a dozen practical uses for my drill. For example, I used it to:
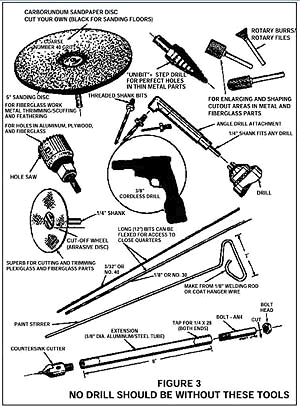
- drill holes, of course. However, fitted with a long 12 inch drill bit it can often take the place of an expensive 90 degree angle drill when drilling holes in corners and other close locations.
- do light to heavy sanding, feathering, and trimming using a sanding disc fitted with coarse carborundum sandpaper.
- countersink holes for the installation of flush fasteners.
- cut and trim Plexiglas™ windshields and canopies, safely and quickly.
- drive and remove screw fasteners quickly.
- speed the installation and removal of bolts and nuts.
- install and remove the piano hinge wires, the easy way, in a new cowling installation. Those long cowling wires are very difficult to insert and remove, initially, without the help of a pair of pliers, or preferably, a drill.
- deburr holes quickly and effortlessly.
- cut large holes in plywood, fiberglass and metal.
- rout, mill, and shape openings and trim edges in plastic, wood or aluminum, using rotary burrs chucked in the drill.
- cut slots in metal and other materials.
- mix paint.
I’m sure this list is not all-inclusive.
The ability of a drill to complete any of the tasks listed depends more on the accessory installed than it does on the power and rpm the drill can produce.
Naturally, the capacity of the drill can impose certain limitations because the 3/8" shanks some accessories have will not fit a ¼" drill. Likewise, you will find it important that the drill have what is called a "teasing throttle" (trigger). Without a smooth easy working trigger, the drill’s sudden start is difficult to control. This certainly increases the risk of causing a drill bit to walk or skid off the center mark you want to drill.
Other than these considerations, it doesn’t matter much what size, or type, drill you have.
Still, if your drill is an old one, or lacking in power and capacity, you might consider adding a late model drill (or two) for your workshop. It is not at all uncommon for a builder to have two or three different drills at his disposal.
Here are some of the characteristics and uses of drills most used by homebuilders.
The Electric Drills
The familiar plug-in electric drills are still good general purpose drills to own and use - but they do have a few limitations. My ¼" capacity electric drill, an older model, is hardly used any more due to its limited capability. As a matter of fact, I’ve taken it to the airport where it is kept in case I ever have to drill a hole in something. It’s quite good for drilling small holes (up to ¼" dia.) in wood, plastics, mild steel, and in aluminum.
My 3/8" electric drill, on the other hand, with its variable speed and reversible features can accept almost any accessory made for drills. Its speed can be varied from 0 to 1200 rpm.
The low speed capability and geared power makes it ideal for drilling holes in heavy steel parts like landing gear legs and axles . . . and for drilling larger holes.
Lately, I’ve used it a lot with a UNIBIT® Step-Drill (it has a 3/8" shank) for drilling holes through bulkheads for control cable passages. I also use an old Unibit to drill larger holes in stainless steel firewalls for engine control routings. Drilling holes in stainless steel, however, is hard on drill bits, and sometimes it may be easier to enlarge a small hole to the size needed with a rotary burr or a coarse rat-tail file.
The biggest drawback to any electric drill is that umbilical cord you must connect to an electrical outlet with a long extension cord to give it life.
This need is now more obnoxious than it used to be because the manufacturers are making the cords, built into the drill, shorter and shorter. So short, in fact, that some brands have a cord that hardly reaches much beyond the drill itself.
What a nuisance this can be because the connectors always seem to catch on something when you are trying to manipulate and use the drill. Somehow, the method of securing the chuck key to the cord never works well for me. It, too, catches on things.
So, what do I do? I remove the chuck key from its cord location and place it near my work. Not a smart solution because now the loose chuck key has a way of disappearing when I need it. Having a spare key lying around helps . . . but not much because I am quite capable of losing track of that one too.
Naturally, the newer model electric drills with their keyless chucks, variable and reversible speeds, and rugged lightweight construction have features that are as tempting to me as they must be to any builder whose only electric drill lacks them.
The Cordless Drills
No builder should be deprived of the sheer pleasure and convenience of having a cordless drill to use.
You can take it anywhere and use it anywhere . . . in the airplane, on the ramp, and even where there is no electrical source nearby. Best of all, it has no pesky extension cord and plug to grapple and cope with. A good cordless drill is not cheap, but cheap tools no longer are welcome in my workshop . . . nor should they be in yours. It took a smart wife and nine aircraft projects to convince me of this. Now, I wonder how I managed to get along without a cordless all these years.
You, too, would probably find a cordless drill to be the one you reach for most often once you become spoiled by its versatility. Because it is cordless, you don’t have to have a nearby electrical outlet in order to use it.
Anyway, if your shop is like mine, all available wall plugs are already taken for other essential functions.
To enjoy the maximum benefits of a cordless drill, be sure to acquire an extra battery. That way you will never have to wait until a run-down battery is recharged. Simply slip in the spare and go on about your work without delay.
My cordless drill rates ****. However, if I didn’t already have an efficient Makita cordless drill with its convenient spare battery, I would certainly consider buying a new, made in the USA, DEWALT 12-volt Cordless Drill.
It is a variable-speed 3/8" Versa-Clutch® Drill/ Driver with a pressure-activated keyless chuck. Power is provided by a 1,000 cycle battery pack that has a one hour charger capability. Best of all, it has a torque adjusting system and low speed range of 0 to 400 rpm and a high speed range of 0 to 1,300 rpm.
In short, this cordless drill has all the features you could hope to find in a cordless drill. Heck, owning one would be excuse enough to start another airplane project.
The Air Drills
Air drills have been used almost exclusively in the manufacture of aircraft for good reason. There is no danger of electrical shock or fire because the drill is operated by air from an air compressor, and not from a high voltage electrical outlet.
Air drills are unique in that they are smaller and lighter than electric drills. This feature makes them less tiring to use when drilling the countless rivet holes required in the construction of an all-metal aircraft.
Air drills are also capable of producing high variable speeds . . . often exceeding 2600 rpm. Compare this with an electric drill turning a mere 1300 rpm.
An air drill with its variable higher speeds is, therefore, better suited for cutting, routing and grinding operations than is a slower turning electric drill.
My pneumatic drill, based on its frequency of use, rates ****. To me the air drill is a very important tool, especially when the project is a metal aircraft.
The drill’s only disadvantage is the air hose connecting the thing to the air pressure source (air compressor). Hoses, like extension cords, do get in the way.
When fitted with the appropriate accessory it can also be used for grinding and cutting.
However, the typical air drill with its ¼" chuck can only accept accessories that have ¼" shanks. Of course, air drills come with larger capacities but are not as popular with builders as the lightweight ¼" drills.
Don’t buy a cheapie air drill . . . especially one that does not have a "teasing throttle." I have one of those too, and never use it.
The Angle Drills
Although angle drills are not used very often, when the need arises there is no better solution for drilling in close quarters. The pneumatic angle drills (air drills) are expensive and, considering their cost/benefit to a homebuilder for infrequent use, very hard to justify.
When only a few occasional holes have to be drilled in close quarters, a far less expensive angle drilling capability may be obtained:
1. By using a long 12" bit and flexing it to reach where you want the hole to be drilled.
2. With a small lightweight angle drill attachment which can be chucked into most any kind of drill.
Many angle drill attachments typically have a ¼" female thread spindle which can accept standard threaded-shank bits. Other types utilize a collet or the somewhat bulkier key chuck. These chuck key versions, however, require more space in which to operate. It is useful to know that these close quarters angle drills can also be fitted with a countersink cutter for countersinking inside holes. Incidentally, my angle drill rates a modest *. It is very useful when it is needed but the need is infrequent.
Cutting and Trimming Windshields and Canopies
One awesome task that most first-time builders anticipate with considerable anxiety is the cutting and trimming of the windshield and canopy . . . and to a lesser degree, trimming the cowling. Many Plexiglas™ canopies have been ruined by builders who tried to cut and trim theirs when the Plexiglas™ and the shop temperature was cold. When it is cold, avoid handling your canopy and windshield parts because they will be more brittle and more prone to crack. Another risky practice is attempting to cut and trim the Plexiglas™ using a saber saw . . . especially when it is not solidly supported during the cutting. Even a fine tooth (metal cutting) saw blade is apt to chip the edges. However, laying masking tape over the line of cut and cutting through the tape can minimize this problem.
By far the safest way to cut and trim Plexiglas™ canopies and windshields is with an abrasive cut-off wheel chucked in your drill . . . preferably in an air drill because it can turn at a higher rpm. The cut-off wheel to use is a 3" diameter x 1/32" disc clamped in a special ¼" mandrel which can be chucked in your drill. When cutting and trimming your Plexiglas™ windshield or canopy, the friction of the cutting disc heats the line of cut and minimizes the risk of developing a crack, or breaking the Plexiglas™. The cut-off disc, being somewhat flexible, further lessens the risk of cracking the Plexiglas™ while you are cutting it.
You will find that the cut-off wheel can be also used for cutting and trimming cowlings and other fiberglass parts. It also does a good job of cutting off protruding bolt shanks and trimming uneven metal edges. You can even use it to cut slots in tubing and metal.
Deburring and Countersinking
Chuck a countersink cutter in your cordless drill and you will have a speedy way to deburr all the holes in a wing skin panel in minutes. Careful you don’t countersink the holes . . . just knock off the burrs.
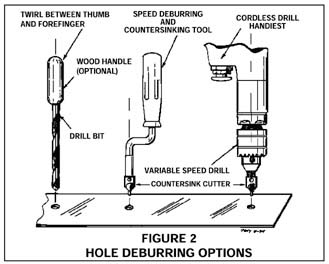
Use a slow speed for the best results.
No need to buy high priced accessories for your drill when you can easily make your own. This is especially important when you need to use the accessory only once in a while.
A paint stirring tool, for example, can be made out of a bent piece of coat hangar wire. Chuck it in your drill and it will mix your paint as efficiently as any store bought gadget. Run it at a slow rpm and the paint won’t splash.
Chucking a countersink cutter directly into the drill chuck might sometimes limit its access to some holes in a structure due to the close proximity of the countersink’s tool to the bulky drill. Solve this problem by making an extension for the countersink cutter. Tap both ends of a 6"-8" length of tubing with a 3/16" tap. Screw the countersink cutter into one end, and a short AN3 bolt into the other end. Cut or grind off the bolt head to form a shank which you can chuck in your drill.
Those Rotary Burrs
Several different shape rotary burrs are very handy for enlarging holes, trimming, and contouring cut-outs in most any kind of material.
In Summary
So, which type of drill do you think would be the most useful to you in constructing your project? That’s easy to answer. The drill you already have.
In my estimation any powered drill would be a big help - be it a small low-powered job you got from some relative as a Christmas present, or that big deluxe model your wife bought for you assuming that bigger is better . . . and that you deserved the best.
In any case, be assured the type of drill you have now will be very useful in constructing your project . . . very useful, provided you take advantage of different accessories to exploit its full potential. Of course, if you can see your way clear to obtain another drill or two, by all means do so. There is nothing handier than having two or three different drills at hand . . . each fitted with a different bit or accessory. Think of the time you can save by not having to constantly change drill bits, countersink cutters, and the like.
Sources
Drills - Your nearest Sears store.
Drills/Accessories - Avery Enterprises, phone 817/439-8400.
