Part 3 Composite Construction Bonding
By Ron Alexander(originally published in EAA Sport Aviation, July 1999)
During this series on composite construction, I am attempting to convey to potential builders the very basic knowledge necessary to construct a composite airplane. Composite building is not difficult. It simply requires a fundamental knowledge of the basics. When you undertake the building of a composite aircraft, the plans or assembly manual will guide you through the process. The basic skills needed for this type of construction consist of 2 primary items: knowledge of how to do a basic layup and knowledge of how to bond pieces of material together. Building a composite airplane from a kit is similar to building a model airplane. You glue the pieces together. Now, obviously the gluing procedure for an aircraft is much more critical and sophisticated than with a model, but the basic principles are very similar.
To review the material previously presented in the two preceding issues, I discussed the primary elements of a composite structure: core materials, reinforcement materials, and resin systems. Workshop space and tools needed were presented along with how to work with all of the basic materials. Various types of fillers were discussed and how to use them. The June article presented safety issues and outlined how to do a basic layup using fiberglass and resin. The proper inspection of a completed laminate was also given. We will now pick up at the next step of our layup - application of peel ply.
Peel Ply
Peel ply is a polyester or nylon cloth material applied to the completed laminate while the resin is still wet. This cloth will not adhere to the layup thus allowing it to be peeled off at a later time, hence the words "peel ply". The application of peel ply is suggested when you are going to complete another laminate at a later time. If you are immediately going to apply another layer of cloth this step is not necessary. Peel ply provides an added benefit of absorbing excess resin from the composite skins.
Assuming you are going to apply another laminate later, or you are completing the final laminate, you will want to place peel ply onto the completed surface. Cut the peel ply to the proper size and lay it over the laminate while the resin is still wet. One layer of peel ply is all you will need.
Use a squeegee and a brush to work the resin up through the peel ply. You may have to add a small amount of resin to get the peel ply to bond adequately to the laminate and to completely impregnate the peel ply and thus fill the weave. After ensuring the peel ply is saturated onto the layup, set the piece aside to cure. After the resin has cured you must then remove the peel ply. This is very important! Failure to remove peel ply will result in an unsafe bond of the next layer of reinforcement material. (Note that a number of kit manufacturers will ship pre-molded parts that still have peel ply attached. It is imperative this be removed prior to bonding the pieces together.) After removal of the peel ply you will see that the laminate is very smooth and requires little preparation for the next layer of cloth or for the finishing process. The resulting surface is actually fractured somewhat leaving it better prepared for additional bonding or painting. Small glossy areas will be present on the peel-plied surface requiring abrading with 180 grit sandpaper or Scotchbrite(tm) pads. Without using peel ply, the composite surface will require extensive sanding or filling to prepare it for bonding or painting.
Bonding
Definition
Bonding is not a new process in aircraft building. In fact, bonding has been used in aircraft construction since the very beginning. The technique of gluing wood structures together has been used for years. Many of the same gluing elements found in wood is also found in composites. The term bonding, as applied to composites, is used to describe a common method for joining composite structures. Bonding is the process in which previously manufactured component parts are attached together during assembly of the airplane. Bonding composites can also be compared to welding metal. It is designed to be a permanent joining method. Several important points must be considered in bonding. We must know how much strength is needed in the joint, the bonding area required, what type of material must be used to provide the adhesion, and the procedure used to apply the bonding material. Preparing the surfaces that are to be bonded together is also crucial. As stated earlier, the majority of composite kit aircraft require some type of bonding procedure.
The first method of bonding used in amateur-built aircraft involves a four-step process. The first step is to cut and trim the component parts to get the proper shape and fit. The second step is to position the two pieces together. This can be accomplished by using temporary jigs or by temporarily gluing them together with a non-structural adhesive. Third, we must fill any gaps that may exist as a result of butting the two pieces together. The final step consists of actually creating the structural joint using wet (resin laden) strips of reinforcement material (usually fiberglass) bonded over the area connecting the two components together (see Figure 1). If we are bonding
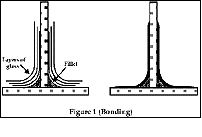
together two pieces that are perpendicular to each other as in Figure 1, then we must create a fillet. The strength of a joint that is joined by a fillet is derived from the reinforcement material and not the fillet itself. The fillet is needed to prevent the reinforcement fibers from making a direct 90-degree bend without any radius. Composite materials must have a bending radius just like sheet metal. The number of strips of reinforcement material laid down over the fillet determines the strength of the bond. An example of the type of construction explained is found in mating a wing rib to the wing skin. Another example is placing a bulkhead into a fuselage. Both of these are
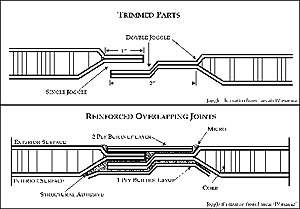
common types of construction techniques used when building a kit composite airplane.The second method of composite bonding is termed "adhesive bonding." Adhesive bonding involves assembling component parts together using a structural adhesive in place of resins and fiberglass. Structural adhesives range from preformulated, two part mixtures that are in paste form to structural laminating resins that are mixed with flocked cotton or milled fiber to provide the necessary strength. The first method of bonding discussed uses laminating resins and reinforcement material to create a bonding overlap. Adhesive bonding requires the bonding area to be formed into the part when it is molded. This is usually accomplished by lowering one side of a part and raising a side of the second part. This allows the two pieces that will be bonded to slide over each other providing a precise fit.
The joint that is formed when the pieces are joined in this manner is referred to as a "joggle" (see Figure 2). With this type of overlap the builder is required to lay down the structural adhesive and apply some clamping pressure.
Some kit manufacturers prefer to combine both bonding methods to achieve the greatest possible strength. The key to achieving strength in any joint is to properly prepare the surfaces that will be joined. The laminating resin or structural adhesive must bond well to the surfaces. The surfaces must be cleaned properly and sanded.
You will often hear the term "secondary bonding" used in composite construction. This type of bonding simply refers to the bonding together of previously cured composite parts using the methods outlined above. Secondary bonding is commonly found in most composite kit aircraft. It requires proper surface preparation. Prepare the surfaces according to the instructions provided by the kit manufacturer. Usually, the surface will be abraded using 180-grit sandpaper or a Scotchbrite pad. Each of these will provide the proper surface preparation without cutting or damaging underlying fibers.
Steps of Bonding
When you receive your kit it will usually consist of many pre-molded parts that need to be bonded together. Sounds relatively simple - and it is - provided you carefully follow instructions. You must first of all remove any peel ply, prepare the surfaces, and then the pieces must be properly jigged to maintain an accurate alignment. Then the actual process begins. So, let's take the steps one at a time. We will use a simple "T" bond of 2 pieces of material to illustrate the steps.
Preparation
Most of the construction process of a kit aircraft involves secondary bonding. This means it is critical to properly prepare the surface. With a plans-built airplane or a kit airplane where you have just completed building a part, the piece is already prepared for the bonding step.
Assuming you are working with pre-molded parts, you must abrade the surface to ensure an adequate bond. Failure to do so will result in an unsafe bond. We have discussed this process earlier. Prepare the piece according to the instructions of the kit manufacturer. They will usually have you use sandpaper or Scotchbrite(tm) pads to scratch up the surface. 3M(tm) Rol-loc disks also work very quickly to prepare glass surfaces for bonding. You will want to make sure you have the proper fit between the pieces. A certain amount of sanding may be necessary to ensure this fit. You do not want any gaps between the pieces that are to be bonded together. The pieces must then be thoroughly cleaned to remove any contaminants. Often residue from a mold release compound will be present on the piece. This must be removed. Acetone is often recommended for the initial cleaning followed immediately by a dry rag. The part should then be cleaned with soap and water to remove any solvents and then dried. Again, follow the directions of the kit manufacturer. I will amplify on the cleaning process in the next article.
Tack the Parts Together
The next step in the bonding process is to mate the pieces together and glue them in place using a non-structural glue. This simply allows you to begin the bonding process. You can use 5-minute epoxy, hot glue or instant glue to hold the pieces together. The parts only need to be tacked in just enough areas to hold them in place. This is not the final bonding of the pieces - it is simply a method of holding them together while we actually complete the bonding operation. None of the glues mentioned should be considered as structurally sound. Hold the pieces together until the glue sets up. Figure 2 shows our two pieces glued together using 5-minute epoxy. Assembly instructions will often require the use of clecos, screws, or clamps to attach the pieces together for the bonding process.
Note: As a reminder, remember to remove any peel ply that may be present on the component parts prior to bonding.
Create a Fillet
Once the temporary bond has hardened, a fillet needs to be made. This fillet provides a radius for the reinforcement material that will be bonded on next. The fillet alone is not strong enough to bond the parts together. Dry micro or SuperFil is used to make a non-structural fillet. Structural fillets, if required, are made by substituting microballoons with cotton flox.
Creating a fillet is relatively simple. Mix the SuperFil or micro and place it in a sandwich bag or in the middle of a piece of plastic. Close it up and snip a small hole in the bottom of the bag. This is similar to a cake-icing dispenser. Now squeeze the mixture from the bag along the corner area where the pieces are joined. A small amount is sufficient. An optimal fillet will have about a 3/16-inch to 5/16-inch radius.
After placing the SuperFil along the fillet area, take a tongue depressor and smooth the mixture into the corner area. Rounding the end of a tongue depressor with a pair of scissors will provide the exact size fillet you desire. Use the tongue depressor, holding it perpendicular to the fillet and not leaned fore or aft. Remove any excess material that may have formed near the fillet along the sides of the pieces. This can be done using the tongue depressor. You do not want any micro or SuperFil where the glass will be applied except at the fillet itself. The completed piece should have the appearance of a smooth fillet. You are now ready to bond the pieces using reinforcement material.
Tape Glassing
In our example, we are going to use fiberglass to complete the bonding process of our two parts. This is often referred to as "tape glassing." On your project, you will complete this process according to the manufacturer's instructions. Usually at least 2-3 layers of cloth will be placed between the two pieces. Once the glass tapes are in place, the load path between the two pieces will be complete.
Wet layup strips of fiberglass cut at plus/minus 45 degrees are used for bonding nearly all components together. The most simple and clean way to make the layups is to pre-impregnate the material with resin while it is between two sheets of plastic. Clean 1- or 2-mil plastic drop cloth material works well for this. First, determine the total size for all pieces you will need. Obtain a piece of fiberglass slightly larger than this total size. Next obtain two pieces of plastic and cut them 3-4 inches larger than the fiberglass both in length and in width. Using a Sharpie marker, draw lines on the plastic to form the necessary strips of cloth that will be the exact length and width needed. Flip the plastic over so the resin is not placed on the marks. Mix the required amount of resin necessary to saturate the cloth. Pour the resin over the plastic and place the fiberglass on top of the resin. Next place the second piece of plastic over the resin.
Using a squeegee, work the resin into the fibers through the plastic. In other words, you will be placing the squeegee on the plastic, not on the cloth. This enables you to keep everything clean and neat. Wet out the fibers completely just like any other layup. You can now pick up the entire piece of material and handle it without getting resin everywhere.
The next step is to use standard scissors and cut out the tapes you will need along the lines on the plastic. As you cut the strips, draw the scissors slightly toward you. This will enable you to make neat, easy cuts.
Next, lightly moisten the area to be laminated (on our "T") with resin using a brush. This will ensure that the bond is not resin-starved. Remove the plastic from one side of the tape. Place the strip down with the remaining piece of plastic facing up. Use a squeegee over the top of the plastic to remove any air bubbles and to smooth the resin evenly. After the tape is in place you can then remove the top piece of plastic. The process is then repeated for additional layers of cloth. Be sure to remove the plastic. Plans usually call for the pieces of reinforcement material to be stepped out with succeeding layers. In other words, if the first layer is 2 inches wide the next layer would be 3 inches wide. The widest piece will be on the top.
Thoroughly inspect the piece for air bubbles and resin starved areas.
As you will see from the completed piece, the tape is providing the strength of the bond. This is a very efficient and effective method of bonding two composite parts together. Again, it is a commonly used technique for installing ribs in wings or bulkheads in a fuselage. Use of the plastic is not necessary, but it does allow you to remain neat and clean.
The final step is to place peel ply over the material. Laminate a strip of peel ply over the surface and allow the resin to cure. This will eliminate the sharp edges that will otherwise result from the fiberglass material. Remember to remove the peel ply after the resin has cured.
Joggles
Joggles are simply joints that have been pre-molded to fit precisely together. They overlap each other and are usually bonded together using a structural adhesive. This type of construction is very common in the mating together of fuselage parts. After bonding the parts together at the joggle, reinforcement material is usually applied for added strength.
Often you will be required to trim excess material off a joggle prior to bonding. Usually you will place the two pieces together and then drill holes to allow for the installation of clecos. (The same clecos used for sheet metal construction.) Some instructions call for the use of clamps or even strips of wood glued on the surface to hold it in place and to maintain proper alignment. This will often be done in a jig to ensure alignment of the parts. After the pieces are mated together, and the proper fit attained, you will then mix the structural adhesive. Structural adhesives are usually in a thick paste form. They consist of a Part A and a Part B mixed according to instructions. You want to be sure the ambient temperature is at least 60+ degrees. Most of the adhesives have a working time of 1-2 hours at 77 degrees F. Be sure you are ready to glue prior to mixing the adhesives. Remove the clecos or other fasteners as you apply the adhesive to both parts. Instructions will often tell you to replace the clecos with rivets after applying the adhesive. The rivets are later drilled out after the adhesive cures. The resulting holes are then filled. Fiberglass strips are usually applied as a final step.
This provides you with a very basic idea of how to accomplish composite bonding. The key to doing this correctly is to practice. Cut a few pieces to form a "T" and bond them together until you perfect the process. This will save you a lot of problems when you begin working on the real thing. Next month we will continue our discussion of composite construction with some advanced techniques and methods of fabrication.
