Repairing Composite Surfaces
It's Not Always A Straightforward Process
By Ron Alexander(originally published in EAA Sport Aviation, June 2000)
Repairing dents and dings in sheet-metal airplanes is often fairly simple, and assessing the damage to repair is usually straightforward. The same is true with a fabric-covered airplane. You look beneath the fabric for any structural damage, repair it if present, and then repair the fabric with a patch and a few chemicals. In both cases, you’re flying again in short order (depending on the severity of the damage of course).
Repairing a composite airplane isn’t always so straightforward. Although damage to the composite exterior is readily apparent, detecting damage beneath it is often difficult. After assessing all the damage, repairing a composite structure usually means greater downtime because of the cure times resins and adhesives require.
For example, a builder (certainly not you) accidentally drops a wrench on the wing of a composite airplane. All the builder sees is a small crack in the surface, but has the wrench’s impact damaged the underlying surface? Will the crack allow moisture to penetrate into the part? How can the builder tell what the total damage is? How does he or she repair it-and should the builder be the one to make the repairs?
Legally, if you have a production composite aircraft, only a certificated airframe and powerplant mechanic or repair station can make and sign off the repair, although some may let you assist in the repair. If you have an amateur-built aircraft, you can repair it regardless of your qualifications. But let’s apply some common sense to this. If you didn’t build the airplane-and you do not have a basic understanding of composite materials- then you don’t need to attempt these repairs. With anything that’s beyond repairing simple, cosmetic surface scratches you should find help.
Composite Wounds
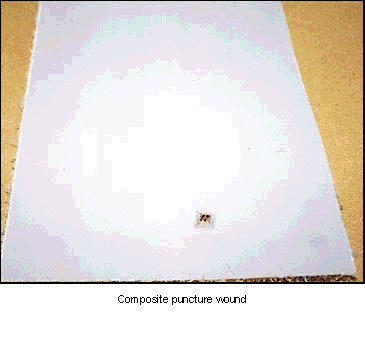
Like humans, composite airplanes suffer several types of wounds. Hangar rash or surface abrasions are small scratches and dents that can be easily repaired. Puncture wounds are usually the result of some sort of impact. The damage may result from a tool being dropped on a surface or by someone accidentally gouging an area with a sharp object.
Often difficult to detect, "disbonding" is serious damage that denotes a separation between the skin and the underlying core material. Delamination is one of the most common types of damage. An impact force such as a bird strike or hitting a hangar door can cause delamination, which can be visible if near the surface.
An impact force can also cause core damage-and it can occur during construction. All cores are susceptible to damage. Excessive heat can be a culprit, as can a fuel leak, which may completely eat away the internal foam core. The sun’s UV rays, paint stripper, impacts, and other forces can cause resin damage. Determining the amount of resin damage and the resulting overall strength of the structure is difficult.
Water intrusion is more of a problem on aircraft with honeycomb cores, but you can find it with other types of core materials. Water seeps into the underlying laminates through a crack that develops in the surface materials. If enough water finds it way into the core material, over time it adds weight to the structure, and this weight may create flight control balance problems. And if the water freezes, the ice may delaminate or otherwise damage the core. Finally, major structural damage is usually the result of overstressing the structure, accidents, and so forth.
Simple Repairs
We’ll discuss simple repairs here because only knowledgeable mechanics or builders should undertake major structural repairs. Do not attempt to repair major structural components unless you have a complete understanding of what you are doing and have support from the designer or kit manufacturer. The steps involved in composite repair are:
- Detect and assess the damage
- Identify component
- Remove Paint
- Design the repair
- Obtain materials and tools
- Remove the damaged area
- Effect the repair
- Allow proper curing time
Damage Detection-As already mentioned, finding and assessing damage to a composite structure isn’t always easy, and it can be downright difficult. Surface damage is readily apparent, but underlying structural damage often goes undetected. Without sophisticated detection methods such as ultrasonic inspection, it may be impossible to detect damage beneath the surface.
Visual inspection and "tap testing" are the most common inspection methods builders have at their disposal. Determining damage visually is fairly self-explanatory, and major damage will be readily apparent. The challenge is ascertaining the extent of less apparent damage. Look for surface cracks, dents, scratches, bumps, or humps you haven’t seen before. Heat damage (particularly in engine cowls) changes the paint color, etc. If you are unsure about an area, ask someone with composite experience to inspect the area. Always remember that visual inspection only detects surface damage. It can be misleading because of the possibility of damage to the structure underneath.
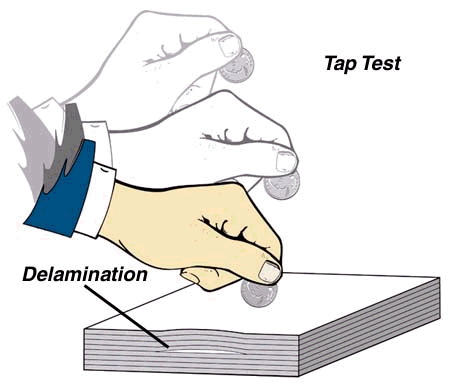
Tap testing is a simple inspection method that works fairly well, particularly on thin laminates. Tap on an area with a coin (a quarter will do). Listen for a change in the taps’ tone as you move from one area to another. To tune your ear, tap an area that you know is sound and then compare the sound you hear when tapping an area of suspected damage. The change in sound will usually indicate a problem underneath-either a delamination or the damage of a laminate.
You can use this method to map out the damage needing repair. Small tap hammers are available for this test, and composite repair facilities have electronic hammers that show changes in the density of a material as the area is struck. When performing a tap test, be aware that the damage might be more substantial on the back side of the structure than where you are testing.
Here’s the deal. Assume you have a rock strike or drop a tool on a composite surface. Even light damage will spread out in a cone-shaped area from the point of impact. This means delaminations can occur on multiple plies, and usually they’ll be larger on the back side of the structure than on the impact side. This is true on both solid laminates and sandwich-type structures.
As you tap-test, try to gain access to the back side of the structure, where you’ll often find a larger area of damage. If you can’t get to the back side, at least be aware that the damaged area would be more extensive in this side. Tap-testing in the impact area will not reveal this damage.
If you’re unable to completely determine the extent of damage, you may want to take the airplane to a repair facility that has more sophisticated testing equipment such as ultrasound (and even ultrasound has certain limitations).
Component Identification-In an ideal situation you’ll identify the composite components before you repair the structure. In other words, you know the nature of the core material, the type of resin and reinforcement fiber used, and the number of layers of cloth and their orientation. This information helps you make the proper repair, and if you built the airplane you’ll have it. If you didn’t build the airplane, you should be able to find details of construction in the builder’s log or gather data from the designer or kit manufacturer.
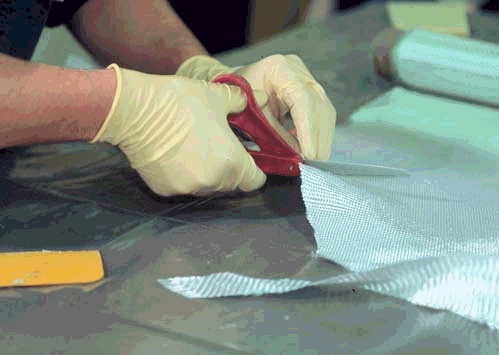
Paint Removal-Removing the paint will help you better determine the extent of damage and identify component materials. Do not use paint strippers. They will add to the damage you’re repairing. Sanding is probably the best way to remove paint.
Design the Repair-After determining the extent of damage, you need to design the repair. If the area is significant, you probably will want to involve the designer or kit manufacturer. This is certainly true if the repair involves a structural part. You’ll need to lay out the damage and decide how deep the repair should go. In other words, do you need to replace layers of glass? Is the core material damaged and, if so, do you need to replace a portion of it? What type of material are you going to need? What about tools-anything special? What type of repair is needed?
There are four basic types of repairs. Nonstructural repairs are mainly cosmetic and involve filler material, sanding, and repainting. Semistructural repairs are those where the structure’s strength isn’t important. An example would be the plug-and-patch repair where you remove and replace a portion of the core material and rebuild the area with laminates.
A resin injection repair is often used for a delamination. You mix some resin and inject it into the damaged area using a syringe. Usually it’s restricted to damage involving one ply. Usually considered a temporary measure, it’s a quick and inexpensive repair that usually is not long lasting.
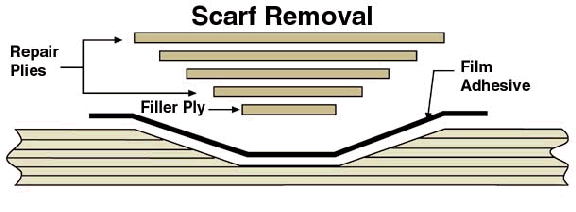
A structural repair obviously is used on the airplane’s structural parts. It is much more extensive than the other repairs discussed above and involves several different methods. You can remove the damaged area using the scarf method, which tapers the laminates as you remove the bad layers. The resulting repair will be flush with the surface of the airplane. Step removal is another method. It’s similar to a scarf patch except you cut back the underlying plies one by one in a terraced fashion. The resulting plateau areas are then filled in with new laminates.
Part of designing the repair is deciding whether you want to attempt it. You may need to bring in someone else to help you with the repair or you may decide to hire a professional. Unless you have proper knowledge and/or training, hiring someone to repair your composite airplane may make sense. This is certainly the case if primary structures are affected.
Next month we will continue our discussion by completing the steps of repair as outlined.
