Those Amazing Spark Plugs
By Tony Bingelis (originally published in Sportplane Builder, May 1995)
I guess everybody knows what spark plugs are and what they do . . . in a vague sort of way, that is. Anyhow, most of us know enough about spark plugs to have gotten by so far. But, could it be that some of us are unaware of essential spark plug information that could well affect our pocketbook and perhaps the safety of our future flights? Here’s a brief review of the essentials, and what we should remember about spark plugs - especially the parts they play in the safe operation of our engines.
Spark plugs don’t look very impressive, but be assured that those simple looking steel plugs screwed into your engine are precision-built and sturdily constructed to withstand extreme temperatures and pressures during engine operation. They are far more complex than their outward appearance would lead you to believe.
It is not surprising, then, that spark plugs are expensive little buggers and, if for no other reason, deserve careful handling and a certain amount of attention. After all, by the time you pay for the eight shielded spark plugs your little four-banger Lycoming or Continental needs, you will have parted with about $100.
Are Those Plugs Right For Your Engine?
Spark plugs come in two sizes, the smaller ones fit the 5/8" x 24 threaded cylinder holes while the larger cylinder spark plug openings take the 3/4" x 20 plugs.
Your engine probably came into your possession with the spark plugs already installed. If the engine was new you would naturally expect that the engine manufacturer had installed the correct plugs. However, if you bought a used engine, it is quite possible that the previous owner may not have been using the right spark plugs for the engine.
Verify for yourself that the plugs installed are the correct ones as shown in the FAA and manufacturer’s approved spark plug listing. This is extremely important because if, for example, the wrong reach plugs are installed, spark plug seizure and improper combustion may occur. Not only that, you should inspect those used spark plugs to determine what kind of story they can reveal about themselves and the part they played in the engine’s operation to date.
If Spark Plugs Could Talk
You might overhear some pretty candid remarks:
About being lead fouled: "My appearance due to those cinder-like deposits or dark glaze you see was caused by the engine operating too cold. Sometimes the fuel doesn’t get vaporized like it should and, of course, the high lead content of the fuel I’m exposed to is mostly to blame a good part of the time."
About being oil fouled: "On the other hand, you can bet my wet, oily appearance with carbon deposits is usually brought on by piston rings that are broken or worn. Sometimes, however, it is due to excessive valve guide clearance. And, naturally, during an engine’s break-in period I can get oil fouled also . . . hopefully though, the fouling will quit when the rings seat themselves."
About carbon fouling: "Most often I acquire that black, dull, sooty deposit because of an idle mixture that is too rich. Often the condition is brought on, or further aggravated, by excessive ground idling . . . and you know who is guilty of that."
About being worn out: "We spark plugs get old and worn out, too, you know. That’s when my ground and center electrodes become eroded leaving my electrode about half its original thickness. This may be normal with the passage of time but, on the other hand, it indicates I am eligible for retirement."
About being normal: "When I am myself you know I am the right plug for the engine’s heat range requirements and my appearance is a nice healthy brownish-gray with only a slight sign of electrode wear. All I need is a little bit of cleaning and, maybe, regapping before you put me back to work. Oh, yes, how about giving me a nice new engine seat gasket, too?"
You can bet your boots spark plugs could tell you plenty more about their trials and tribulations and how they would like to be treated, but let me take it from here.
How To Remove Spark Plugs
This is a relatively easy job providing you follow the proper procedures for removing the spark plugs:
1. First, loosen the shielded terminal elbow nut on the top of the spark plug. Use a 3/4" open end wrench (most small Lycomings). These ignition lead terminal nuts should not have been tightened excessively . . . some builders do, however.
2. Next, pull the terminal sleeve assembly straight out taking care not to damage either the spring, cigarette, or barrel insulator.
3. Now, you can loosen and remove the spark plug (it will be an 18mm plug with 5/8" x 24 threads for most small Lycomings), using a deep-reach 7/8" six-point socket.
Be sure you seat the socket securely on the spark plug hex.
Furthermore, be careful not to cock the wrench lest you damage the insulator or connector threads.
NOTE: Sometimes carbon will build up on the end threads of the spark plug making it difficult to loosen. If the plug is tightly seized, do not apply a lot of torque in an attempt to remove it. Never use an impact wrench because it may cause the plug to snap off. The safest procedure would be to start the engine and run it until the CHT (cylinder head temperature) reaches its operating range. Immediately shut the engine down and you should be able to loosen and remove the plug from the now hot cylinder.
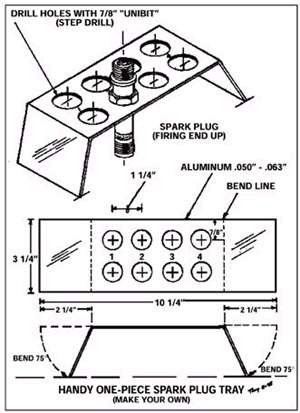
4. Remove your plugs in pairs from each cylinder and place them in a spark plug tray (a homemade one is O.K.) arranged by cylinder number.
Place the plugs in the tray with the electrodes up. This way you will be able to see if any of the plug’s firing ends look noticeably different. Such a clue could simplify your troubleshooting if a problem exists.
5. Be sure to remove the copper gasket from each spark plug and discard it. A conscientious builder will always keep spare spark plug gaskets on hand for immediate replacement.
Cleaning and Reinstallation Preparations
If your plugs look oily, before reusing them, wash off the firing ends with unleaded gasoline, naphtha, Varsol or Stoddard solvent. Apparently no other solvents are approved for plug degreasing by either AC or Champion.
After the plugs have been thoroughly degreased, blow-dry the electrodes with compressed air.
Next, give the firing end of the plugs an abrasive blast cleaning if they need it. If necessary, find a shop that will allow you to use their spark plug abrasive cleaning machine, or you can buy one of those economical hand-held air blast spark plug cleaners . . . they do work quite well.
NOTE: If you have an extra set of spark plugs, simply install the new (clean) plugs and put the removed plugs aside to be cleaned at your leisure, later, without keeping your plane out of commission just because you have to get the plugs cleaned somewhere.
Gapping the Plugs
After the plugs have been cleaned, and not before, you will be ready to check the spark plug gaps.
The Spark Plug Gapper I use is the economical one sold by ATS (Aircraft Tool Supply Co.) for less than $10 (1-800/248-0638). It is simple to use on the massive electrode aircraft plugs most homebuilders use.
When you set the gaps, be careful that you don’t bend the brittle center electrode because a ceramic fracture is sure to occur. Check the gap setting with a "GO/NO-GO" type round wire feeler gauge.
I set my plug gaps on the low side to a .016" gap . . . which should be O.K. for most any spark plugs. Lycoming recommends a .016 -.021" gap setting, while Continental prefers a .015-.018" gap range.
Why settle on the lower .016" setting? Logic. The plug electrodes are continuously eroding in use. So, what happens? That’s right, the spark plug gap increases (never decreases). Therefore, by setting my plugs at their lower gap range, I won’t have to readjust them for many flying hours.
How To Reinstall Your Spark Plugs
First, an admonition. Never install a spark plug that has been dropped accidentally. Throw it away! It could have been damaged even though you can’t detect any visual signs.
If when you removed the spark plugs you placed them in a numbered plug tray, you should have no difficulty in "rotating the plugs" as most authorities recommend. Basically, this is switching the top plug with the bottom plug in the same cylinder.
You can go one step further and rotate the plugs to reverse their firing polarity by swapping the top plug of a cylinder with the bottom plug of the next cylinder in firing sequence. This will rotate the plugs from one magneto to the other.
Supposedly, this increases plug life, but I am not sold on it. A simple plug rotation swap, about every 100 trouble-free hours, from bottom to top, is good enough for me.
Apply Anti-Seize Compound to the lower threads being very careful not to get the compound anywhere on the first two threads. To do so would increase the risk of the compound seeping into the plug and contaminating its electrode.
A few builders believe that engine oil is just as good for lubricating spark plug threads prior to reinstalling them . . . I do not agree!
Make one final check of the firing end of each plug visually before installing it. Look for ceramic cracks or foreign matter.
Install a new copper gasket on the plug before you insert it in the cylinder head. Always replace the used 18mm copper gaskets because, in time, old gaskets become flattened and hardened and may not seal properly.
If a thermocouple gasket is to be installed for a cylinder head temperature gauge, do not install the regular copper gasket under that plug.
And finally, screw the spark plug into the cylinder head as far as you can by hand. If you can’t get the spark plug started most of the way by hand, remove the plug and clean the threads with a wire brush.
Use the correct size six-point deep reach socket fitted with a torque-indicating handle. (Don’t use vise grip pliers or any other "clever" substitute tool.) Tighten the spark plug to the torque limit specified by the manufacturer. In the case of the small Continental and Lycoming engines, 30 foot-pounds (360 inch-lbs.) will be sufficient. The torque range for Lycomings is 30-35 foot-pounds (360-420 inch-lbs.) and for Continentals, 25-30 foot-pounds (300-360 inch-lbs.). Don’t guess or rely on an educated elbow for the proper torque.
However, if you have no torque wrench, use a short handle (no longer than 10") with your socket to keep from overtightening the plug.
NOTE: Undertorquing the plug may allow the hot gases to blow past the threads . . . a loss of compression and burn damage to the cylinder can follow. On the other hand, overtorquing overstresses the plug and may result in damaging the seal. Consequently, the next time you try to remove that plug expect to have a difficult time of it.
The last installation step is to connect the Spark Plug Terminal Connector for the spark plug lead. Before connecting the terminal sleeve, be sure to clean it with a cotton swab or lint-free cloth moistened with MEK, naphtha, alcohol, acetone or lead-free gasoline.
Once cleaned, don’t touch the cigarette connector or spring with your fingers (oily salt contamination, you know).
Check that the inside of the spark plug shielding barrel is also clean and dry. When you insert the assembly, do so carefully screwing the connector nut on finger tight while holding the ignition lead elbow to keep it from twisting. Complete the installation by tightening the nut with a 3/4" open end wrench no more than another 1/4 turn.
Many builders overtighten this connector nut and run the risk of cracking the shielding barrel.
What A Magneto Check Can Tell You
Your spark plug installation is not considered to be completed until after you have thoroughly checked both ignition systems.
Start the engine and make your mag check only after the engine has warmed up a bit and the rpm has stabilized. Naturally, you would expect a rpm drop when switching to a single magneto operation. However, pay particular attention to the amount and speed, or absence, of rpm drop:
1. A fast rpm drop almost always means the spark plugs or ignition harness is faulty. This, naturally, has an immediate effect on the power output for the cylinder(s) affected.
2. A slow rpm drop is often the result of incorrect ignition timing. Late timing is indicated when the charge is firing too late in the piston’s travel. Therefore, the power loss is higher than normal for single ignition. This power loss is rather slow as compared to the instantaneous drop accompanying a dead spark plug.
3. Sometimes on an ignition check an incorrect fuel mixture may also show up as a slow rpm drop when one or more spark plugs are affected.
A Few Practical Suggestions
Buy a second set of spark plugs before you need them. Be sure they are the recommended plug for your engine.
Both Champion and Auburn have application and service manuals listing FAA approved plugs for a variety of engines. Or you can check with your nearest aviation parts department for the best spark plug for your engine.
You should pull your plugs and look at them at least once every 100 hours. Of course, if you are plagued with frequent plug fouling, a more frequent 50 hour look-see is suggested with special attention given to the bottom hole plugs.
To get the most out of your spark plug life, rotate your plugs regularly. That is, move the top plugs to the bottom and the bottom plugs to the top in the regular firing sequence. This will offset the fouling tendency in the bottom plugs.
Spark Plug Trivia
A spark plug of the massive electrodes type should not be operated with a gap larger than .025" maximum. The larger the gap the greater the voltage required to fire it. I understand that over a 100 hour operating period a spark plug will have had to fire 7,000,000 times. How about that?
