Repairing Sheet Metal - Dealing with dents, scratches, cracks, and missing rivets
By Ron Alexander (originally published in EAA Sport Aviation, August 2000)
One of the advantages of building your own airplane is that, if you build it, you can fix it. Repairs to sheet metal airplanes fall into two categories: simple, which doesn't involve damage to structural members or affect the balance of control surfaces, and major, which encompasses repairs not covered by the simple category. We'll address simple repairs here. If you face major repairs and you don't have knowledge adequate to deal with them, get the assistance of someone who does.
Making these repairs applies to homebuilts only. On production airplanes, you can do the work permitted by Federal Aviation Regulation Part 43, but an authorized airframe and powerplant (A&P) mechanic or FAA-approved repair station must supervise your efforts-and sign-off all repairs to production aircraft. As a homebuilder, you can repair any surface on a wood, metal, composite, or tube-and-rag airplane. But use some discretion and don't attempt repairs beyond your capabilities and knowledge. Building the airplane may not give you the required skills and knowledge because repairing a structure is different than building it.
If you're not sure how to approach a repair, get the assistance of a qualified aviation sheet metal mechanic. In all cases, your primary reference for all repairs is FAA Advisory Circular 43-13-1B, Acceptable Methods, Techniques, and Practices-Aircraft Inspection and Repair. Another excellent source is Aircraft Sheet Metal, published by Jeppesen.
Assessing Damage
The first step in any repair process is assessing the damage to determine whether it's simple or major. Minor damage to a sheet metal structure includes missing or damaged rivets, scratches or small dents, a small crack, and a corroded sheet metal surface. Damage that exceeds the scope of these items is, in most cases, major. For example, deformed rivets often indicate damage to a sheet metal structure, and your inspection should include an area well past the deformed rivets.
If you own a production airplane, call a knowledgeable A&P mechanic, and if you own a homebuilt, you might want to call the kit manufacturer or designer. Damage to the surrounding area might be hidden, and the manufacturer should be able to offer guidance on how to properly make the repair. A damaged control surface is an example. The repair might be simple, but any change to the surface affects its balance, which can lead to flutter in flight. To complete the repair, you'll need to rebalance the surface and perhaps other components or surfaces attached to it.
Replacing Rivets
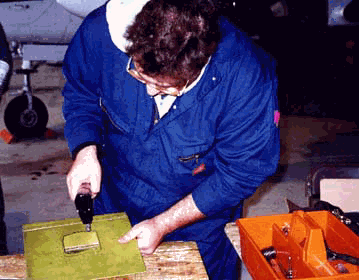
Finding missing rivets is not uncommon. Their loss could be the result of improper installation, corrosion, or some sort of underlying damage. You need to find out why it's missing and investigate the surrounding area for additional damage. Look for damaged rivets, the heads of which may be slightly slanted or raised. If you can place a 0.020-inch feeler gage under the rivet head, it's been stretched-an indication of damage.
Replacing a missing or damaged rivet is a fairly easy task. Repairing any additional damage to the sheet metal structure itself possibly could be classed as a major repair. When replacing a rivet, use the exact same type originally used. If you built the airplane, you should know this information. If you bought the airplane already built, check the plans and/or builder's manual or call the kit manufacturer. Most likely, you'll need "AD" rivets, which have a dimple on the rivet head.
Naturally, you'll have to remove the damaged rivet. It sounds simple, but you must use extreme care to keep from making the problem larger. (If you built the airplane, you're probably well-versed in removing rivets.) When drilling out the damaged rivet, you do not want to make the hole larger. Make sure you use the proper size drill bit.
During original installation, builders drill rivet holes slightly larger than the rivet's diameter to allow the rivet to drop into place without force, which scrapes off the rivet's protective coating. When they properly drive (or set) them, the rivets expand to fill the hole. Drill bit sizes are based on numbers and letters. The most common rivet diameters are 3/32-inch and 1/8-inch, and their corresponding drill bit sizes are 40 and 30, respectively. A 5/32-inch rivet requires a size 21 drill bit, and a 3/16-inch rivet requires a size 11 bit.
To remove rivets, use a hand drill (a pneumatic drill is usually preferred) and a bit slightly smaller than the one used to originally drill the rivet hole to the proper size. This is a safeguard against enlarging the rivet hole. Make sure the bit is sharp, and consider using a split-point bit, which makes it easier to keep the bit on the rivet head when you start drilling. (Don't forget your eye protection.)
When removing rivets, do not drill any farther than the rivet head. Do not attempt to drill into the sheet metal itself. After drilling into the head, use a pin punch to pry off the rivet head. Then use a punch smaller than the rivet shank to drive the rivet out of the hole. Your goal is to remove the rivet without enlarging its hole or damaging the sheet metal.
The strength of a riveted piece is based upon the rivet's expanded diameter. This is why it's important to drill out the rivet using the proper size drill and to replace it with a rivet of the proper diameter and length. The length must be such that the shop head (driven head of the rivet) must expand to form a head that is 1.5 times the diameter of the shank. Rivets may be cut to proper length using a rivet cutter.
What kind of replacement rivet you'll use also depends on whether you can reach the backside of the rivet. If you can hold a bucking bar on it or apply a rivet squeezer, use the same type of rivet that originally filled the hole. If you cannot reach the rivet's backside, you'll need to use an aviation-grade blind rivet. Using a blind rivet eliminates the possible need to cut an access hole in the surface to apply a bucking bar to a standard rivet. There are many different types of blind rivets available, such as friction-lock cherry rivets, CherryMAX rivets, mechanical-lock cherry rivets, etc. A special tool must be used to install most of these rivets.
Scratches, Dents, and Small Cracks
Scratches happen, and you should repair them to prevent corrosion from taking place. In addition, scratches can lead to cracks. To prevent this, in most cases you can burnish or polish scratches smooth, and the best tool to use is a high-speed grinder with a Cratex abrasive wheel. This special, rubberized wheel is designed for use on sheet metal. Available at most industrial supply houses, it will allow you to easily remove the damaged area without further damage.
You can repair a small dent with a filler material. SuperFil is an ideal filler material because it does not shrink with time. Bondo filler tends to shrink after being applied. Apply the SuperFil with a squeegee, let it dry overnight, sand it smooth, and touch up the area with paint.
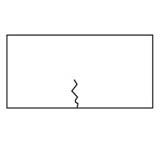
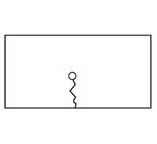
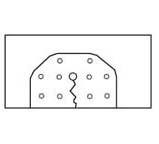
Small cracks are a common problem on sheet metal airplanes. Created by vibration, you'll often find them developing on areas like the engine cowling. The common fix is to "stop drill" the crack with a small diameter drill bit. In other words, you drill a small hole at each end of the crack in the hope of stopping its growth. This fix is not a repair. To repair the crack, after you stop drill it, rivet a small sheet metal patch of the same type and thickness metal over the crack to restore the area's strength and to keep vibration from acting on it further (see Figure 1).
If you have a crack in a 0.032-inch aluminum skin, stop drill both ends of the crack. Then cut a small patch out of a piece of 0.032-inch aluminum, making sure the patch provides adequate room for riveting and has no abrupt changes in its shape. Rounded or several-sided patches are preferable over a square patch. AC 43-13 1B is your reference for determining the patch's rivet layout. With the rivet layout complete, you can drill the holes using the proper size bit and hold the patch in place with Cleco fasteners. Once you're satisfied with the fit, remove the Cleco fasteners, apply zinc chromate to the backside of the patch to prevent corrosion from forming, and then rivet it in place.
|
|
|
|
|
Vibrations will cause a crack |
Stop-drill the end of the crack to |
Rivet a small patch over the |
Corroded Sheet Metal
It should be obvious that corrosion weakens sheet metal. To prevent this, remove all corrosion you discover with fine sandpaper, Scotch-Brite pads, or aluminum wool. A high-speed grinder with a Cratex wheel is another good way to remove corrosion. Never use a steel wheel or a wire brush.
After removing the corrosion, acid etch the aluminum by washing it with Poly-Fiber's E-2310 Acid Etch, diluted with water, or a similar product. An acid etch removes oil and light corrosion, and it etches or roughens the surface to create a good surface for the primer to bond to.
After thoroughly rinsing the area, wash it with E-2300 Conversion Coating. This inhibits corrosion and further enhances the primer adhesion. Rinse the area again and let it dry completely before priming and painting the surface.
Depending on the corrosion's location, you might have to remove and replace rivets, and we discussed this process earlier. In some cases, the corrosion might be so great you'll need to replace the sheet metal itself. Generally, this counts as a major repair, and you should seek assistance from knowledgeable sources before attempting the repair.
Definition of Sheet Metal Defects
One person’s ding is another person’s dent. Here is how FAA Advisory Circular 65-15A, Airframe and Powerplant Mechanics Airframe Handbook, the types of damage and defects you may see on sheet metal parts.
BRINELLING-Occurrence of shallow, spherical depressions in a surface, usually produced by a part having a small radius in contact with the surface under high load.
BURNISHING-Polishing of one surface by sliding contact with a smooth, harder surface. Usually no displacement nor removal of metal.
BURR-A small, thin section of metal extending beyond a regular surface, usually located at a corner or on the edge of a bore or hole.
CORROSION-Loss of metal from the surface by chemical or electrochemical action. The corrosion products generally are easily removed by mechanical means. Iron rust is an example of corrosion.
CRACK-A physical separation of two adjacent portions of metal, evidenced by a fine or thin line across the surface, caused by excessive stress at that point. It may extend inward from the surface from a few thousandths inch to completely through the section thickness.
CUT-Loss of metal, usually to an appreciable depth over a relatively long and narrow area, by mechanical means, as would occur with the use of a saw blade, chisel or sharp-edged stone striking a glancing blow.
DENT-Indentation in a metal surface produced by an object striking with force. The surface surrounding the indentation will usually be slightly upset.
EROSION-Loss of metal from the surface by mechanical action of foreign objects. such as grit or fine sand. The eroded area will be rough and may be lined in the direction in which the foreign material moved relative to the surface.
CHATTERING-Breakdown or deterioration of metal surface by vibratory or “chattering” action. Usually no loss of metal or cracking of surface but generally showing similar appearance.
GALLING-Breakdown (or build-up) of metal surfaces due to excessive friction between two parts having relative motion. Particles of the softer metal are torn loose and “welded” to the harder.
GOUGE-Grooves in, or breakdown of, a metal surface from contact with foreign material under heavy pressure. Usually indicates metal loss but may be largely displacement of material.
INCLUSION-Presence of foreign or extraneous material wholly within a portion of metal. Such material is introduced during the manufacture of rod, bar or tubing by rolling or forging.
NICK-Local break or notch on edge. Usually displacement of metal rather than loss.
PITTING-Sharp, localized breakdown (small, deep cavity) of metal surface, usually with defined edges.
SCRATCH-Slight tear or break in metal surface from light, momentary contact by foreign material.
SCORE - Deeper (than scratch) tear or break in metal surface from contact under pressure. May show discoloration from temperature produced by friction.
STAIN-A change in color, locally causing a noticeably different appearance from the surrounding area.
UPSETTING-A displacement of material beyond the normal contour or surface (a local bulge or bump). Usually indicates no metal loss.
