Aircraft Welding and Steel Tube Fabrication Part 7
A Primer for the Novice Aircraft Builder
By Budd Davisson (originally published in EAA Experimenter, February 1988)
TROUBLESHOOTING YOUR WELDS
One of the fortunate things about aircraft welding is that it has been around for so long that there is a tremendous backlog of experience which covers just about every type of problem or mistake that can be made. That's not to say you won't come across a problem that nobody else has had . . . airplane structures being what they are, you are bound to come across a lot of totally unique welding situations. However, 90 percent of the problems you will encounter have been plaguing welders for nearly 75 years, and you might say that "we," as an industry, have pretty well gotten the hang of it.
The following paragraphs highlight some of the more common problems, what causes them, and how to deal with them. If you have what appears to be a mechanical problem that's not covered here, go see your welding equipment distributor. If you have a serious welding problem, it's worth a few dollars to either take the piece to a professional to look at or hire a highly experienced aircraft welder to come look over your shoulder and see what you're doing wrong.
The Torch "Pops"
It's not unusual to get what appear to be small explosions, or "pops" between the torch tip and the weld itself. When this happens, it's not only disconcerting, but it blows molten metal around, which can be downright uncomfortable. This can be caused by one of the following:
1. The flame is turned too low for the torch tip being used. Go to the next smaller tip.
2. You're almost out of acetylene. You are sucking acetone from the bottom of the tank, so go get a refill.
3. Torch tip is being held too close. Move it back a little.
4. Possible equipment problems. Although this is not likely, when in doubt, have your regulators and torch looked at by a repair shop.
Puddle "Dries" Up
Sometimes you'll find the puddle has a tendency to cool when you are welding and appears to dry up. Most of the time this is caused by:
1. Not enough preheat. You are moving into an area where the mass of metal is such it is still sucking heat away from the weld and should be heated up more before you progress any further.
2. Filler rod is too large. Don't forget the filler rod is a heat-sink, too, and using too large a rod for the thickness of metal and the size of puddle being worked means that when you dip the rod into the puddle, it sucks all the heat out of it, instead of being melted to become part of the puddle.
3. Feeding too much rod. Even if you are using the right-sized rod, it is quite possible to run it into the puddle too quickly, which is asking too much of both the puddle and the torch, and the rod causes the whole puddle to cool off and solidify.
4. Too great a torch angle. If you point the torch too far forward, or in other words lay it down too much, it is directing heat away from the immediate area, i. e. you are trying to heat too big an area and aren't concentrating the heat. Straighten the torch up so it is pointed at the weld at approximately 30 to 45 degrees.
Rod Sticks to Surface
One of the more common and certainly more frustrating incidents in learning to weld is having the welding rod stick to the surface. It is not only unprofessional looking to leave a welding rod sticking out of your airplane structure, but slowing down to melt the rod loose usually causes a discontinuity in the bead (See Figure 1).
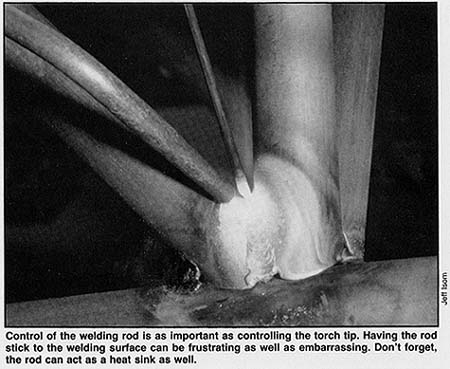
The causes of rod sticking are often:
1) Jabbing the rod in too quickly. This causes that portion of the puddle to cool off, and the rod becomes part of the puddle without detaching itself from the rest of the rod.
2) Poor rod control. In other words, you're not putting the rod exactly where you want it. You're either in an unstable position and are shaking slightly or you're holding the rod too far away from the tip and your control is so bad the rod is hitting the surface some place other than the center of the puddle, which is the leading edge directly in front of the torch tip.
3) Not preheating rod. You don't consciously preheat the rod like you do the parent material, but you should be aware that holding the rod a fraction of an inch away from the puddle, always being ready to dip it into the puddle, means that the tip of the rod is picking up heat from the surrounding area, so it is almost ready to melt before you get it in contact with either the torch or the puddle. If you hold the rod away from the little ball of heat that lays on top of the torch/puddle interface, the rod itself will be quite cold, and sticking it into the puddle can cool things off very quickly.
Uneven Bead
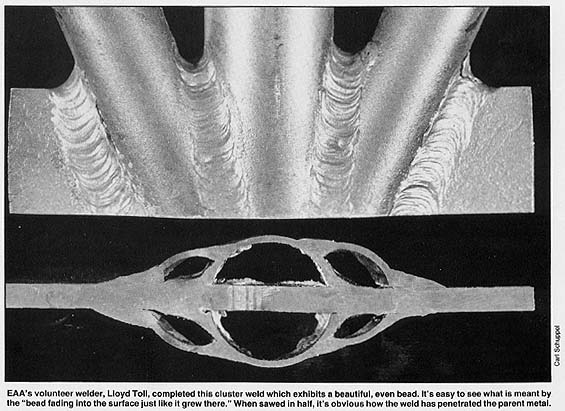
It's instructive to go back and look at some of the fine examples of welding which can be found on older aircraft, such as 1929 Curtiss Robins. There are some of the most even beads you'll ever see in your life, with each little ringlet or ridge equally spaced from the other, and the edge of the bead just fades into the surface like it grew there. You should look at those beautiful beads laid down by old-time welders (See Figure 2) so you'll know what you're striving for. Although you may never reach the perfection those old-time professionals did, you should at least have a weld that is uniform and pleasing to the eye, instead of having the classic "bird dropping" appearance.
Just about everything you do in welding changes the appearance, and especially the evenness of the bead, but the more common problems are listed below:
1) Melting the rod too high. This causes the drops of metal to fall off the rod tip and splash into the puddle in a random, uncontrolled fashion that really is a bird-dropping derivative. Keep the torch closer to the surface and develop a rhythm of heating the surface with the torch to create the puddle and then dipping the rod, heating and dipping, moving forward in measured increments every time. Above all, the rod must flow into the puddle-not be dropped into it.
2) Unsteady welding position. If you're trying to weld at an arm's length or standing on your tiptoes to reach something, there's no way you can get an even bead, because your hands are shaking like cornstalks. Even a slight amount of instability in either one of your hands will show itself in an uneven appearing bead. So, as we mentioned earlier, do everything you can to get a stable welding position and keep your hands steady.
3) Use a circular motion. Many welders move the torch tip in an almost imperceptible circular motion, which has the effect of spreading the heat a little more evenly and rounding out the shape of the puddle. When the rod is fed into the middle of the puddle, this circular motion helps move the new material into the existing puddle, keeping each of the ringlets well balanced and even.
Can't Get Puddle Started
It's not unusual to run into an area where you can sit there with the torch for what seems like hours and yet the surface never melts and the puddle never forms. There are several possible reasons why the surface never reaches melting temperature:
1) Area not heat-soaked. If the surface isn't melting, it is obvious that all the heat you are putting into it is either going somewhere else or you're not putting enough heat in. Feed more heat into the surrounding area and preheat longer, so the weld area isn't losing so much heat.
2) Using too small a tip. If the tip you are using isn't large enough for the thickness or the mass of metal being welded, you'll never to be able to feed enough heat into it to keep the surface melted. Here, too, the solution is obvious: Go to a bigger tip. It is possible, however, to find weldments that are so large that even your largest tip with its maximum pressure can't keep it warm. This is where you bring in a second source of heat. Many welders have a helper hold a second acetylene torch on the area. However, an excellent source of supplemental heat for a large area is an old-fashioned, garden-variety blowtorch.
Melting Holes in Tubing
One of the more frustrating things in welding thin wall aircraft tubing is to be charging along, getting an excellent weld going, with the bead flowing and the puddle perfectly shaped, and then have a portion of the tubing disappear as you melt a hole in it. When this happens, you have to back the torch away from the area for a second to let it cool, then come back in and feed rod into the edges of the hole to weld it closed. The surest cure for that is not to let it happen in the first place.
1. Tip is too large. Too large a tip runs too much heat into the area too quickly. This can easily cause concentrations, and the immediate area can disappear before your very eyes. If you've got the tip adjusted properly and you find the surface comes up to welding temperature almost as soon as you put the torch on it, then you probably have too large a tip. Move down to the next-sized tip and see if that doesn't make things a little better.
2. Welding too slowly. One of the things you will find in practice is that each combination of torch tip size and material thickness has a natural welding rhythm dictated by the rate at which the puddle is progressing and the rate at which you can dip/feed the rod. If you try to move too quickly, the puddle cools off and the penetration goes to nothing. If you move too slowly, too much heat is fed into a small area, and a chromoly pothole develops. Just remember, if that happens, instantly light the torch for a fraction of a second; then come back in and feed more rod into the area to fill in the hole. So long as you weld the hole properly and it's not too big, it won't affect the strength of the local area.
Giving Off Sparks
It's been mentioned before, but it's worth mentioning again; a weld that is giving off a profusion of sparks is a weld that is oxidized, and is very porous, brittle, and generally rotten. This is not the type of weld with which you want to go flying. However, it is important to know that there are some situations that will cause sparking that have nothing to do with actual weld oxidation.
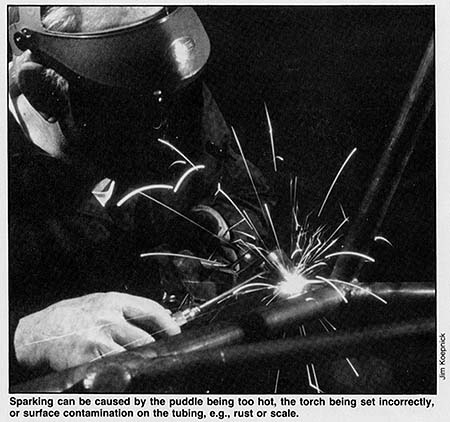
1) Puddle is too hot. If you're using too much heat for the size of the weld, it is possible to heat the puddle up to the point that it is boiling and giving off sparks, although in this case the sparks will be a relatively minor amount. Turn down the torch heat or use a smaller tip.
2) Torch is set incorrectly. If too much oxygen is used in the setting of the torch and a pointed, pale blue inner cone results, oxidation is certain to take place. This is the most common and most damaging of all the situations which cause sparks. Immediately remove the torch from the weld and reset it to a neutral flame or maybe even leave a small amount of "feather" showing on the inner cone.
3) Surface contamination. If there is surface contamination such as scale or rust, as the weld area and the puddle come up to temperature, these contaminants will be burned off and sparks will result. This will happen regardless of the type of flame used or the amount of heat and has no bearing on the weld itself. This can generally be avoided by cleaning the areas to be welded with fine sandpaper and wiping them down with some lacquer thinner to remove any oil. Normally, tubing is clean enough already.
Little or No Penetration
In welding aircraft tubing where there is no intermingling of the parent material, it is critical that the weld bead itself have sufficient penetration into the surface of the tubing to give adequate strength. If penetration is lacking, there is virtually no way to know whether that penetration is there after the weld is made without cutting it apart. However, by keeping a watchful eye on the puddle, and being sure that it is penetrating into the surface, rather than just floating along on the top of the metal, penetration is generally guaranteed. If, in your practice, you find that you can break your welds apart at the surface, or in cutting them open, the weld has not penetrated into the parent material, there are several possible causes:
1. Lack of preheat. With insufficient preheating, it is possible to get only the very surface to melt and accept the bead. As has often been said before, preheating is of paramount importance.
2. Puddle flowing on surface tension alone. When there is insufficient heat available or retained to melt the puddle deeply into the material, it is quite possible to "wet" the surface of the material, which will allow the melted welding rod to flow on the surface tension of the molten metal without actually going into the material. In this situation, the puddle and the weld appear almost normal, except that a careful examination of the leading edge of the puddle will show that it has not "cratered" into the material. The leading edge of the material must be flowing beneath the original surface of the parent material, or there is no penetration.
Gusset Edge Melting Away
Although the actual act of welding a gusset to a tube is an easy weld, once in a while you'll find that the edge of the gusset is melting away faster than you can weld it. This can be caused by several factors, but the remedy is not difficult:
1. Too much heat allowed into gusset. Because the gusset edge requires much less heat to melt than the surface of the tube, it is necessary to direct the heat away from the gusset. Make most of the weld on the surface of the tubing, allowing the edge of the bead to just flow up onto the edge of the gusset.
2. Not controlling heat buildup with rod. If the edge of the gusset tends to melt away too quickly, it's possible to force feed rod into the edge of the gusset, melting the rod faster than the edge of the gusset, soaking up the heat into the melted rod. At the same time, however, you should momentarily take the torch away, to allow the area to lose some of its heat.
Welding Close to End of Tube
If you have an L-shaped joint in tubing in which one tube is welded very near to the end of another tube (a very common type of structure), you will find yourself having all sorts of trouble finishing the weld without burning the edge of the tube away. The same thing occurs anywhere you have a weld where there is such a small amount of material on one side of it that the heat wants to melt the entire area. There are a number of solutions to this type of weld:
1. Weld first; trim later. The easiest solution to the short-tube syndrome is to leave an inch or two extra tubing and trim it off after the weld is made. Sometimes, however, that is not possible:
2. Increase thermal mass of tube. We have mentioned it earlier - but it's a good trick - and that is to insert a loose-fitting bolt (repeat: loose fitting) into an open end of the tubing and then doing the weld. The bolt will make the tube think it is much, much longer, and sink out much of the surplus heat. It's important you use a loose-fitting bolt (at least a sixteenth inch smaller than the inside diameter of the tubing), or grind it to a slightly triangular cross-section; otherwise, the scale buildup on the inside of the tubing will keep you from getting the bolt out.
