Aircraft Welding and Steel Tube Fabrication Part 8
A Primer for the Novice Aircraft Builder
By Budd Davisson (originally published in EAA Experimenter, March 1988)
Working With Tubing
Knowing how to weld tubing is one thing; but knowing how to get it ready to weld - the cutting, the fitting, the jigging, etc., is another entirely different skill which must go hand in hand with that of welding. Fortunately, learning how to make all those little tubes fit so you can weld them together easily is not a difficult task. It is, however, one that requires:
A willingness to make the part two or three times, to get it right. This is especially true in the initial stage of construction, because you are bound to cut some pieces a little too short, grind away a little bit too much and have too big a gap; there's a real temptation to make up for sloppy fit with large, sloppy welds, neither one of which is kosher.
Your ability to visualize. Many of the joints and assemblies you are going to be making require some unusual joints, and you will be able to make them much easier if you try to mentally visualize what's going on inside the joint, so you can have some idea where metal must be taken away to make the tubing fit. More on this later.
View each piece as a single job. The successful builder is one who views every piece of tubing and every fitting as a separate job all unto itself. This has several advantages, not the last of which is that it's possible to finish one of these jobs in 20 or 30 minutes, giving you a feeling of accomplishment and progress.
Don't forget what you're building. When you're working late at night and you're tired, don't let your defenses down. Don't look at a piece that's a little sloppy or a weld that's not going in quite right and let the "that's good enough" attitude overtake your work. Remember, you are building an airplane - a flying machine - something that gets you high enough to get severely hurt or worse -and "good enough" just won't hack it.
In effect, what we're going to try to do now is to go through the very basic steps of putting together a steel tube fuselage. Some of this will be a bit redundant; some of it may be a little too basic for some of you; some of it may even be missing. (Hopefully, we'll cover all of those in the random collection of building tips we'll offer in our last column.) However, starting at the bottom and working up is what aircraft building is all about, and careful planning of chronological events is critical.
Work Space
Depending on the size of the fuselage you're building, you will be amazed to see how little actual space is required for the average tubing fuselage. That doesn't mean, however, you should try to build it in your downstairs bathroom. There is no such thing as too much workspace. Remember, when you get this thing up on its gear, you are going to have to work around it, and you should try to have a work space that gives you a minimum of five feet all the way around it, including front and rear. A normal, single-car garage is perfectly adequate for the average steel tube fuselage. Naturally, a double garage is twice as good.
Make sure the work area is extremely well lit, because a tubing fuselage, once you start putting clusters together, is crammed full of nooks and crannies that you want to see into but often can't.
You should also make certain that the work area has plenty of fire extinguishers. The ideal situation is to have one mounted on the welding cart itself, one on each side of the welding table, and one to carry around with you to set down within an easy arm's reach of where you happen to be squatting at the time.
Tooling
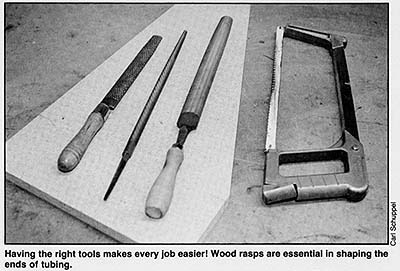
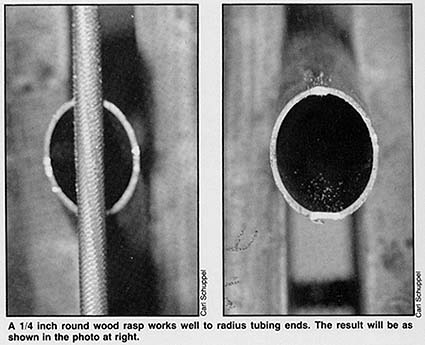
It sometimes amazes people how little specialized tooling is required to build a steel tube fuselage. The real basic minimums would be a hand hacksaw and a bunch of round and quarter-round wood rasps (that's right, wood rasps). This would allow you to cut the tubing and shape the ends so that they nest together to form those complicated little joints you need for welding (See Figure 1).
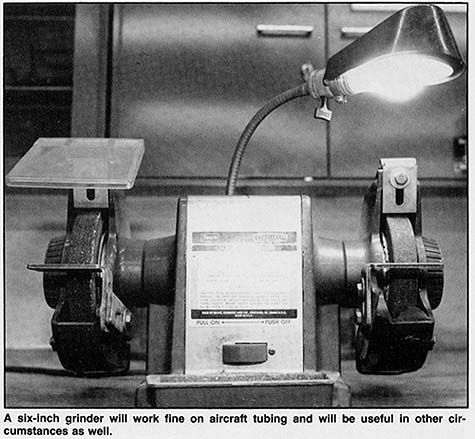
The next logical addition would be an electric bench grinder. Size is of little or no importance; because steel aircraft tubing is so thin-walled, power is not required. However, to make it useful for other applications, a six-inch grinder (See Figure 3) should be considered minimum. When you stop to think that a decent bench grinder is available these days for the price of a good electric drill, it doesn't make any sense to live without it.
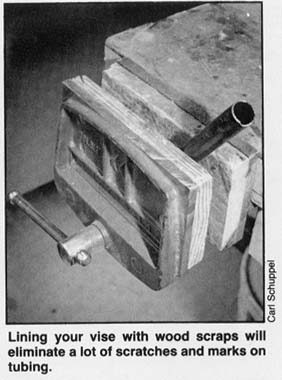
Another absolutely required item is a wood vise (See Figure 2). Here again, the vise doesn't have to be an enormous one, nor does it have to be expensive. A four-inch vise will do the job nicely. Obviously you can't just take a piece of tubing and stick it in a vise, or you'll wind up with terrible marks and scratches on the tubing, something which must be avoided at all costs. Since you'll be using the vise so much for holding tubing and cutting and shaping it, it pays you to take an hour or two and make some special jaws for it. One of the handier type jaw setups is shown in the accompanying photographs and can be made quickly and easily out of scrap hardwood. Incidentally, the best supply for scrap oak and maple for making tooling of any kind is shipping pallets. They are invariably made out of some sort of hardwood, mostly red oak and maple. The best part about them is you can normally get broken ones free, and what you don't use for making vise jaws and other bits and pieces of tooling you can feed into the woodburner you just finished to heat your workshop.
Do not - repeat - DO NOT -mount your vise and your bench grinder on a stationary bench. If you do, you'll find that you spend more time walking back and forth from the fuselage to the grinder and the vise than you do actually building, because no matter where you bolt a vise or a bench grinder, you're going to find it's in the wrong place, eventually. The best situation is to make a portable work station on which the bench grinder and the vise are mounted together - one that can be moved from place to place as the job progresses.
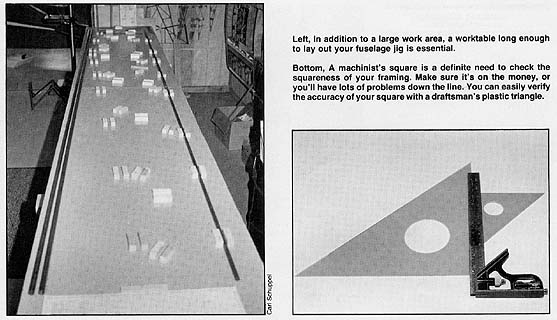
You will need to construct a worktable that will give you enough space to lay out the fuselage and any other welding you may need to do, from landing gears to tails. Since the fuselage may be as long as 12 or 15 feet, the worktable can easily become a project in itself. The traditional worktable is four feet wide, but a 4 x 15 foot table becomes a major obstacle to navigation in the shop. A better plan would be to build two 2 x 8 foot tables that, when bolted end to end, will let you do your fuselage jigging, and bolted side by side will give you a 4 x 8 foot work area for laying out tails and landing gear. Whatever route you take, it is essential that the top of the table or tables be perfectly flat and extremely rigid. Make the top out of 3/4 inch plywood with plenty of 2 x 4 structure underneath. Also, make sure you smooth the edges and round the corners, because you're going to spend many hours leaning against and walking around this table. The last thing you need is to be picking up splinters and gouging chunks of flesh out of your hips every time you walk around it. Underneath the bench you should have a rack/shelf to store your tubing. While you're at it, throw a sturdy cardboard box two feet square underneath to serve as a scrap receptacle. The scrap you save will prove invaluable later on when doing detail work on the fuselage.
Jigging
In an aircraft utilizing steel tube structures, the fuselage is the backbone of the airplane, and the backbone is only as straight as your assembly jigs (See Figure 5) make it. You'll have plenty of opportunities to get your fuselage bent out of shape during the welding process, but if your jigs are not relatively accurate, you're in trouble before you even begin.
A steel tube fuselage, or any steel tube structure, uses the absolute most rudimentary jigs. Basically, they are nothing more than a flat board (in this case, the worktable), with wooden blocks positioned so as to hold the tubing in position while you tack weld it. If that sounds simple, it's because it is simple. Just pay attention to the simplest details and you'll have no problem.
Layout
The first step in setting up a jigboard is to figure out where to put the blocks in the first place. This requires reproducing a side view of the fuselage layout on the board itself with a pencil. If you're building from plans, nine times out of ten all they show you are the center lines of the tubing and the distance between the intersections of the center line, and that's all you need to set up your jigboards.
First, lay out a perfectly straight base line from which to do all of your measuring. Normally, this will be to the bottom or the top longeron. There are a million ways to draw a perfectly straight line, but one way that never fails is to tightly string a piece of wire between two nails driven into the bench top, using the wire as the center line. Take a staple gun and staple that wire to the bench top every ten inches or so, and you'll have a centerline that's hard to ignore. You'll save yourself a tremendous amount of grief later on if you make sure that the base line is perfectly parallel to the edge of the bench, and the edge itself is straight. If you do that, you'll be able to use a carpenter's framing square to lay out your vertical lines.
Somewhere along the line you should have purchased a combination machinist's square-the kind with a 90 and a 45 degree guide on it (See Figure 6). These squares are quite accurate, but you can check it against a draftsman's plastic 90 degree triangle. Then you want to take the machinist's square and use it to check your framing square, because framing squares vary as much as two or three degrees, and you need one that is dead on the money.
Once you've laid out all your center lines, you can start laying out your jigging blocks. To make life easier for yourself, try to use clean, uniform material for the blocks. You can buy 3/4 x 3/4 parting stock at a lumber yard, but it may be a little on the expensive side. Or, you can ripsaw scraps of 1 x 3s or 1 x 4s into strips that are 3/4 of an inch or so wide. It's more convenient if you saw the material so it's as square as possible, so you don't have to worry about varying dimensions when you use it later on for jigging or shimming. Cut the strips into short pieces about an inch and a half long and keep cutting until you have about two coffee cans full.
To aid in getting the blocks located on the jigboard parallel and equidistant from the center line, you will need to make some little jig blocks to aid yourself. One way to do this is to make up strips out of your jig block material that are exactly as wide as the various pieces of tubing you will be using, usually 1/2 inch, 5/8 inch and 3/4. Trim them to be about a foot long, and then mark the exact center line on each end of them. You can lay these strips down on the centerline, line up each end of the strip with the center line on the jigboard, and then glue your jig blocks on the jigboard on either side of this strip.
An alternate to the wooden jigging strip is to actually take a piece of tubing of each size that you'll be using, about a foot long, and hacksaw a slight notch right on center line on each end. Don't worry about wasting the tubing, because if it's a foot long, you'll find an application for it somewhere later on.
When you're gluing down your jig blocks, don't get crazy with the glue; you're not building furniture. Just a slight dab of white glue on the surface of a block will do the trick. If you put the glue on one block and rub another one up against it so that you spread it out nice and thin, you'll find when you force it down on the surface of the bench that it requires no clamping. The surface tension will hold it down. The blocks should be just far enough apart to accept the tubing but have absolutely no slop. Also, you should be able to drop a piece of tubing into its designated space and have it be held by three pairs of blocks and not be binding in any of them. You don't want to force tubing into the blocks, because when you heat it up you are liable to set a bow into the tubing.
When placing your blocks, be aware of the fact that you'll be welding at each end of the tubing and that the tubing will be coming into clusters where you'll have to do some planning to keep the blocks from interfering with one another. As a general rule, if you keep the blocks two to three inches away from the end of the tubing, there won't be much tendency for it to catch fire during the welding process and you won't have block interference except at the busiest of cluster joints. Once you've got all your blocks in place, get ready to cut tubing.
Methods of Fitting Tubes
There are as many different ways of dressing the ends of the tubes so that they fit together as there are builders and restorers. Everybody has their own technique and every single one of them works. They range from the simplest method (a wood rasp) to the most sophisticated (an end mill in a milling machine). Find a method that works for you and stick with it, but don't try to get too sophisticated. You will be amazed how quickly you'll develop the ability to visualize what has to be removed where, and you will be equally amazed at how easy the entire process is.
As mentioned elsewhere, the simplest method - and quite possibly the best - for cutting the radii at the end of the tubing is the old-fashioned wood rasp (See Figure 6). Now, somebody out there is doing double back flips at the idea of using a wood rasp on high carbon steel, but that is the accepted method of doing final trim work. The tubing you're working is so thin-walled that the wood rasp works fine. Get yourself the biggest round rasp you can lay your hands on, which will probably be a 5/8 inch around, 14 inch long rasp. Then get a 9 inch and 12 inch, 1/4 round rasp. Stick the readily available wooden handles on the ends of them, and you're ready to go to work.
The bench grinder is probably the second most common way of radiusing the ends of the tubing, and it works just fine. One trick many builders use in speeding up the process is to round the edges of the grinding wheel and use a wheel the same thickness of the tubing being ground, i.e., a 5/8 inch thick wheel radiused the same amount as used on 5/8 inch tubing.
A few builders don't bother rasping or grinding; they use a pair of "Dutchmen's" metal snips, the most common type mechanical advantage snips available at any hardware store. This methods works fine on .035 tubing, but requires a healthy grip when working .049 and bigger.
In the ever-increasing search for eliminating the massive amount of elbow grease required to fit tubing, quite a number of folks have tried using small hole saws and a drill press to cut the tubing at the right angle and length and cut the radius at the same time. Although this sounds simple in concept, in practice it introduces a precision factor in measuring the required length of tube that may take more time than it saves. The same thing holds true for using an end mill in a lathe or a milling machine to radius the tubing, although in this case the length measurement isn't quite as critical.
Don't get so complicated that you are spending more time playing with your machinery than you are building your airplane. Once you get a rhythm going and your experience level increases, you will be pleasantly surprised at how fast the whole fitting process moves forward.
Fitting Procedure
Once again, there are a zillion different ways and techniques of fitting a piece of tubing into the jig, but almost all are a variation on a basic theme.
Measuring. Don't laugh. There's technique in measuring the length of the tube to be inserted. Theoretically, the length of the tube to be cut should be the center-to-center distance between the two intersections. Practice and theory once again argue with each other, because the actual length you need to cut should be something less than that. Generally, the final length will wind up being about one-half the diameter of the longeron shorter. One way to get the cut length just about right is to take a length of tubing that's too long, radius one end so it fits into the longeron at the required angle, fit it into the jig so that it's tucked into the longeron on one end and laying on top of the other longeron at the other end. Then mark on the tubing with an illustrator's pen - make a line parallel to the tube to be intersected and about a third of the way across the longeron.
Cuffing. If the intersections of both ends of the tubes to be fit are 90 degrees, then cutting is simply clamping it into the work vise and sawing off the ends with a hack saw. If the angles at the ends are anything but 90 degrees, then it's important that you make the cuts on the ends so that they are parallel to each other, i.e. on the same plane. To do this requires clamping the piece of tube to be cut in the vise so that one end which has already been cut to the proper angle is erected so its longest length is up. Then, when you cut from the top down, at least the two ends will have the right length at the right places.
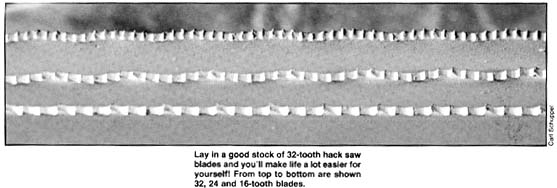
Hacksaw blades. A hacksaw blade is not just a hacksaw blade (See Figure 7): For cutting thin-wall steel tubing, it is essential you lay in a good stock of wavy-edged 32-tooth blades. 24 tooth to the inch blades will work in a pinch, but anything coarser will just hang up in the tubing, which will tear teeth out. Cut right to the bottom line and get the 32-tooth blades and change them whenever you think they're getting dull. Blades are cheap, and a fresh one makes you feel like you're making progress faster.
Radiusing the first end. Regardless of what method you are using to radius the end, the first step is to file, grind or rasp a notch right straight across the middle of the end of the tube. This will center the radius. If you are using a grinding wheel with square edges, then use the edge to cut a deep "V" in both sides of the tubing. If you are using a radiused wheel, cut your radius into both edges of the tubing, but not quite the full depth. Keep a scrap piece of tubing on the bench to test the fit every so often. The smart money uses a quarter-round rasp to do the final fitting; that way you don't make as big a mistake or waste so much tubing. Remember: If the intersection is at an angle, you'll be grinding more off of one edge than you will the other, and it's a whole lot easier to take metal off than it is to put it back on, so go slowly.
Radiusing the second end. The actual fitting of the second end is the same as the first, except there is one other problem . . . you must keep the center line of the radii of both ends parallel to one another. This requires only a little attention to detail. When grinding or filing the initial notch on the second end, develop some sort of technique to make it line up with the one on the other end. The most common technique, for those who have a little experience, is to grab the tubing so the thumb on the right hand is directly in line with the deepest part of the radius on the first end. Then the tubing is fed into the grinder, making certain you're holding the tubing so that your thumb is on the top. There have been a thousand jigging and tooling devices made to aid in lining up radii on both ends, but none of them is a replacement for practice and careful attention to detail. So long as you know the problem exists, you'll figure out a way to solve it.
Test fitting. Don't expect the tubing to block right into place the first time you grind your radius on it. As a matter of fact, you should always plan it so that it doesn't. On the second end always leave a little extra metal so that you can carefully rasp that extra metal away until the tubing fits perfectly and clicks into place between the longeron with about a sixteenth of an inch of slop at each end. Ideally, you'll have a nice, even gap all the way a round the joint, but if you don't, don't worry about it because you are going to weld that gap closed. However, you must be careful that you don't inadvertently have a gap all the way around the joint, except at one point where it contacts the other tubing. If that's the case, when you weld the joint and it expands, that one point will force the longeron out of line and you won't be able to correct for it.
Correcting mistakes. In the unlikely event that you make a mistake in fitting the tubing, don't lose heart - some mistakes can be corrected; those that can't simply mean another piece of tubing must be cut to fit. If you always cut your tubing 1/8" or so overlength and carefully rasp it down to fit, your mistakes will usually be that the radiuses at the ends don't line up. If you try to cut them too close initially, you may wind up with some pieces that are too short, giving yourself 1/8" to 3/16" gap, which is entirely too much, and the piece of tubing should be replaced. To realign the radii so that they match is no problem, since you only have to work on one end, where you carefully rasp away the edges where it's contacting. However, you can only get away with a certain amount of this before you wind up with too big a gap at the joint. You can, however, tolerate a little slop at the corners of the 'T' or the inside of an acute angle, because you have a little trouble getting the weld bead down in that area, anyway. But don't allow any sloppiness to occur on the outsides of the joint.
Tack Welding
Don't tack weld any part of the structure until you have all the pieces in place. The reason for this is obvious . . . since the ends of the crosspieces are radiused to notch into the longeron, or whatever, they usually can't be put in place without disturbing one of the major pieces so as to get the piece into place. If you tack weld part of the frame together, you have a difficult time getting the other pieces in, and some of them just won't go in. So, wait until you have all the pieces in place before you tack weld any of them.
Once you've got everything lined up and ready to tack weld, you should give some thought to protecting the bench top; when you tack weld the tubing, everything within several inches of the joint comes up to kindling temperature almost immediately. There are several ways to keep your bench top from turning into a patch or charcoal: One way is to pick up several six-inch square pieces of black iron sheeting from your local sheet metal shop and trim these so you can slide them under the joint to be welded. Don't use thicker than 22 gauge, or it will distort your layout too much. Also, don't use galvanized metal, because as you burn off the zinc plating, it gives off toxic odors.
One sure way of protecting your bench top is to cut holes in the top everywhere there will be a weld. If the wood's not there, it can't burn. This, however, will return to haunt you when you want to use the bench for other purposes later.
When you light up your torch to do your first tack welds, be aware that you are about to become acquainted with a new nemesis that will become an old nemesis before this project is over . . . warpage. As you heat the tubing up to do the tack weld, you will cause the metal on the one side of the tube to expand and then contract when it's cool. At this stage of the game don't let that alarm you; but you will see the joint that you are tack welding open and close slightly.
When tack welding, bear in mind that you will be pulling the tack welded unit of the jig, and the tacks must be big enough to allow you to do that without any of the tacks coming loose. A tack of approximately 1/4 to 3/8's of an inch will keep the proper relationships between the parts and still allow you to cut it loose should you find that you have made a mistake and have to move something.
