The Installation and Use of Piano Hinges
By Tony Bingelis (originally published in EAA Sport Aviation, May 1985)
We amateur builders have taken the lowly piano hinge and increased its usefulness and versatility by giving it two distinct functions. Its first and primary function, of course, is that of a, simple hinge. The second function is that of a quick-disconnect fastener. But even when the piano hinge is used primarily as a hinge, it can also be made to double as a quick-disconnect fastener as well . . . simply by making the hinge pin (wire) removable.
As evidence of its versatility let's tabulate some of its uses:
- Oil inspection door hinges
- Cowl flap hinges
- Landing gear fairing hinges
- Instrument panel hinge/fastener
- External battery compartment door hinge
- External baggage compartment door hinge
- Cowling hinges/fasteners
- Trim tab hinges
- Control surface hinges
- Inspection plate hinges/fasteners
- Canopy hinges
- Door hinges
- Seat and seat back hinges
That's quite a list, but I am sure there are other unique uses for the inconspicuous but ever present piano hinge.
There is this to keep in mind regarding the use of a piano hinge. Wherever you use it as a hinge, its axis must be straight or the hinged part will bind and be difficult or impossible to operate. On the other hand, a piano hinge used strictly as a quick-disconnect type of fastener will accommodate a moderately curved hinge axis.
PIANO HINGE SPECS., ETC.
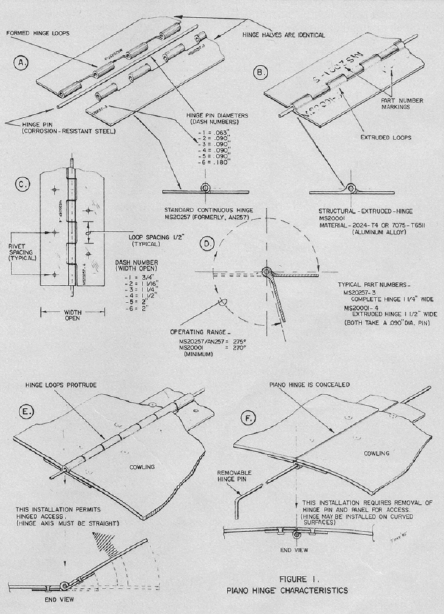
There are two types of piano hinges. One has formed hinge loops and carries the designation AN257 (Figure 1-A).
NOTE: AN used to be the designation for AIR FORCE-NAVY AERONAUTICAL STANDARD. This has been replaced by the more modern MS designation which stands for MILITARY STANDARD. Because of the new designation for military hardware, the old piano hinge, AN257, is now identified as MS20257 (notice that the original 257 number is still buried in the new designation).
The other type is an extruded aluminum hinge designated as MS20001. It is a very strong hinge and is used primarily in structural applications. The extruded MS20001 series hinges are made of either 2024-T4 or of 7075-T6511, two very strong metals (Figure 1-B).
The common piano hinge (MS20257), on the other hand, is made of a softer, weaker grade of aluminum. Because of this and because of its bent hinge loops, it is not as strong as the extruded type of hinge. Naturally, the extruded hinge will cost more - about five times as much as the bent loop hinge.
A piano hinge with formed loops (MS20257) must never be substituted for the stronger extruded hinge, especially where it is to be used in a structural application.
Incidentally, a corrosion-resistant steel piano hinge is also available in the AN257 designation (AN257C) but is seldom used by builders because of its greater weight.
PIANO HINGE PINS (WIRES)
Piano hinges are sold as hinge halves or as complete hinges. This is possible because both halves of a piano hinge are identical. With the price of everything continuing to go up, it is not surprising that some suppliers are selling hinge halves only . . . often for the same price that a complete hinge would have cost. This is an especially vexing situation because there will be no hinge pin in a hinge half section. At any rate, be sure you know what you are ordering.
The hinge pins you use must be of the correct diameter or there will be too much slop in the hinge assembly (see Figure 1, Detail A).
If you need and cannot find a replacement hinge anywhere else, you might try the hobby shops. The piano wire sold there, however, is ordinarily only 36 inches long. Nevertheless, this should be long enough for even the longest of cowlings.
SECURING HINGE PINS (WIRES)
Nearly everyone considers it important to secure piano hinge wires so that they do not work their way out of the hinge under prolonged vibration. I have never seen this happen, but why take chances? Secure that wire somehow.
Sometimes, it is not necessary to make any special provision for securing the hinge pin because it will be naturally restrained due to adjacent structure. This is often the case in a typical oil inspection door installation.
When you use piano hinges to hinge the ailerons, flaps or trim tabs, the hinge pin must be retained in such a manner that it can be easily removed. Otherwise, the hinge would have to be attached to one of the units with bolts or some other removable hardware. This will permit future removal of the control surface for maintenance and repair.
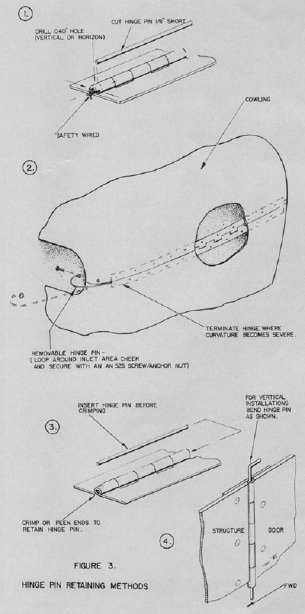
If you think the hinge pin will never have to be removed, you can lock it in place by slightly peening the hinge loops at each end of the hinge. Cut the hinge pin about 1/4" shorter than the hinge and, oh yes, don't forget to put the hinge wire in before you peen the end loops (Figure 3-3).
Another way to retain the hinge pin without destroying the hinge pin's removability is by safety wiring. Do this by drilling a .040" diameter hole in each end loop (about 3/32" from the hinge end). Safety it with wire as shown in Figure 3-1.
OIL INSPECTION DOOR
Many a builder prefers to cut a section from his fiberglass cowling and use it to make an oil inspection door. The reasoning being that the piece cut out will conform exactly to the shape of the cowling, hence a perfect fit will be assured. This is true generally, initially, at any rate. However, as time passes, the fiberglass door may tend to curl up or warp.
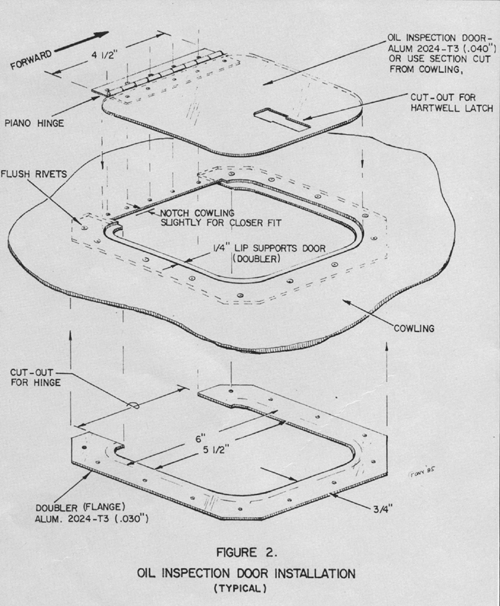
My preference is for an aluminum oil inspection door made of .040" 2024 T3, especially if there is no compound curvature in that area. The metal can be bent to match the curve in the cowling and can even be warped slightly to conform. Unlike a fiberglass door, once you have obtained a good initial fit for the metal door, it will remain unchanged during the life of the cowling.
Determining exactly where to cut out the oil door opening is important because you should be able to add oil to the engine without removing the entire cowling. Check for yourself . . . wouldn't it be better to locate the opening slightly aft and off to one side rather than directly over the dip stick? Naturally, if you have a hinged cowling section that can be easily opened, like an old time auto hood, you will not need an oil inspection door.
CONTROL HINGES
Installing full length piano hinges along the leading edges of ailerons is an appealing idea. However, such long hinges may tend to bind the ailerons whenever the wing flexes . . . and flex it will. You can avoid this difficulty by using short sections of extruded piano hinges for your control surfaces. Use no less than 3 complete hinge sections, about 5 to 6 inches long per control surface.
Hinges are ordinarily installed with rivets, especially on metal and fiberglass surfaces, but they can also be installed with screws, machine screws, and in special applications, with AN3 bolts. It depends, actually, on whether or not the control surface hinge pins are removable.
INSTALLING PIANO HINGES ON COWLINGS
Attaching a piano hinge to the inside of a cowling can be a tricky operation because the alignment of both halves of the hinge is so critical.
There are two ways you can install a piano hinge. One way is to install the hinge right side up so that the hinge loops are visible from outside the cowling. This method permits the cowling section to be swung open like a door (provided, of course, that the hinge axis is straight) - see Figure 1-E.
The second way to install piano hinges is just the opposite. The hinge is installed upside down and the hinge,
in fact, becomes a fastener and its hinge function is not useable. Instead, the hinge pin must be accessible and easily removed to separate the cowling sections (see Figure 1-F). Alignment of the hinge for this type of installation is more difficult.
Regardless of the installation method used, it is easy enough to install the first hinge half to either cowling section. It is the fitting of the other half of the hinge that causes all the problems. Try the following method, or your own variation thereof.
Pre-drill the rivet holes spaced one inch apart in one piano hinge half, using a number 40 drill bit. Leave the other hinge half undrilled.
If you want your cowling section to swing open like a door, install the hinge half right side up (hinge loops visible). The hinge loops will butt against the edge of the cowling and alignment is assured.
If you want your piano hinge to serve solely as a quick disconnect fastener, install it upside down and it will be invisible from the outside of the cowling. First, draw a centerline on the back side of the hinge to act as an alignment guide. Then clamp the hinge half to the cowling taking great care that the hinge axis parallels the edge of the cowling. The remainder of the steps are identical for either type of hinge installation.
Next, back-drill through the predrilled rivet holes in the hinge and into and through the cowling. Install a cleco fastener in each hole drilled to keep the hinge from slipping out of alignment.
After all the holes have been drilled through the cowling, remove the hinge and countersink the rivet holes in the cowling.
Rivet the piano hinge half to the cowling section. You now have one half of the hinge installed with perfect alignment.
NOTE: You can rivet piano hinges to fiberglass cowlings. The riveting will not split or damage the fiberglass provided that the shop head of the rivet is formed against the metal hinge and not directly against the fiberglass.
Next, assemble the complete hinge by slippping in the hinge pin (wire).
If you had to make your own cowling you may already have a plywood alignment disc bolted to the engine hub. If not, you should make an alignment disc to support the front end of the cowling while you are fitting it to the aircraft. It would also simplify the cowling fitting if you already have attachment brackets along the firewall area.
Set your cowling in place on the aircraft and double check the fit at the firewall, and down both sides of the cowling. After you are satisfied with the fit, assemble the complete cowling on the aircraft, preferably using ropes or straps to hold the two halves together. Use block wedges and 2 inch wide grey duct tape wherever it helps.
Reach in through the air inlets and stick pieces of duct tape to hold the free half of the hinge tightly against the inside of the cowling. You can also reach inside through the air outlet areas and even through the oil inspection door opening. Add more pieces of duct tape wherever you can reach to better immobilize the hinge.
Very carefully . . . while applying only light pressure . . . drill the first rivet hole from outside the cowling. Insert a cleco fastener to pull the hinge snugly against the cowling and drill the next hole. Continue in that fashion, always putting in a cleco fastener to keep that hinge pulled tightly against the cowling.
It might be a good idea to install a couple of screw fasteners, Camloc fasteners or whatever you intend to use along the firewall edge of the cowling at this time.
Knowing exactly where to drill holes to match anchor nuts already installed is not easy. If your cowling does not have a gel-coat on it, you could insert a drop-light inside the cowling so that the light will shine through the fastener holes and onto the cowling. It is then easy to drill through that reflected light spot. If that light spot trick doesn't work you will have to try something else. Perhaps drill from inside with an angle drill.
You could reach up inside the cowling from the air inlet area or oil inspection door opening and use a sharp pointed nail or tool inserted in the fastener to make a scratch mark on the cowling. This will pinpoint where you need to drill the hole. After you pinpoint a couple of holes and drill them. The fasteners will insure that you will be able to reassemble the cowling in its correct orientation. The remainder of the holes can be more easily marked with one half of the cowling removed.
A slight misalignment of the two fringe halves could make the removal or insertion of the long hinge wire difficult.
If you cannot push the hinge pin in entirely by hand, you might be able to improve the alignment a little by resorting to the use of a bit of power. First, make things easier by grinding one end of the hinge wire to a bullet shape so that the wire will more readily snake its way through the hinge loops. Then chuck the free end of the hinge wire in an electric drill, pull the trigger and spin your way in through each and every hinge loop. This should help force all the loops into alignment and should take care of any minor alignment problem you might have had.
Do not put any lubricant on a hinge pin until after the cowling has been painted. Paint will not adhere very well to oily surfaces, so resist the temptation to get early help by lubricating the hinges before you finish the cowling.
Anyway, if the hinge pin can be inserted and removed by hand with no lubricant the assembly will be much easier when the hinge pin and loops get oiled together.


