Rigging and Trimming Part 2
By Tony Bingelis (originally published in EAA Sport Aviation, August 1984)
A less than discriminating pilot may not know or notice that his airplane is out of trim . . . however severe that condition might be.
Most of us, fortunately, immediately sense when some flight condition isn’t quite right . . . even when all we may have aboard in the way of a sophisticated flight system is a whiskey compass, needle/ball and airspeed.
For the most part, we instinctively apply and hold the necessary pressure to whatever control requires it to maintain coordinated flight.
Of course, if the airplane is equipped with a turn and bank indicator, a directional gyro, and an artificial horizon, even the most oblivious among us should notice when an airplane is not tracking like it should . . . that it is out of trim.
Last month, in Part 1, considerable attention was devoted to the importance of maintaining accurate alignment during the construction of the many parts, and later, in joining those parts to each other in final assembly. Included was the advice to install your turn and bank indicator so its ball is perfectly centered when the aircraft is level laterally.
However, even after you have done the best you can to get the wing incidence perfectly aligned with a Smart Level® (buy, beg, or borrow one) and the airplane accurately rigged and ready for flight, you still won’t know how effective an assembly and alignment job you did until the airplane is flown.
You Say It Flew Hands-Off?
If your airplane did, indeed, fly straight and level "hands-off" during the initial flight, you are to be congratulated for the fine assembly and rigging job you did.
However, I am sure you understand that a "hands-off" condition, if realized, was noted during a particular period of the flight. And, without a doubt, this feat was accomplished with a slight tweaking of a cockpit controllable elevator trim.
NOTE: I believe every real airplane (make that read "every airplane with a cross country capability") should have a cockpit controllable elevator trim.
Think back. Exactly when did it fly hands off? During the takeoff? While orbiting the airport in level flight at cruise rpm? At reduced power? For most of the flight?
As perfectly rigged as your airplane may be, you will learn later if you aren’t aware of it already that your airplane does not always fly hands off - not without a little help on your part.
Naturally, if you have a three-axis trim capability, you should be able to re-trim the airplane anytime you want, in order to relieve whatever manually applied control pressures you are holding.
This capability is especially appreciated during level flight cruise conditions.
Without cockpit controllable trim tabs it is a different story. At best, the airplane, if it does fly hands off, will do so only for one specific power setting, airspeed, altitude, and, yes, cockpit loading.
How To Trim For Level Flight
Here is the correct way to trim for level flight when you have a cockpit controllable three-axis trim capability:
- Accelerate to your intended level flight cruising speed.
- Adjust the elevator trim to maintain altitude.
- Take your feet off the rudder pedals, but use whatever aileron pressure is necessary to keep the wings level.
Look at the ball in your T&B. Is the ball centered in its race? If not, apply rudder pressure to center it. Then adjust the rudder trim to relieve your foot pressure on the pedal. Now, when you put your feet on the floor, the T&B ball should remain centered. - Finally, concentrate on the wings. Is one wing heavy and you have been holding aileron control pressure to keep that wing up? If so, adjust the aileron trim to relieve the stick pressure you are holding.
That’s it. Simple as one, two, three . . . simple, that is, if you have cockpit controllable trim tabs.
One final note. If you have trim position indicators in the cockpit, check to see that the neutral indications are actually neutral when the external trim tabs are streamlined with the control surfaces.
Ground Adjustable Tabs
But, what about the homebuilt that has no cockpit adjustable trim controls except maybe for an elevator trim?
Well, the trimming sequence will be the same when fixed ground adjustable trim tabs are attached to the rudder and aileron(s).
There is, however, this difference. Your airplane trimming exercise is going to be a drawn out process because every time you re-adjust a fixed trim tab by bending it, you will have to fly the airplane to see how well you guessed.
Actually, you may have to make several test flights before you get the results you want.
Properly adjusted, ground adjustable trim tabs can relieve the pilot of some in-flight control pressures - but can do nothing, for example, to compensate for the unbalance created by the uneven use of wing tank fuel, taking on a passenger, or changing your altitude and/or power setting.
Adjusting Fixed Trim Tabs
Trim tabs, as small as they are, exert a surprising amount of aerodynamic force against the control surfaces to which they are affixed. Moving (bending) a trim tab in one direction causes a control surface to be deflected aerodynamically in the opposite direction.
I’m sure most of you have seen parked aircraft with ground adjustable metal trim tabs installed. Sometimes there was only a rudder trim tab. However, the same airplane may also have had a trim tab on one aileron . . . and, in rare instances, one on each aileron.
I doubt if you have ever seen a fixed trim tab on an elevator.
As previously stated, in my opinion even the simplest aircraft needs a cockpit controllable elevator trim tab.
Fixed (ground adjustable) trim tabs are quite common on many light personal aircraft because they are simpler and cheaper to install than cockpit controllable tabs.
Such trim tabs are so common that you will hardly notice them until you see one so severely bent that it resembles a deployed flap more than it does a simple trim tab.
When you see a tab like that, you wouldn’t be wrong in assuming a tab that badly bent is indicative of a desperate attempt to compensate for a rigging problem . . . a misaligned or warped wing, perhaps?
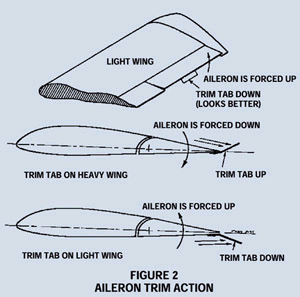
Some wing heavy conditions are so severe that both ailerons may require sharply deflected trim tabs (in opposite directions).
Here is the bad news about trim tabs . . . any kind of trim tab. In short, the more you must deflect a trim tab to overcome an unbalanced flight condition, the more drag you create . . . and since drag is a parasite that feeds on performance your airspeed suffers because of it. That’s why a good job of rigging and aligning your wings is so important.
Adjusting Fixed Trim Tabs
These tabs, naturally, can only be re-adjusted on the ground, and that introduces a dilemma for some folks. The direction in which to bend the tab can be confusing if they don’t stop and think about it a bit.
All you have to remember is that a trim tab forces the control surface in the opposite direction from which the tab is bent.
For Example:
- If the nose of the aircraft is yawing to the left, bend the rudder trim tab to the LEFT.
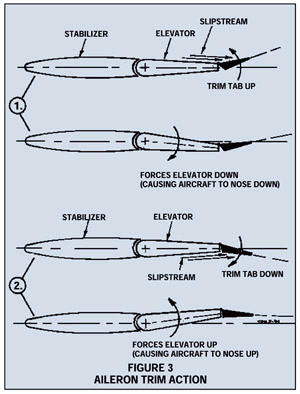
- If the aircraft has a nose heavy condition, bend a fixed elevator trim tab DOWN.
- If one wing is heavy, bend the trim tab on that wing UP.
You can make your fixed trim tabs of 2024 T3 aluminum. A tab made of .025" or .032" aluminum should be stiff enough for the job.
That raises another question. How big should a trim tab be?
Well, I know of no particular standard size, shape, or placement for trim tabs. Actually, the tab may not have to be as large as you think because that little gadget, when deflected, exerts a powerful corrective force against the control surface.
If your unbalance condition isn’t severe (how severe is severe . . . a snap roll when you let go of the stick?), you might try a trim tab that measures about 3" x 6". About 1" of its width will be used in attaching the tab, leaving a 2" width to do the work.
If that size tab proves to be excessive, you can always trim it down with tinsnips. Anyhow, that has proved to be a good starting point.
Attach your trim tab to the trailing edge of the control surface with rivets or screws, or by whatever means will work best for the type of construction used in the control surface.
When you have to re-bend a trim tab that is already installed, try not to exert a twisting pressure on the trailing edge of the control surface as you try to bend the tab, because you may damage it or cause the rivets securing the trim tab to loosen.
Use a pair of pliers, or a duck bill hand seamer to assist in making the bend.
Your trim tab adjustments (bends) should be made in small increments followed by a check flight to determine the result.
Designers have long realized the need to compensate for the varying effects of engine torque in their aircraft and often incorporate design features which are intended to reduce the need for drag producing trim tabs. The two most common of these "fixes" are:
- An offset vertical fin.
- An offset engine centerline.
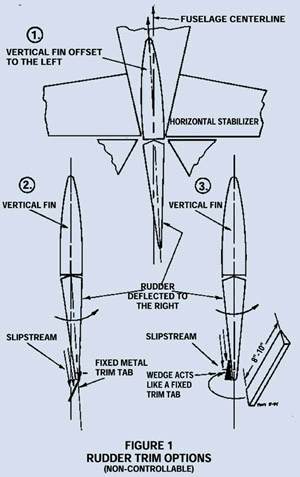
The Offset Vertical Fin
The slipstream from the propeller, in conventional aircraft, does not flow straight back but takes a spiral or helical path around the fuselage. This, in effect, causes the "propwash" (slipstream) to hit the vertical fin and rudder on one side at somewhat of an angle thereby aggravating the effects of torque.
Therefore, by rigging the fin off-center a bit, the tail surface will more nearly be parallel to the airflow. Thus, the side loads on the tail surfaces are reduced as would be the need for a substantially deflected trim tab.
Of course, this is a rather simplified cause and effect explanation but it is adequate for now.
The fin offset, when used, is to the LEFT for conventional aircraft engines having a clockwise propeller rotation (as viewed from behind the propeller).
How much should this offset be? 5/8"? More? Less? Guess wrong and once incorporated, realigning the fin to a neutral setting would be difficult as the fin-to-stabilizer fairing would also have to be reworked.
Incidentally, the fin offset method, if used, would be to the RIGHT for VW engines, and others that rotate opposite from standard U.S. aircraft engines.
The Offset Engine Centerline
As with the offset fin, the designer may have determined that offsetting the engine thrust line, say 3 degrees, would help reduce the need for corrective rudder pressure in flight.
Many aircraft designs utilize either an engine offset or an off-center vertical stabilizer as a rigging and trimming ploy.
Here again, however, even if all the calculations work out, the aerodynamic trim achieved will be most effective, hopefully, during normal cruise conditions.
Other Considerations
In general, the larger the trim tab the smaller its deflection will have to be to obtain the desired trimming effect.
Cockpit controllable tabs that are inset in the elevator surface are structurally better and are as effective as trim tabs attached to the trailing edge of the elevator. The Emeraude is a typical example.
Controllable tabs should be as light as possible to avoid adding too much weight behind a control surface’s hinge axis.
An aileron’s tab chord is more effective when it is well over 5% of the aileron chord because a chord less than 5% would be too ineffective at higher deflection angles.
In general, keep tab aileron deflections to 20% maximum.
According to early NACA studies, the tab deflection angle should be below 75% of the movable control surface angular deflection to prevent an overbalance effect.
With part-span trim tabs, an outboard location is a slightly better position, aerodynamically. However, an inboard location for the trim tab is considered to be a better choice structurally.
Although tabs are effective at all speeds, they are less effective at higher angles of attack (low speeds).
In the final analysis, trim tabs on rudders and elevators are similar to those on ailerons, therefore, maximum deflections relative to the attached control surface are best limited to plus or minus 20 degrees.
It is also advisable to keep as much free-play out of your trim tab installations as possible because floppy trim tabs have been known to induce control surface flutter.
The amount of free play at the trailing edge of the trim should be minimal. FAA’s AC 43.13-1 gives a simple formula for establishing the maximum permissible free play at the trailing edge of the tab. They recommend limiting this movement to not more than 2-1/2% of the chord. A tab with a 4" chord would have a maximum amount of play of 4" x .025 (0.100 inches total motion up and down).
For all practical purposes you should strive to keep the total amount of free play in your trim tabs under 1/8".
And, finally, if you have a high performance aircraft that has extremely effective and sensitive trim tabs, you should also add a trim tab check to your Cockpit Check List
