Tail Wheel Installations
By Tony Bingelis (originally published in EAA Sport Aviation, June 1979)
REGARDLESS OF ITS unsightly and unstreamlined configuration, the conventional tail gear is completely functional and probably produces less drag than the average nose wheel installation. Expanding this line of thinking a bit further, a tail wheel configured airplane should be faster than one with a nose wheel . . . everything else being equal, of course. Furthermore, a tail gear is lighter than the equivalent nose gear rig. Another big plus for the conventional tail wheel installation, at least during the buying and building phase, is that of cost. A nose gear installation, with its larger wheel,. shock strut, shimmy dampener and a complex welded nose strut truss, is more expensive.
With so many tail draggers around, it is surprising that so little practical information has been printed about tail wheel installations. Perhaps this indicates that more builders end up with satisfactory installations than not. And yet, on occasion, even an experienced builder can be plagued with tail wheel problems such as spring breakage, shimmy and unusual control characteristics.
A tail gear malfunction, or failure, can inflict severe damage to the airplane. The result often is a ground loop with the usual embellishments like damaged wing tips and wheel fairings or fractured propeller and recontoured spinner. In extreme cases where total directional control is lost, a complete flip-flop may occur.
For the most part, a tail wheel is a rather innocuous configuration which does what it is supposed to do and does it effectively, too. Tail wheels can be troublesome from the very start, however, if the few essential design and installation standards are violated.
The Tail Spring
You have to connect the tail wheel to the aircraft in some manner, right? Most frequently this is accomplished by using a flat spring or a tapered, spring steel rod bolted to the fuselage. This arrangement provides a simple shock absorber system as well as an effective means for attaching the tail wheel.
The length of the tail spring, more particularly the angle at which it is bent, establishes the height that the tail will sit above the ground. If the tail sets too high, the tail wheel will not allow the aircraft to make full-stall three-point landings. To put it another way, if the ground angle, as produced in combination with the gear and tail wheel, is too shallow, the aircraft will land too hot. It will be impossible to rotate it into a three-point attitude without the tail hitting the ground first.
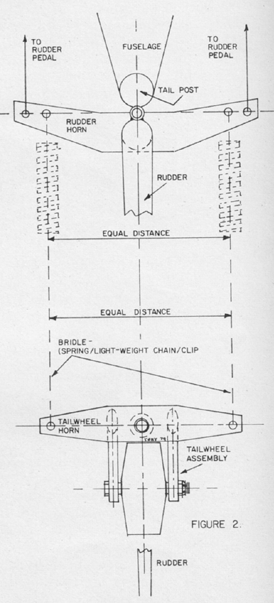
If your plans do not provide the spring length or bend angle, you must determine this for yourself. Remember, the tail wheel will flex up and down. In its most upward flexing, the tail wheel must not strike the rudder. On the other hand, the length and bend in the spring must not position the tail wheel too far beneath the rudder as this will affect the aircraft's stance on the ground and cause the landing problem described earlier. In addition, if the tail spring juts down at too steep an angle from the fuselage, the tail wheel steering might be impaired because of the extreme angle formed when you connect the steering bridle to the rudder. You may have to fabricate and attach an additional horn to the rudder and bend it down to lessen the angle between the rudder and the tail wheel connections.
Making The Tail Spring
A builder can make a big problem out of fabricating the tail spring for his homebuilt. This shouldn't happen, however, as the spring steel material is readily available from almost any auto wrecking yard or auto spring shop in the form of automotive springs. These leaf springs are perfectly suited for homebuilt use. I would suggest locating some auto springs, from smaller cars, that happen to be about 1 1/2" wide and 3/16" thick , an ideal size. It may be that a single salvage spring 1/4" or 5/16" thick would be heavy enough for your airplane. The 1 1/2" width is suggested rather than a narrower 11/4" because it is more stable torsionally. Incidentally, always specify your spring width when ordering your tail wheel as tail wheel assemblies are made in two widths – 1 1/4" and 1 1/2". The option is yours.
Now, if you aspire to form your own -tail spring(s), here is a pleasant surprise. You can bend your automotive spring cold. That is, you do not have to heat it to bend it . . . or heat treat it later.
Here's how you can do it. First cut the spring to the proper length. Auto spring can be cut and drilled with a reasonable assurance of success . . . and without first being annealed. A hacksaw with a good blade or a handsaw adjusted for cutting steel will do the job.
Drilling the holes in the steel spring is just as easy. Use a masonry bit! Masonry bits have very hard carbide cutting tips. They are relatively inexpensive and you can find them at any discount store. Get one - it will do a great job!
When drilling holes in spring steel always apply enough pressure (and that is quite a bit) to keep the bit cutting. Use a drill press if you can. It might be better to first drill the holes with a smaller 3/16" masonry bit, although I've had good luck using the proper-size bit, usually 5/16" or 3/8", in the first place. Either way, be sure to apply a steady and fairly heavy pressure . . . and keep that bit cutting! If you hear a squeaking sound start, you've just developed a bit of a problem as the metal is over-heating and hardening under the drill bit. Your only recourse, in that case, would be to switch to another smaller drill size and try again. A little cutting oil sometimes helps. The drill press must, of course, be turned at a slower speed than that used for drilling wood or aluminum. Check your drill press chart.
Smooth and shape the spring ends the way you want them and then clamp. the spring in a large, solidly mounted bench vise for the bending. Allow the long free end of the spring to stick out (parallel to the floor). Before tightening the vise, slip a block of wood between the jaws of the vise and .the spring steel to protect the metal.
Then, using a couple of large heavy duty ‘C’ clamps, clamp a 4 foot length of a 2 x 4 to the spring. When this is done, grasp the long 2 x 4 extension near its end and apply the bending force to the spring. That means pull (or push) on the clamped-on extension with all your might until the spring gradually takes the bend you want. (Springy, isn't it?) There will be a lot of spring-back. However, with the leverage gained by the clamped-on 2 x 4, you will find that the spring will bend in spite of its springiness. Avoid making a sharp bend by assuring yourself that the edge of the wood back-up block is well rounded. Very rarely will you find it necessary to bend a tail spring more than 20 to 30 degrees. Since this little bend will have a large bend radius, concentrated stress will be insignificant. Certainly not enough to appreciably weaken the spring.
A lot of builders would probably prefer to have a spring shop cut and bend their springs to a given template. The spring shop will heat them, bend them, and temper them to the correct hardness. Of course, you would still have to drill the holes.

Attaching The Tail Spring
The spring attachment to the fuselage needs to be simple and easily accessible. Be sure that you will later be able to remove the attachment bolts without tearing into the fuselage. Usually a single AN5 or AN6 (5/16" or a 3/8") bolt holds the forward end of the spring(s). Two other bolts immobilize the aft portion (at a point approximately 6 inches away from the front bolt) by straddling the spring with a retaining plate or, in some installations, with a saddle-like fitting. See Figure 1.
Tail Wheel Selection
The choice is yours. You can put in a steerable tail wheel or a full-swivel one. The steerable tail wheel is often a homemade or a custom-built rig. Most commercially sold aircraft tail wheels are of the full swiveling variety and are, of course, quite expensive.
A full-swivel tail wheel is interconnected to and is controlled by the rudder pedals. However, with full rudder applied and perhaps a light tap of the brake pedal, the tail wheel becomes free-swiveling. This makes it possible to turn or pivot the aircraft around one wheel. Not a good practice really as it grinds off some tire rubber. Close-in maneuvering in hangar areas and on the crowded flight line is possible and even pleasurable with a full-swiveling tail wheel.
A steerable tail wheel is likewise connected to the rudder pedals by mechanical means except that its degree of turning is limited to the amount of rudder travel available. Actually, its turning radius is often so limited that it might be impossible to turn the aircraft around on a narrow runway for take-off. Of course, after operating a steerable tail wheel aircraft for a while, one becomes wise to its limitations and boxed-in situations like that can be avoided. I'm sure the thought occurs to you that you could kick in full rudder, ease the stick forward and blast the throttle just so, raising the tail with the prop blast while simultaneously affecting a hot rock pivot turn. So, some old time Cub pilots did it all the time . . .most of them quite successfully, most of the time . . . but not all of the time! (Anyway, shake your head and the impulse will go away.)
The Typical Full-Swiveling Installation
The Maule 6" (and Scott) tail wheels (full-swiveling) weigh approximately 6 lbs. and the leaf spring another 2 1/2 to 3 pounds. After you add the light weight bridle chains, the two connector springs and clips to connect the tail wheel steering arms to the rudder horn, the total weight of the tail wheel installation will reach at least 8 1/2 pounds. That is, if only a single leaf spring is used. Otherwise, a 3-leaf tail spring unit could cause the weight to reach 11 pounds.
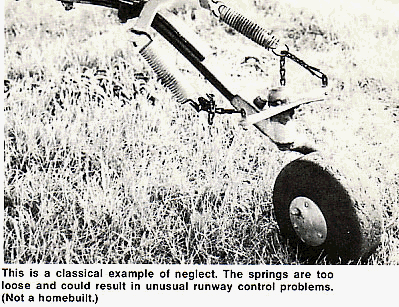
Stretch the connector springs a bit when hooking them to the chains. Approximately 3/4 of an inch will give just about the right tension. Loose springs can result in some wild runway antics. After the hook-up is made cut any excess links off of the chains. Incidentally, you can substitute G.I. steel-cot bed springs for the regular store bought type. They are shorter but work well for the smaller aircraft. You can even hook two in tandem if you need extra length.
To swivel properly, the pivot axis for the tail wheel gear must be ahead of the wheel's point of contact with the ground. That is, the wheel should be slightly in trail. This means that the pivot axis should be slanted forward up to 2 degrees.
Debugging Tail Wheels
A full-swiveling tail wheel should lock automatically in its steerable condition anytime the wheel is in trail. And it should release easily whenever the plane is pushed sideways or backwards during ground handling. Of course, while taxiing anytime full rudder and some brake is applied the tail wheel should go easily into full-swivel.
Full-swivel tail wheels have been known to become unintentionally unlocked and go into a full-swivel condition in crosswinds and in rough field operations. Usually the mishap (yup, mishap, like getting a wing tip or a prop' in the ensuing corrective heavy braking) occurs when the tail wheel mechanism becomes worn and out of adjustment. That condition can also cause hard steering and skittish runway behavior because of a tendency to over-control.
Builders suffering a broken spring should consider lengthening the replacement spring to give it greater flexibility. Many a tail spring installation on homebuilts is too short and too stiff . . . and builders don't help matters by adding an extra spring leaf just to be sure it will handle the weight.
Short springs must absorb the impact loads with very little deflection and therefore, are subjected to much higher concentrated stress. A higher frequency of failures seems to follow. Instinct might mislead you into believing that a. shorter spring would be stronger and should cure a recurring breakage problem. Not so, amigo. Don't shorten the tail spring. If anything, make it longer. If additional stiffness is required to handle heavier tail loads, add one or more leaves.
