Your Brake Installation
By Tony Bingelis (originally published in EAA Sport Aviation, October 1987)
Brakes, as well as the lack of brakes, are co-contributors to a lot of embarrassing incidents, accidents and scares due to downright unpredictable braking actions. Some types of brakes, it seems, have a peculiar propensity for not working, or when least expected, working too good. I guess most of this unpredictable behavior can be attributed to worn, poorly maintained brake units, and some of it to poor installations. The rest of the incidents can always be charged off to poor pilot technique.
We sportplane builders and aircraft restorers, in our attempts to economize, sometimes came across unusual opportunities to pick up parts and equipment, much of it second hand. If the price was right, we bought the stuff right on the spot. Wheels and brakes were no exception.
In many instances, not only did we have to figure out the best way to make those old units work in our project, but at times we even had to search around for hard-to-find replacement parts.
It should come as no surprise that that sort of adventurous approach to building an airplane is not appealing to most new builders. Even some experienced builders are shying away from using old wheels and brakes. Maybe it's because they have already scared themselves once or twice, or they are embarrassed that they cannot check their magnetos without rolling into the next county. At any rate, some folks I know have already purchased new master cylinders, and even new wheel brake units in an attempt to improve their braking or upgrade their brake systems. That makes me wonder if some basic fundamentals were being ignored by these builders in the first place.You would assume, for example, that no builder would risk his newly completed airplane by using old wheels and brakes without completely reconditioning them before that first taxi test. But that would be a naive assumption, wouldn't it . . . or could it be that some builders really fail to recognize that they have a brake problem?
You Know You Have A Brake Problem When . .
.
. . . you realize that you cannot apply brake pressure when either rudder pedal is fully against its stop .
. . . your rudder pedal angle is such that you inadvertently apply brakes when you don't intend to do so .
. . . after starting the engine, you try to taxi out but the airplane won't move .
. . . you open the hangar door one cold morning and see a pool of hydraulic fluid under one wheel .
. . . you can't get braking action unless you pump the brake pedals furiously.
. . . you apply brakes and the pedals sink all the way down and the airplane keeps rolling along. (It's not accelerating - it only seems that way.)
Are any of those symptoms familiar to you? Here's another one for you taildragger types. Does your tail come up menacingly when you apply your brakes hurriedly? Don't blame the brakes - your wheels are probably located too far back and you have an aircraft design problem . . . not a brake problem.
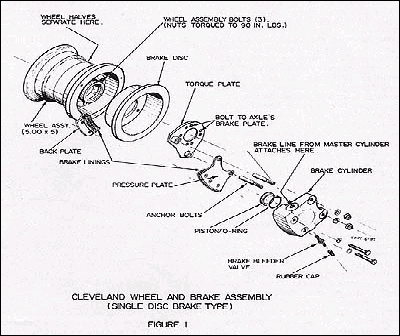
Some types of brakes seem to develop fewer problems and elicit fewer complaints than other kinds. The Cleveland wheels and brakes apparently fall into this category as most builders seem to prefer them. The Clevelands are a good choice because, in addition to their record of reliability, they are easy to install and maintain.
This is not to say that other brands aren't as good - they may be. But because more 5.00x5 and 6.00x6 Cleveland wheels and brakes are sold than other varieties, the discount prices that can be found for them are more enticing to builders than those routinely quoted for other brands more commonly associated with larger, heavier aircraft.
And along this same line, builder preference seems to center on the single disc type. This may be because most homebuilts gross less than 2,000 pounds and single disc brakes can handle that sort of load nicely. Naturally, brake units should be and are matched to wheel size, gross weight and landing speeds.
As gross weights and landing speeds increase, you can expect brakes of a given capacity to exhibit a marked decline in effectiveness.
What Type Master Cylinders?
Your master cylinders should be co-located with the rudder pedals so that they can be operated individually by toe pressure.
Two different types of master cylinders are in use, and you may find it difficult to decide which type will best suit your installation. For my money, I prefer the non-reservoir type master cylinders over those with the self-contained, or built-in, fluid reservoir for several reasons.
For one thing, the non-reservoir type master cylinders can be mounted in any attitude . . . right side up or upside down. This versatility, obviously, is essential for aerobatic flying, as the last thing you need is for hydraulic fluid to drip up your legs when flying inverted. Then, too, I like them because servicing the other type of master cylinders, those with built in reservoirs, often requires the ability of a contortionist who can work while he has his head and arms poked under the instrument panel, and around the control stick. If you goof while servicing the built-in reservoir type master cylinder, and allow hydraulic fluid to overflow around the rudder pedals, you will have ruined your carpeting and have a mess to clean up to boot. Outside of that, though, there really isn't any difference in the servicing or operation of the brakes, regardless of the type master cylinders you choose to install.
There is one optional feature worth mentioning in behalf of the reservoir type master cylinders - it is their simple, easy-to-hook-up, parking brake clips incorporated on top of the cylinder caps. These simple gadgets eliminate the necessity for installing a separate parking brake valve. The other type (non-reservoir) master cylinders, on the other hand, do require the installation of a separate (expensive) parking brake valve (assuming that you want parking brakes), and, of course, a separate reservoir.
Another factor may influence your master cylinder selection. Sometimes, due to the lack of space around the rudder pedals, it is easier to install the less bulky non-reservoir master cylinders than it is to modify the pedals to accept the fat reservoir type. At any rate, the choice is yours. Obviously, selecting the reservoir type master cylinders results in the simplest . . . and, perhaps, the least expensive installation.
About That Remote Reservoir . . .
If you intend to use the slim non-reservoir type master cylinders, you will also have to install a remotely mounted hydraulic fluid reservoir to provide the fluid supply for the entire brake system. This separate reservoir is generally a small metal container mounted on the front of the firewall at a level well above that of the master cylinder and rudder pedal locations inside the cockpit. This insures that gravity will keep the brake lines and the master cylinders full of fluid at all times.
You should fit the vent port in the top of the reservoir with a short 1/8" copper, or aluminum, tube, bent into the shape of an elongated "S". This is especially recommended if you ever expect to fly inverted, however briefly . . . otherwise, the hydraulic fluid will leak out the vent.
Since your reservoir must provide fluid to at least two master cylinders (four for a dual brake installation), it will be necessary to divide the line from the reservoir after it passes through the firewall, using a suitable "T" fitting.
Brake Lines
You have three basic options. You can make your brake lines from 5052-0 aluminum tubing, Aeroquip 303 (or similar) rubber hoses, or Nylon-Seal (or Nylo-Flo) nylon tubing. For that matter, you could even use a combination of all three types of material in different parts of your brake system if you like.
Brake lines in certificated aircraft are generally installed using 1/4" or 3/16" aluminum tubing for the long runs inside the aircraft, and Aeroquip type rubber hoses at locations where considerable flexing occurs. For this reason, manufacturers install rubber hose sections at the rudder pedals for the master cylinders, and also at the wheel brakes.
We homebuilders have learned that the so-called standard installations, although well proven and FAA sanctioned, are usually the most difficult and the most expensive to install. Consequently, almost all builders are currently fabricating their brake lines of Nylaflow (3/16" dia.) nylon tubing, or Nylo-Seal (1/4" dia.) nylon tubing . . . and for good reasons too.
The nylon tubing is a lightweight, super tough, high flexibility tubing that is compatible with the red aircraft hydraulic fluid. It is extremely easy to route through areas where access is difficult. Furthermore, its connections are easily made using inexpensive stock automotive brass fittings, Nylo-Seal fittings or the standard Poly-Flo fittings. As for comparative costs, the 3/16" dia. 5052-0 aluminum tubing is currently (1987) about $1.35/ft., the Aeroquip 303 rubber hose about $2.94/ft. and the Nylo-Flo tubing a mere .15 cents/ft. When you check your catalogs for the price of the fittings, you find that the Aeroquip type reusable fittings will be the most expensive, running about $10 per hose.
The nylon plastic brake lines do have minor shortcomings. They suffer from embrittlement when subjected to temperatures over 180 degrees F., and when exposed to sunlight for extended periods of time. This, however, is not usually a serious problem because very little of the brake line is ordinarily exposed to the blazing sun . . . and that little can be easily shielded from direct exposure.
The heat generated at the wheel brake units when the brakes are ridden hard is another matter though, and the brake lines should be insulated locally from that kind of conducted heat.
Servicing and Bleeding the Brakes
The procedure for initially servicing the brake system, or for bleeding the system when the braking action is spongy or erratic, is essentially the same.
The best results are assured when the brakes are serviced (or bled) from below using some kind of a pressure pot or a hydraulic brake system bleeder unit that can be lightly pressurized with air to about 15 to 25 psi. A good substitute would be a modified pump oil can fitted with a short length of plastic tubing slipped over its snout. It will work good as very little pressure is needed. Naturally, you should use aircraft hydraulic fluid - not automotive brake fluid, primarily because the "O" ring seals may not be compatible with both types of fluid. "O" rings have been known to harden or swell, jamming the internal brake cylinder piston. Besides, if you ever need brake fluid on a trip, you would be more likely to find the red aircraft hydraulic fluid (MIL-H-5606) on an airport than you would the automotive type brake fluid.
Servicing From The Bottom Up
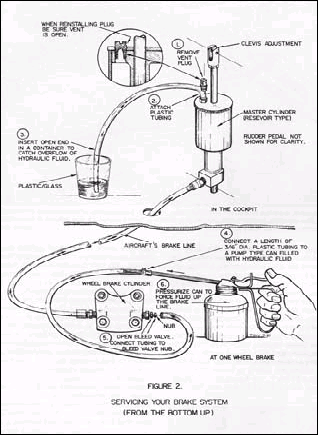
1. Remove the vent/filler plug from the top of the reservoir. This applies to either type of master cylinders.
2. Unless you like cleaning up a mess, I would advise attaching a short plastic tube to the reservoir vent/filler opening and poking the open end of the tube into a glass or plastic container to catch the hydraulic fluid overflow that will be expelled along with the air bubbles.
3. Remove the protective rubber cap at one of the wheel brake cylinder units and open the brake valve by backing off the small protruding center portion about half a turn with a 1/4" wrench.
4. Press the free end of the plastic tube (connected to a pressure pot containing hydraulic fluid) over the protruding valve nub. Pump the hydraulic fluid into the wheel brake cylinder valve connection and up through the system. This will force all the trapped air in the lines up with the hydraulic fluid and out of the reservoir. It should be noted that it is not necessary to pump the brake pedals using this system. The air bubbles and the fluid overflow will pass through the plastic tube and into the plastic container or glass jar you thoughtfully provided.
5. When the fluid overflow is free of bubbles, close the wheel brake bleed valve (careful-don't overtorque it) and disconnect your pressure supply source.
6. Replace the protective rubber cap.
7. Disconnect the overflow hose at the reservoir and siphon off a bit of the excess fluid from the filled reservoir before replacing the vent/filler plug.
This method of bleeding the brake system is the most effective. Any air in the system will be forced to rise and bleed out the top . . . every time.
Servicing From the Top Down
There is little merit to dwelling on how to bleed the brakes "the easy way", that is, from the top down, because the method hardly ever works the first time. After all, it is hard to force air bubbles to flow down through the system when they want to rise. Anyway, even though the procedure is as simple as:
1. removing the vent/filler plug from the reservoir. Be sure the reservoir is full of hydraulic fluid and let gravity do its thing.
2. pumping the brakes while someone at the wheel opens the valve and allows the bubbly fluid to squirt out for a split second.
3. closing the brake bleed valve quickly while pressure is still being exerted on the brake system with the brake pedal in the cockpit.
It doesn't always work. For one thing, unless that wheel brake bleed valve is quickly closed while brake pressure is still being applied, the system will suck in air. As a result you may have to go through the process a couple more times to get rid of that spongy feeling in the brake pedal.
Breaking In Brakes?
That's right. We have to break in a newly majored engine and a newly bought pair of shoes, don't we? So, why not brakes?
According to the manufacturer, Cleveland's new brake lining materials made of an asbestos based organic composition held together with resins, and these resins must be properly heat conditioned (cured) in order to insure a good service life. Furthermore, they say, if newly installed brakes are subjected to excessive heat before the recommended curing procedure is completed, the brake linings will carburized and be short lived (ruined).
The Product Reference Memo I received with my new Cleveland wheels and brakes states that the "conditioning" may be accomplished as follows:
"1. Perform a minimum of six light pedal effort braking applications from 25 to 40 mph. Allow the brake discs to partially cool between stops.
"
That's it. Apparently the procedure insures that sufficient heat is generated to cure the resins in the linings and yet not cause them to become carburized due to excessive heat.
You never heard of conditioning brake linings? Don't feel guilty, neither has anyone else I've talked to. Seems to me, though, that the cure could have been accomplished during the manufacturing process and not stick the user with the responsibility.
Incidentally, a good preflight inspection of both brake discs and pressure plate assemblies is very important. Grip the brake pressure plate with both hands and try to wiggle it a bit. It should move slightly because it is supposed to slide in and out on those two anchor bolts (pins) as the brakes are applied. The anchor bolts should be free of rust or they may jam and cause excessive wear of one pad, reduced braking effectiveness, or even increase the potential for a locked brake.
Keep the anchor bolts free of rust and lubricate them with a dry lubricant spray like G. E. Silicone or graphite. Don't use your old favorite WD-40, or any kind of wet grease as they will only attract dirt and compound the wear.
So you aren't about to remove your wheel pants for a preflight inspection of the brakes, heh?
O. K. Next time build a retractable.
