Rivet Gun Notes and Riveting Tips
By Tony Bingelis (originally published in EAA Sport Aviation, January 1988)
Installing solid rivets in an aircraft structure requires considerably more know-how and skill than does working with pop rivets. For one thing, you can install those hollow-core pop rivets working alone with only a simple hand operated pop riveter . . . even if you don't have access to the back side of the parts being riveted together. It is sometimes called "blind riveting".
Unfortunately, it's quite different with solid rivets. You do not enjoy the luxury of that pop rivet "blind" feature because you absolutely must have access to both sides of the parts being riveted. Sometimes it even takes two people. Furthermore, you will have to become proficient in the use of a few special tools.
The Riveting Process In Brief
Three basic tools are involved. A rivet gun, a bucking bar and a rivet set.
To drive (set/upset) a solid rivet after it has been inserted in a rivet hole, the protruding stem (shank end) of the rivet must be backed up or bucked by a "bucking bar". Then, and only then, the other end - the one with the manufactured head - can be "driven", or "set", by impacts from a rivet gun fitted with the correct rivet set, or by the hammering blows of a hand wielded ball peen hammer. (A solid rivet can also be "set" with a rivet squeezer.)
The net effect of this coordinated hammering and bucking action causes the rivet to swell, filling its hole tightly.
Then, as the blows (impacts on the rivet) continue, the shank end of the rivet becomes compressed and flattened, forming what is known as a "shophead". Properly set, the compressed rivet solidly locks the riveted parts together permanently. There can be no doubt that such an assembly, riveted together with solid rivets, is more reliable, and generally stronger than one similarly put together with pop rivets.
Although pop rivets are easier to install, they are complex to manufacture and, as you might expect, are more expensive to use than the solid type rivets. Futhermore, pop rivets are more likely to loosen under prolonged vibration. Another disadvantage, pop rivets, being hollow, also introduces the need for sealing each of the holes in the installed rivet heads. This must be done not only to seal out moisture and corrosion, but also to improve overall appearance.
Selecting Your Rivet Gun
If you don't already own a suitable rivet gun and are in the market for one, check around with other builders before you buy. Be sure you get the type of gun you need. Don't goof and be fooled into buying an air hammer or air chisel just because the price is enticing. Although the thing might look like a rivet gun, and sound much like one, too, a rivet gun it ain't. The problem with an air hammer is that it simply hits too hard and too fast. If you try using it as a rivet gun, you will stand a good chance of denting and damaging the soft aluminum skin around the rivet you are attempting to drive (set).
A rivet gun's blows, on the other hand, are typically slower and you can exercise far better trigger control over its impact rate.
It's hard to tell one type of gun from the other by appearance alone. Sometimes a rivet gun will have the term "riveter" embossed on the side of its barrel or housing, but not always. Other identifying information to look for is the size or capacity of the rivet gun. For example, most aircraft rivet guns are rated as 2X, 3X or 4X. The numbered "X rating" gives you a fair indication of the size rivets a particular gun can readily drive. A 2X gun should be able to drive your 3/32" and 1/8" rivets with ease. A more powerful 3X rivet gun has a designated capacity for handling rivet diameters up to 3/16". A still heavier 4X gun would be needed to drive 1/4" rivets.
Be sure the rivet gun you select takes the standard .401 shank diameter tools and that it has an easy working throttle (trigger), one that allows positive control over the gun's impact rate. Install an air tool regulator (they are inexpensive), and it can help you with the control of the rivet gun. (Guns can, typically, produce up to 2000 to 2500 blows per minute.)
Compressed Air Source Requirement
Of course, to operate any air tool (rivet gun, air drill, paint spray gun, etc.) you must have an adequate supply of compressed air. That means you will need an air compressor.
It doesn't take much of a compressor to operate either an air drill or a rivet gun. However, if later you expect to spray paint your own airplane, be advised that the typical spray gun can use a lot of air. You may, therefore, have to plan on a larger compressor, say one with a 20 gallon tank and a 7 cfm (cubic foot per minute) capacity because one much smaller than that might not be able to keep up with your spray gun.
Rivet Gun Accessories
Before you can drive a single rivet, your rivet gun will have to be fitted with the proper rivet set for the type of rivet to be driven.
Rivet Sets-You can drive any size flush head (countersunk) rivets with a single "flush set" (with or without an added protective rubber guard that is sold separately). On the other hand, you will need several different size rivet sets for driving universal head rivets, or any other kind of raised head rivets.
Each raised head rivet size requires the use of a similar size "cupped rivet set" as it is sometimes called. That is because the driving end of the set will have a cup-like depression that conforms to and fits over the rivet head shape and size to be driven.
To retain a rivet set in the rivet gun, a coiled retainer spring is screwed onto the end of the gun. There are two types. One is a "beehive-like" coiled spring, and the other is just a coiled spring with looped ends that looks like something went awry during its fabrication.
You can insert a rivet set in a rivet gun fitted with either type of retainer spring simply by unscrewing the coiled spring. However, that is doing it the hard way. It is far more convenient to discard the "beehive" spring retainer and install the other, quick change type (see Figure 1).
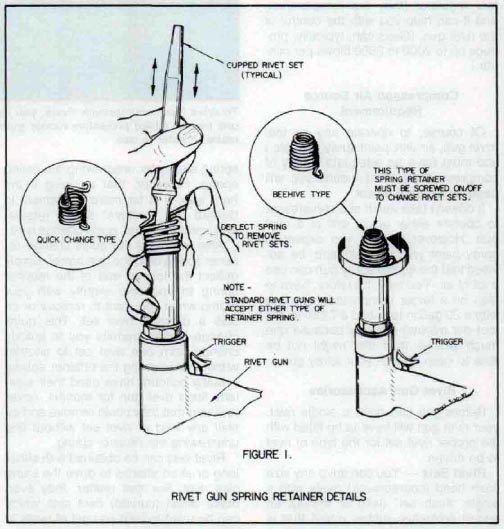
After screwing the quick change retainer spring onto the gun barrel, simply deflect the looped end of the retainer spring to one side slightly with your thumb when you want to remove or install a different rivet set. This quick change feature permits you to quickly change from one rivet set to another without unscrewing the retainer spring.
Many builders have used their similarly fitted rivet gun for months, never realizing that they could remove and install any kind of rivet set without first unscrewing the retainer spring.
Rivet sets can be obtained with either long or short shanks to drive the same size rivet. For that matter, they even make offset (curved) rivet sets which can be used to help you get at rivets in difficult locations.
I would recommend the acquisition of one long and one short cupped rivet set for each size rivet you will be using (3/32" and 1/8" rivets, primarily). For example, you might need a long rivet set (about 5-1/2" long) to rivet in your aileron brackets. As for an offset rivet set, it might be just the thing for setting rivets in corners where a straight rivet set won't reach.
Bucking Bars - They are dumb looking hunks of hardened steel with polished ends. These heavy steel tools are sometimes endowed with weird shapes and protuberances. Although no bucking bar entry could ever win a blue ribbon at an arts and crafts show, a rivet gun would be a lonely useless thing without one of these working companions.
The bucking bar used for a particular job must be held firmly and squarely against the end of the rivet shank while the rivet gun is doing its hammering act on the opposite end.
Before using a bucking bar for the first time, check to see that its edges are slightly rounded and free of burrs. If not, smooth them yourself with a file or on a bench grinder. This will keep the bar from gouging into and scratching the adjacent aluminum surface during the bucking action. It is also helpful to wrap your bucking bars with duct tape for the same reason. Wrap all but the hardened polished bucking ends.
If you have a particularly vexing bucking bar access problem, you may have to design your own from a piece of scrap steel. The steel piece you intend to grind to some special shape you need should be quite heavy. Unfortunately, it may be hard to design and make a heavy bar that can reach into a narrow confined space.
Generally speaking, a bucking bar that is at least as heavy as the rivet gun seems to be the most effective. However, you may seldom realize this ideal. Actually, you will probably be quite satisfied to use a bucking bar weighing about 2 lbs. against 3/32" rivets, and one weighing approximately 3 lbs. against 1/8" rivets. More often than not, though, you will find the bucking bars you are using the most weigh somewhat less.
Good Riveting Practices
Adjust the compressor air pressure, and the regulator at the rivet gun, if necessary, by adjusting the gun valve so that the impacts produced by a cupped rivet set, when held against a wood surface, just dents the wood. (This, of course, would be somewhat less than demolishing the wood.)
The proper pressure at the gun is a far lower pressure than that most builders assume to be essential. Would you believe a mere 25 psi is all you need for 3/32" rivets, and a slightly higher, 40 psi, for 1/8" rivets? If you balk at that low 25 psi setting, why not give 40 psi a try for both rivet sizes, and alter the pressure later to suit your own gun handling technique.
Take care - although driving larger rivets will take up to 90 psi of compressed air at the gun, that same high pressure, when directed against a smaller rivet, could cause you to lose control of your rivet gun action and dent the heck out of the surrounding aluminum skin.
Here is something else to remember. Since many of us use an air drill that operates far better with 90 psi than with 25 psi, we have the problem of remembering to cut down the pressure for riveting. Try to develop the habit of verifying the compressed air pressure before picking up any pneumatic tool -especially the rivet gun. All it would take is a single squeeze of the trigger to ruin your day (also see Figure 2).

Always try to use the correct length rivet. It should be long enough to penetrate the parts to be riveted and still protrude to a length approximately 1-1/2 times the rivet diameter. In other words, a 1/8" diameter rivet should stick out about 3/16" (certainly not less than 1/8") before it is bucked.
Next, be sure the parts to be riveted are in close contact with each other. Put clecos in the adjacent holes if necessary. Incidentally, when riveting sheets of different thicknesses, the manufactured head of the rivet normally goes against the thinner skin, whenever practical.
Now, if it is a raised head rivet you intend to drive, select the correct size cupped rivet set and insert it in the rivet gun.
Incidentally, when using a cupped rivet set it is a good idea to stick a piece of masking tape over the end of the rivet set to help keep the rivet head and adjacent skin from picking up tool marks during riveting.
Place the rivet set squarely on the rivet head and hold the rivet gun so that it is perpendicular to the surface. The rivet gun set must be pushed hard against the rivet head, forcing tightly against the skin.
At the same time, have someone position a suitable bucking bar squarely on the protruding rivet shank exerting sufficient force so that you, as the "gunner", can tell that the bucking bar is in position.
Bucking bar pressure must always be positive against the rivet shank, but must not be so much that it overpowers the pressure being exerted by the gunner. Actually, the pressure should be light enough to allow the bar to vibrate in unison with the rivet gun while the rivet is being driven. When you have to do the riveting and bucking alone, this coordination problem doesn't arise. However, when two people are involved (a gunner and a bucker), a method of communication should be agreed upon. You can resort to an exchange of remarks like, "Ready?", "Not yet.", "You on it?", "O.K.?", "O.K.", "Hit it again.", etc. Get the idea?
The rivet gun must never be triggered unless it is pressed hard against the rivet head, and the bucking bar is firmly against the rivet shank and not resting on some adjacent flange or previously installed rivet. The force being applied through the rivet set to the rivet head must never be slackened or removed while the gun is triggered. To do so would allow the rivet set to bounce wildly on the rivet head, creasing it, and possibly damaging the skin as well.
Along that same line of thought, the bucker must never, never remove the bucking bar while the gun is triggered - even if he/she sees that the rivet is being flattened excessively. A bad rivet can always be drilled out but a dented skin will always remain as stark evidence of that blunder.
Avoid teasing the gun trigger to the degree that it hammers too lightly and for too long on the rivet because that may cause it to work harden and crack. A single short burst yielding about a half dozen sharp impacts should be all that is needed to set a rivet properly.
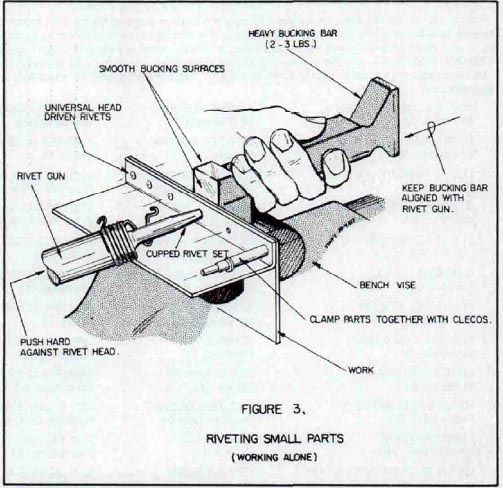
You can rivet in a lot of places without help if you can reach both sides of the work (see Figure 3). When riveting small parts, always try to clamp them in a vise, or otherwise immobilize them whenever possible. That will enable you to hold the rivet gun in one hand, and the bucking bar in the other knowing that the parts will not move around and mess up your riveting.
Inspect each driven rivet, but don't make a fetish of it. That is, do use a small inspection mirror and flashlight if necessary to check the shopheads on the backside wherever you can. However, skip the magnifying glass, feeler gage and rivet gage routine for every rivet. Using a rivet gage initially for the very first dozen or so rivets you have bucked is O.K. But after that you should be able to judge well enough to know a properly driven rivet from a bad one - without measuring every one.
If a rivet has been insufficiently driven and the formed head stands too tall, it is perfectly acceptable to restrike it. Don't overdo it though and smash it down too much.
Remove every rivet that is poorly driven or otherwise damaged. This is a metal working tradition worth perpetuating.
Huh? What Did You Say?
One very important final recommendation. Wear a hearing protector headset, ear plugs or both to block out that sporadic rivet gun noise generated during your riveting sessions . . . and how about a set for your helper?
