Aircraft Welding and Steel Tube Fabrication Part 9
A Primer for the Novice Aircraft Builder
By Budd Davisson (originally published in EAA Experimenter, April 1988)
Before getting into the nitty-gritty of actually welding the fuselage together, let's review the assembly chronology of putting the fuselage together in the first place. These steps are:
Jig sides. As you've already been shown, lay out the jig board for the sides of the fuselage first.
Cut, fit, tack sides. This is self-explanatory. You put the tubing into the side jigs and tack them. Obviously, you make one assembly in that jig, remove it, and then make another identical to it.
Jig for bottom. After you've finished the sides, you can come along with a hammer and knock the jig blocks off the board and lay it out again for the bottom of the fuselage (or the top, as many airplanes are assembled upside down).
Jig for vertical alignment. Once you stand the two fuselage sides up on the table, you will constantly be fighting the battle to keep the sides parallel to one another and perfectly square, so in at least two places (preferably the firewall station and the back of the seat station) erect two vertical plywood "bulkheads" to hold the sides vertical at those two points.
Jig crossbraces. To jig between the two sides, cut 1 x 2 pieces of wood and notch the ends; they will hold the sides exactly the distance apart they should be at each station. Remember to have the jig boards an inch or so away from the exact station where the crosspiece will be welded. Make up homemade clamps from threaded rod and pieces of scrap lumber to clamp these crossbrace jigs in place.
Jig diagonals. To hold each station perfectly square will require maintaining the same dimensions across the diagonals from each corner of the station. This is most easily done with wire -and turnbuckles for adjustment or simply wire and inserting a piece of wood in the middle of it to twist it and give it the dimension required.
Fit crosspieces. Each of the crosspieces can be cut and fitted into place, both top and bottom (See Figure 3).
Tack weld front bays. Most aircraft fuselages are square from the seat back forward, but they taper from the seat aft, so you can jig, fit the pieces, and tack weld the fronts bays, which gives quite a measure of rigidity before pulling the fuselage sides together at the tail.
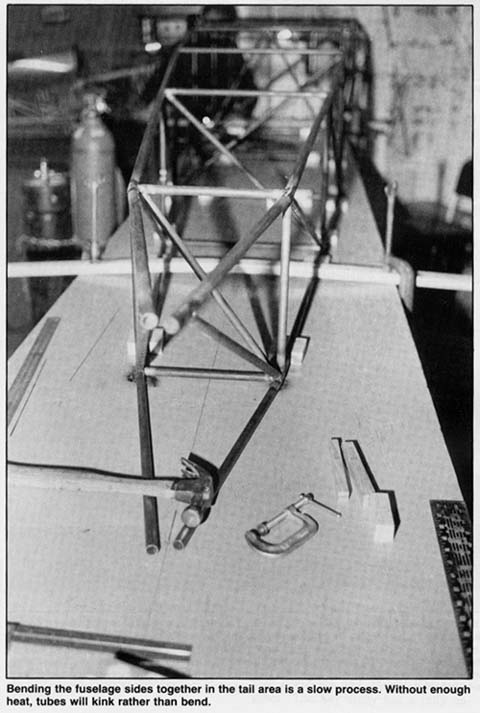
Bend the fuselage sides. In pulling the fuselage sides together at the tail, be careful not to rush the bend (See Figure 2).Heat the longerons completely, bringing the whole bend area to a cherry red, before any pressure is put on them at all. If you try to bend tubing without enough heat, it will kink, and at this stage of progress, that could be enough to kill the project for you because of the frustration.
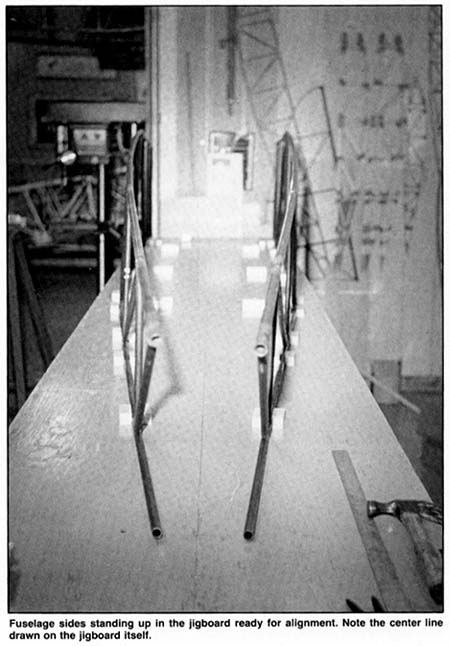
Jig center line. Establish a center line on the firewall station and attach a string to that station. Establish a similar center line at each station and pull the string taut back to the area where the tailpost will be. It is essential that the tailpost fall upon the center line of the fuselage, although a variance of a fraction of an inch is often acceptable. For this reason, many individuals will put the tailpost in only after the fuselage has been finish welded, which allows them to correct any misalignment at that point(See Figure 1).
Finish crossbracing. Moving down the rear of the fuselage installing crosspieces and diagonals is only a repeat of everything you've done in the past, except that there are no 90-degree joints, and you'll get a lot of practice with the rasp, cutting and fitting angles.
WARPAGE CONTROL
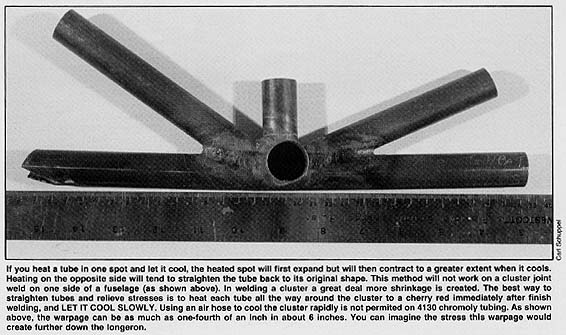
Not enough can be said about the problems of heating and contraction in a steel tube fuselage. If you want a classic demonstration of that, take a piece of tubing three or four feet long and just heat it up in the middle, and watch how the end moves back and forth. The entire fuselage will do the same thing as you do the finish welding, so it is critical that before you light up the torch with the intent of finish-welding any joint on the fuselage you realize what is about to happen.
When you heat tubing up to welding temperature, it will always wind up bowed toward the side that was heated. These forces are quite powerful, and even though you may have your fuselage firmly tacked together with extremely rigid jigs, they still cannot prevent a certain amount of this warpage. You, however, can prevent it and can correct most of it, as it happens, if you just understand the concepts involved.
One way to guarantee a fuselage that is crooked as a dog's hind leg is to stand on one side of the fuselage and weld right down a longeron, doing first one joint and then the next. In so doing, you are concentrating all the heat on one side of the fuselage and all the warpage is going to tend to pull in one direction. Do not concentrate your welding on one side; try to plan ahead and spread it around.
The ideal way to eliminate or control the amount of deformation the warpage has caused in the fuselage is to do completed stations, meaning you will mentally cut the fuselage into vertical planes and weld each one of those planes complete. This way you have fed heat into the fuselage on all four sides in one given area, which will tend to equalize the forces and the resulting distortion.
As you weld each station, measure the diagonals of the next station and check to see if the center line is still where it's supposed to be (remember the string?). If you have some distortion, use diagonal wires and turnbuckles to pull everything back into line, and heat the fuselage in that appropriate area to straighten it out. Since you know that the tubing tends to pull toward the side that's heated, you know that, if you heat it on the outside of the weld, it will tend to pull itself back straight again.
You must be aware of and looking for distortion caused by heat every time you pick up the torch and start to weld. If you know it's there and you know what causes it, you will always be able to correct it.
Chronology of Welds
It's traditional to start welding the fuselage at the front and work toward the tail. Unfortunately, as everybody knows, that also means your best welding is at the back of the airplane, where you need it the least. You get so much better as you work down the fuselage that almost every builder, when he's finished, wishes he could go back and start over again, knowing what he knows when he's finished. There is no reason that you can't start welding at the back of the fuselage and work forward, but distortion control becomes a little more difficult. That does mean, however, when you get up to the front part of the fuselage where you're welding motor mounts and wing fittings, you'll know a lot more about what you're doing and you will be much more comfortable with the project.
Normalizing
Normalizing has been discussed before, but when you are at this point of building the fuselage, you should be thinking about normalizing those critical welds, so you don't forget to do it later (See Figure 4). If you are using the technique in which you normalize as you go by reheating the weld, while it's still hot the first time, and letting it cool slowly, then this is not a particularly critical step. If you don't normalize as you go, go back and reheat the high-stress areas, such as the corners of the firewall station, the wing mount points and the landing gear mount area and play the torch on them while they're cooling down.
Critical Weld Areas: What to Farm Out!
Many builders are not comfortable doing the final welding on such critical areas as wing fittings, motor mounts, and landing gears. Those areas are not as critical as they think they are, but for their peace of mind they might be happier having a pro do it.
There are, however, certain areas that absolutely should be turned over to a pro. There are a few landing gear designs, for instance, that are almost impossible for an individual builder to do with a single acetylene torch, but a pro could knock them out easily with a TIG welder. Make up your mind, well in advance, that somewhere along the line you are going to have to swallow your pride and call in the pros, because once you have tried to weld an assembly, it becomes much more difficult to reweld it. As a matter of fact, once something has been welded, it normally cannot be rewelded; it must be gusseted or sleeved to make up for the bad weld that's already in place. Often you wind up making an entirely new assembly.
Rust Prevention
Preventing the rust on the insides of welded tubes is something that everybody knows is necessary, although not everybody does something about it (See Figure 5). Many tube fuselages are assembled in such a way that before the tubing is welded, holes are drilled at the intersections, inside each piece of tubing, so that oil can be poured in an inlet at one end of the longerons, and it will eventually find its way in to all of the tubing. In the past, this oil has been nothing more than boiled linseed oil, but now there are several commercially prepared oils that do the job even better.
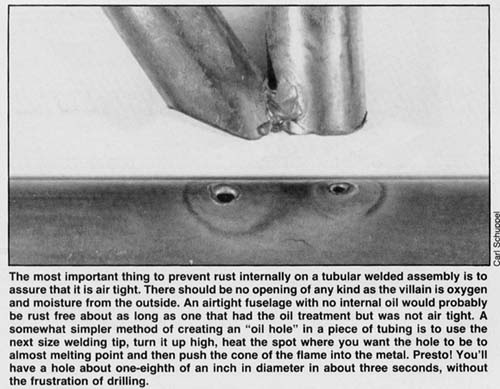
Rather than drilling a hole in each one of the intersections, which raises the possibility of one of the holes being plugged and therefore not allowing the oil to pass, another method is to drill a small (No. 40) hole in the outside of each piece of tubing (especially the rust-critical ones), partially fill the tube with oil, and then either weld the hole shut or put a pop weld in it. Either way works well. It is universally agreed that some form of rust protection must be done on the inside of the tubing, since chromoly is very susceptible to rust.
Something that isn't talked about often enough, however, is the rust on the outside of the fuselage in the building stages. It's not unusual for a steel tube fuselage to sit around for a year or two, after being welded together, before it is painted. Those areas that are welded rust very quickly in that kind of situation. Therefore, it's a good idea, after you have done most of your finish welding, to take a spray can of oil similar to WD-40 or an oil rag and wipe down each one of the joints. However, bear in mind that to paint the tubing you are going to have to remove that oil, either by sandblasting or with a commercial oil cleaning compound like that used by paint shops.
