Making Wood Wing Ribs
By Tony Bingelis (originally published in EAA Sport Aviation, February 1994)
An article entitled "Why Not Build A Wood Airplane" appeared in the May 1991 issue of SPORT AVIATION. The idea of building a simple, inexpensive wood airplane appealed to so many readers that hundreds of you (yes, hundreds!) wrote to the referenced sources for more information and plans . . . for the Fly Baby, the VP-1, and the Pietenpol Aircamper (a 1930’s design), in particular.
Why the interest in the Fly Baby, Pietenpol, and the VP-1? Undoubtedly, it was because the article boldly proclaimed these three wood/fabric jobs to be the simplest airplanes to build - and further pointed out that the referenced designs were well proven, and that many had been built . . . and still are being built worldwide.
Well, it is now about 2-1/2 years later. I wonder how many of you have actually purchased plans or vowed, by golly, that you were going to build one of those dream airplanes for yourself?
I wonder, too, how many of you have actually started to build?
I am sure those of you who are already into a project are enjoying the unique and intriguing experience of actually creating something tangible and worthwhile. Of course, the odds are that many of you haven’t actually started, yet. After all, such a major undertaking deserves plenty of thoughtful contemplation . . . it would demand a lot of your free time for a long time, wouldn’t it?
But, that aside, there may also be other troubling thoughts.
Maybe you are still thinking about shuffling things around in the garage to make space for the project . . . and maybe a workshop.
Or maybe you already have the space and a modest collection of tools, but simply haven’t gotten around to purchasing any materials yet.
Perhaps it could be you haven’t decided how, or where, to begin. After all, the mere thought of building a real airplane can be overwhelming.
Well, that need not be the case if you keep this thought in mind. All you need to do to get started is to make one simple part, then another and another . . .
Before long, you will have lots of airplane pieces and parts, and you will see your airplane grow and take shape as you assemble more and more completed components.
If you already have a set of plans, and are still intrigued with the idea of building your own airplane, why not obey your original impulse and get started right now? Well, tomorrow will do.
You can begin by making a wing rib jig, and then a wing rib or two.
After that, if you find you don’t enjoy working with your hands and mind, you can simply end the project, right there - and you won’t be out much more than a few hours of your time, interestingly spent . . . and a few bucks.
Here are a few tips that may rekindle your resolve and help you get underway sooner.
About That full-Size Wing Rib Drawing . . .
Most plans come with a full-size drawing of the wing rib(s).
On the other hand, a few plans only provide a small drawing of the wing rib showing its essential dimensions. From these, you are supposed to make your own full-size rib layout.
You will need a full-size rib layout to construct a plywood jig. A rib jig is essential for the assembly of the built-up ribs common to a large variety of aircraft, including the venerable Pietenpols.
Obviously, you can cut out the full-size rib drawing furnished and use it as a pattern. However, if you prefer not to ruin your plans by cutting the rib drawing out to use as a pattern, you can instead transfer the rib outline directly to the plywood base you intend to use as the rib jig.
Building A Rib Jig
If, for example, you selected the Pietenpol as the aircraft to build, lucky you! Thanks to its simple rectangular wing, all the ribs are the same size. This means you only have to build one wing rib jig.
You can, therefore, get by with only one piece of 3/4" plywood for the jig. It should be a piece about 10 inches wide and approximately 64 inches long. It must have a smooth surface . . . at least on one side, and be warp-free.
1. First, draw a base reference line the full length of the plywood about 2 inches up from the bottom edge. Mark off the exact chord length specified in the plans. Note: Since your full-size plans sheet drawing may have expanded or shrunk somewhat with changes in humidity, it’s a good idea to measure the chord to see that it is the correct length. Use the exact dimension specified for the chord, even if the drawing length is off slightly.
2. Lay your full-size rib drawing on the plywood slab and align both base reference lines. Then, tape down the corners of the drawing to prevent it from shifting.
3. Transfer the rib outline to the plywood jig by making prick (punch) marks with an awl, or some similarly pointed gadget, through the drawing and into the underlying plywood jig base. Make a prick (punch) mark at each vertical station depicted on the drawing. This will accurately duplicate the rib shape on the plywood.
4. Remove the drawing and connect the punch (prick) marks with an ultra-fine point Sharpie pen. It might help if you drive small headless nails into each prick mark location on the plywood to force a flexible wood strip to conform with the rib outline while you trace around it. Ignore an obviously misaligned punch mark because its dimension may not have been accurately rendered. A smooth curve intersecting most of the punch marks is what you want.
5. Next, draw in the location of the wing spars, the diagonals, and the uprights.
6. Ordinarily, most builders overlay their rib jig with a sheet of polyethylene, or wax paper. The intention being to keep a freshly assembled and glued rib from sticking to the jig. After all, many ribs will have to be built in that same jig.
My own preference is to eliminate the need for the protective wax paper by drilling a large hole (1" dia.) in the plywood jig (with a hole saw) at every joint intersection. This will effectively prevent the glued rib joints from sticking to the plywood jig. It will also make the removal of a completed rib easier.
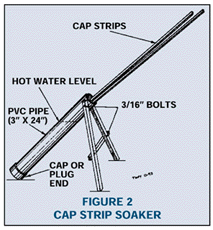
Note: Due to the rather sharp bend in the leading edge area of a wing rib, it will be necessary to soften the first 12 inches or so of the cap strips by soaking them in hot water before prebending them in a bending jig. Flex the strips to see which way they bend the easiest . . . grain orientation does not matter here. Allow the cap strips to dry completely in the bending jig (approximately 24 hours) before using them.
7. Nail small blocks (3/16" x 2/16" x 1-1/2") along the outside rib line. Position a block at each upright location. Next, cut two of the prebent cap strips to the approximate length and load them in the jig, pressing them firmly against the small blocks along the rib profile. Add blocks to the inside of the cap strip, wherever necessary, to force and hold the cap strip in position. Headless nails may be used instead of wood blocks.
8. Prepare a short wood spacer block the exact size of the wing spar, position it accurately, then nail it to the jig.
9. To complete the rib jig, cut and fit the individual uprights and diagonals. Position them accurately in the jig by nailing small blocks on each side of each diagonal and upright.
Making The Ribs
Every new builder wants to know what glue to use. There are several good choices. Aerolite 306, T-88 epoxy, FPL-16, Weldwood Plastic Resin, Recorcinol, and APCO Structural Adhesive, to name a few of those commonly available to builders.
Be careful handling and using any of the epoxies as you may become allergic to them and develop severe skin rashes.

Most wing ribs are built of Sitka spruce strips, however, Douglas fir is often used because it is less expensive and more likely to be found in local lumber yards. Although it is stronger than spruce, it is also somewhat heavier.
Cap strip sizes vary with the design of the aircraft. Cap strips 1/4" x 1/4" are strong enough for use in most fabric covered wings. Even so, the rugged Pietenpol uses 1/4" x 1/4" spruce cap strips.
You will find that wing ribs used in plywood covered wings are, generally, somewhat stouter because they must absorb the stresses imposed by the application of stapling strips, or nailing strips, during the wing skinning process.
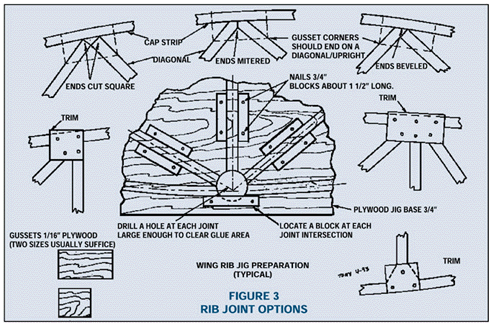
There are two schools of thought about fitting the diagonals.
One believes the ends should be beveled, or mitered, to fit tightly against the cap strip and the adjacent upright or diagonal.
The other believes the ends can simply be cut square with the corners butted against the cap strip and adjacent upright or diagonal.
Take your choice. In my opinion, the method used doesn’t matter. A well glued and gussetted wing rib joint is virtually indestructible. Try to break one apart and see for yourself.
Load your rib jig by inserting the cap strips first. Then, slip each glue coated upright and/or diagonal in place.
After the rib jig is loaded, and while the glue is still wet, add the plywood gussets. Be sure each has been scuff-sanded to remove the surface glaze.
Note: You can save a lot of work if you scuff-sand the plywood sheet before cutting out the individual gussets.
Apply glue to cover the bottom sides of the gussets completely. This will eliminate the need for varnishing under them later.
Secure the gussets in place by clamping, stapling, or nailing them to the underlying wood cap strip, diagonal and/or upright.
If you nail or staple the gussets on, the wing rib may be removed from the jig without waiting for the glue to dry. Simply turn the rib over and immediately attach the gussets on the opposite side to complete the rib.
Obviously, if the gussets are clamped, you will have to allow the rib to dry overnight . . . sort of slows down production but results in a somewhat lighter and better looking rib.
Since the oozed out glue will have dried and hardened on the backside of the rib, it will be necessary to level and smooth each rib joint before adding the backside gussets.
Use a 10 inch bastard cut mill file rather than sandpaper to level the joints. The file also works well for trimming around the spar openings.
Setting Up A Production Line
You can reduce the amount of time it takes to make all those ribs by setting up a sort of production line.
1. You know you will have to have all of the cap strips prebent before you can use them in the jig. Therefore, why not load four additional cap strips in the bending jig everyday so they will be ready for use when you need them. Stockpile the prebent cap strips where they will be safe from harm, and yet be handy.
2. Make your first rib assembly serve as a prototype or master rib by loading the jig with all the pieces fitted and assembled with no glue. Number each diagonal and upright in the jig with your trusty Sharpie pen. Begin at the front of the rib and also mark the same number adjacent to each upright or diagonal location in the jig.
Remove each diagonal and upright, one at a time, and use it as a master for cutting the required number of identical pieces for all of the other ribs to be built. Number each one of these pieces and stockpile them in a simple individual bin, or coffee can, on your workbench or table.
Precut, mark, and stockpile the other uprights and diagonals in the same manner.
You can make a simple cutting jig for cutting each piece to the exact length without having to measure each one separately.
A sanding disc can be most helpful in precisely shaping the ends on the diagonals if you prefer to bevel and mitered fit the end angles instead of cutting them off square.
You can also precut and stockpile all of the many 1/16" plywood gussets you will need.
Other Tips
One end of the wing rib cap strips must be soaked in hot water or steamed. A 3" diameter PVC pipe capped at one end makes a handy soaker for this purpose.
The ideal saw for cutting the diagonals and uprights is
the type used by model builders (Hobby Shops). It has very fine teeth and makes nice smooth ready-to-glue cuts.
You will have to decide whether to nail, staple, or clamp the gussets in place while the glue dries. Using nails is quicker provided you don’t remove them . . . but they will add about 1/2 pound to the aircraft’s empty weight.
If you use staples, staple the gussets on through small pieces of thin cardboard. These will prevent the staples from burying themselves in the plywood fibers, and will be easier to remove later with a pair of diagonals.
Finally, clamping the gussets to the rib while the glue dries is the fussiest but classiest method as there will be no nail heads or staple holes marring the completed rib. However, you will have to prop the jig up on 2x4 blocks so clamps may be used. In this same regard, you will have to trim the jig board edges within 1" of its rib outline for the same reason . . . access for the clamps.
