Hoerner Wingtips Tanks for Sonerai II – Part 2
From Bits & Pieces Newsletter, February 2015 Issue
By Bill Evans, EAA Chapter 266, EAA 794228
This is the second in a series of articles on an interesting project I’m doing over the winter to extend the range of my Sonerai II by adding wingtip tanks. The original plan was to remove the wingtips and use them to make templates so that someone else might make Hoerner wingtips.
-
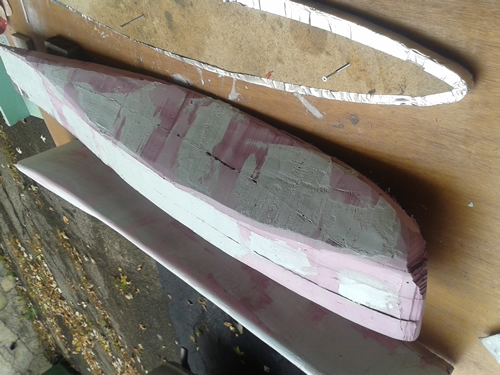
Planning the shape. The Hoerner wingtips are intended to be installed on a Sonerai II. The principal shape is fairly simple. Remove the original wingtips. Use one as a template to cut out four 2-inch foam blocks. The wingtip is also used to lay out the profile for two plywood templates from which the foam can be carved to shape. The plywood templates will be used twice, and they are used to carve the foam. They need to be cut very close to the removed wingtip profile.
The Hoerner wingtips used on gliders are a different shape. This Sonerai hopes for 180 mph. I am fortunate to have a fairly large band saw, and it suited me to saw the foam blanks from a sheet of pink foam insulation. They should be cut at least 1/4 too large all around. I used pink because it resists epoxy resin.
Once cut out, the blanks are glued together. I used fabric spray adhesive (wear gloves, a mask, and goggles) to glue them together, though they can be broken apart later. - Calculating volume. Calculus is beyond me, so I needed a simpler method of finding volume. Two of my kids do calculus; neither was willing. Apparently calculus is work. I did this by averages. The wingtips are 54 inches long. The average thickness is about 4 inches. They are 8 inches wide. Half that thickness is constant chord. Thus half the wingtip is 54-by-4-by-4 or 864 cubic inches. The second or outboard half is carved at a 45-degree angle. Half of 864 + 864 = 1,296 cubic inches or 5.6 U.S. gallons. However, some of that space is for strobe lights. Part of it is for aileron mass balance weights in the wingtip. Part of that space is used for wingtip attachment and fuel bulkheads. In the end, each wingtip holds about 3 U.S. gallons. Ideal for my needs.
The Jabiru 3300 engine consumes about 5 gallons per hour which results in a flight duration decrease from 4 hours to 3 hours. We wanted 4 hours fuel duration. The 6 gallons in the wingtips bring this Sonerai to 4.2 hours!
It is very possible to add enough weight to the wings to pull the wings off in flight. Also, someone did pull the original “A” wings off by doing steep turns, having lengthened each wing by 13 inches. All this is to say it’s wise not to get greedy. It’s also wise to choose the aircraft configuration for aerobatics carefully. So, 6 gallons it is. Tanks must be empty for aerobatics. Watch the g-forces.
- Templates. Tracing the wingtip shape to the 5/8-inch plywood for the template needs to be done carefully. At the end of the process, the wingtips have to fit the wing. However, you can make it easier for yourself. There is a gap of about 1/32 inch between the wing skin and the end rib. If a wingtip is to fit that gap, it needs to be made in matched male/female moulds. That would be four moulds.
Foam blocks after initial cuts with hot wire and some filling
We are not going that way; the wingtip is to be a layup over a male plug because it is much simpler, cheaper, and faster. Just one pair of wingtips are being made. Matched moulds are a waste in every way. But the profile still needs to be very close. Carefully we used a jigsaw to cut the plywood very close to a thin ink line. Once cut, the wingtip is compared to the template which is sanded to match exactly. Once one template is made, make another. Since the wingtip is not a precision layup, you need to have a little room to play with. The trick is to install 1/32-inch aluminum alloy strips. The strips are not rigid, so they can move a little bit to fit the new wingtips.
- Carving the foam (with a hot wire). Essentially our hot wire consists of an Inconel or similar wire stretched over a wooden frame, then electrified with 12-volt DC.
In this project, we used a length of 1-by-2-inch lumber cut into three lengths shaped into an “H”. This frame is about 2 inches square. Bolts were installed at one end with jamb nuts to retain the wire. A coil spring in tension is used at the other end to keep the hot wire tight as it becomes red-hot. Try to get the hot wire as straight as you can now. (See photo below.)
We found that the hobby-shop hot wire is very thin and lasts long enough to cut maybe 2 feet of 8-inch-wide foam. We happened to have some Inconel 0.032 locking wire, so that was substituted as soon as the first wire broke. Do likewise at the outset.
The bolts that were used to attach the hot wire have jamb nuts. We found that hand tight was tight enough. Sections of locking wire also can be used to locate and tension the coil spring at the other end.
Homemade hot-wire deviceYou have probably collected one or more 12-volt battery chargers over the years. I have three or four now. All of them do the job of heating the wire. You will discover that battery chargers have an overload device. Ours all trip off after about 40 seconds of being overloaded by a hot wire. They switch back on about 10 seconds later. Once it does trip off, the hot wire stops carving within a few seconds but starts carving also within seconds of being powered again. You’ll need a little patience. The short version is this: The battery charger clamps go on the two bolts that retain the hot wire. Clamp on and plug in.
You also need to respect gravity. If you lay your foam block stack on a table, the hot wire will sag enough to require that you fill either the male plug or the wingtip layup. Thus you place the foam blank assembly standing on end. Failing to do so will cost you $100 in filler and maybe two full days spent filling and sanding. Your wingtips also will be heavier. The first builder to do this warned in his article that hot wiring is done in the vertical plane. We forgot that bit. Try to do better.
Once the four foam blanks are glued together, the plywood templates are installed so that they are as close to exactly aligned as possible. We used some 4-inch-long wood screws to attach the templates to the foam. Take care of those templates. They will be used twice.
It does not seem to be worthwhile to try to start the red-hot wire exactly at one end. I laid it against the foam about 6 inches from one end. A hot wire cannot be forced through the foam. One can draw it slowly along trying to ensure the wire is against both templates. Speed at this time can only mean wasted time and materials. Just let the wire cut at its own speed. Patience will result in success here. Focus on the wire in relation to the wood templates. (Oh, yes, I put aluminum tape over the edges of the wood templates, hoping for a smoother operation while carving.)
Once you do get to one end, move to the starting point and carve the foam to the other end. Next (and I do mean next), turn the foam/template blank around to carve the profile into the other side. (Warning: Do not, repeat, do not attempt to use the hot wire to clean up irregularities. Sandpaper on a block is ideal for those cleanups.) You get just one pass with the hot wire.
The next step is to carve the 45-degree angle that forms the whole reason for Hoerner wingtips. It is this bevelled shape that causes wingtip vortices to be displaced outboard of the wing by maybe 8 to 12 inches which results in perhaps a 5 percent improvement in lift and a corresponding reduction in drag. On a Sonerai at 180 mph, 5 percent might mean almost 10 mph in cruise speed. A Sonerai is basically a V-class racer. Speed is almost everything.
You need aluminum tape for this task. The shape you lay out with this tape will be carved into the foam and laid up into fibreglass. It matters plenty.
Determine whether the plug you just made will be for the left or right wingtip. This, too, matters. Later you will be making another plug for the opposite wingtip. How? The lower side of the template has a slightly concave shape near the trailing edge. Place this edge down. Now let’s make the left wingtip first. Facing the leading edge of the plug, remove just the plywood template to your right. Using the 2-inch aluminum tape, lay a straight line on the lower side of the plug 4 inches from the tip. (Four inches is easy to find because our foam blocks are 2 inches thick.)
Sight along that tape to ensure it is straight. Use a strong light. Get it straight before anything else. (When it is time to make the right wingtip, you place the plug as above and remove the wood template to your left.)
Next, lay another length of aluminum tape 1/2 inch from the top and curved all the way down the end of that curved shape, from leading edge to trailing edge. Two-inch metal tape doesn’t stretch. So lay as many layers as you need to get that shape. Using a flexible wooden strip or metal strip, mark the curve that you want. Cut those strips of tape for an edge 1/2 inch from the wing top surface adjacent to the first strip. These strips need to be just about perfect, because you are going to carve the foam at 45 degrees with them as templates.
Once they are right, stand the plug on end, plug in the charger, and carve the foam with the hot wire gently running along the edges of the aluminum tape. One again you get just one pass with the hot wire. Second tries just ruin plugs. Gently is the operative word here.
Carefully remove the aluminum tape so the foam is not torn or cracked. Use a knife if you must. Go slowly. (We used the aluminum tape that comes with the wax paper backing.)

- Sanding, filling and taping, and little wax. We used 60-100 grit sandpaper on a block to remove the ridges from what is now our plug. The leading edge is curved with sandpaper or a Bondo rasp to form a 5-inch radius. The trailing edge is also sanded to form a 2-inch radius. A sanding block and paper are used to round that 1/2-inch edge near the top into a radius. That 1/2-inch radius is also sanded into the curve at the leading edge. Get the curves smoothed out.
Take good long looks with bright lights along all those 52 inches of surfaces. You want the lines straight and the curves even. If there are holes in the plug, use some material about the same hardness as the foam. Bits of foam cut to shape and glued in may be best. Sand them smooth, too.
Sight along the length of your plug. If needed, fill and sand any angles, bulges, or other irregularities. Time spent here on the plug will save much more time, weight, and filler on the wingtip itself. Bondo will do nicely.
The finished plug
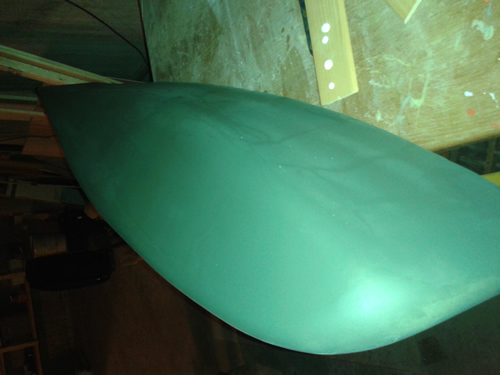
Our plug will be covered in 4-inch-wide tape. Tiny holes will not matter. However, any angles in the curves will be visible.
- The renovation stores carry red plastic tape similar to box tape but 4 inches wide. It is used to tape the Tyvek vapour barrier to the outside of homes before siding is installed. This red tape, simply said, does not easily come off.
The red tape is applied to the foam plug so that it overlaps as little as possible. However, it must not have creases or wrinkles, because they will be transferred to your wingtip. I unrolled the tape a little at a time and used a spreader to press the tape against the plug. Once again, gently is the operative word here. This tape is used so the wingtip may be removed from the plug without damage to either. You won’t reuse the plug, but you will use parts of the foam for bulkheads and fuel baffles.
If you have ever fibreglassed in anything, you know that the trick is to get the layup out of or off the mould. I used some spray wax on the red tape to give it some chance of separating from the layup. If you care for the work, use paste wax, shine it, and then apply parting compound. Sometimes it makes separation easier.
You could also carve into your plug a 2-degree angle on the upper and lower surfaces to aid wingtip removal from the plug, although I chose not to do this.
Look for Part 3 of the series in the March issue.
