A Few Sliding Canopy Details
By Tony Bingelis (originally published in EAA Sport Aviation, March 1984)
THE SLIDING CANOPY lineage dates back many decades to the old military fighters, trainers and to a few noteworthy civil aircraft. The most notable of these was the venerable Navion. It's sliding canopy was a clever installation that permitted the cockpit to be enclosed for comfort without restricting the pilot's vision and, at the same time, effecting a remarkable reduction in drag.
Many homebuilders like that idea and continue to adapt this unique sporty sliding canopy concept to their own aircraft.
Sliding canopies are uniquely suited to most aircraft, other than high wing cabin jobs, of course, because fuselage structures characteristically taper from the cockpit area aft. This taper affords the clearance necessary for a canopy to slide back without hitting on the structure.
The pleasing appearance of a sliding canopy design is well known but its practicality and other important features may not be.
A sliding canopy installation affords the ultimate in unobstructed pilot vision . . . something you can't quite match in a cabin/door arrangement. When a canopy is slid back, the large unobstructed cockpit opening makes entry a simple matter of stepping down. Your interior inspections and the sometimes inevitable maintenance or refurbishing work that may have to be done can be done under good working conditions, better than those to be found in a typical cabin job where the light is bad and ventilation is nonexistent. In flight, you can slide your canopy back and savor that brisk fresh air (for as long as you can stand it) . . . just like in an open cockpit job. During the hot summer days you can park the aircraft with the canopy open, with the assurance that the wind will not slam it shut or tear it off. In the event of a turn-over accident, aircraft having doors or sliding canopies may fair better in such an unpleasant happenstance. The worst off are those aircraft equipped with flip-over, front hinged or the up-and-over canopies, as they cannot be opened for an emergency landing . . . nor after the incident without a lot of luck and outside help.
As for the shortcomings inherent in a sliding canopy installation, I can only think of two. When it is raining and you try to get in or out of the aircraft, the cockpit will get wet (so, who wants to fly when it's raining?). The second shortcoming that comes to mind is that sliding canopies are harder to seal against wind noise. Canopies are natural airfoils and as such tend to lift and possibly widen in flight. A good installation, however, will nullify this small annoyance. In short, the real worth and attractiveness of a sliding canopy is undiminished by such negative trivia.
I feel tempted to point out that the sliding canopy type of cabin enclosure as a design feature has long been shunned by the major aircraft manufacturers . . . but I won't (ha). Understandably, a sliding canopy is hardly suitable for a high wing aircraft but why should the buyer of an otherwise attractive store bought low wing design be denied the prestigious sliding canopy installation as an option? All this is of no great significance to you as a homebuilder except that it means there are no surplus or used canopies, frames or tracks in the supply pipeline that you could obtain and use for your own project. As a consequence, if you are to have a sliding canopy, you must make your own canopy frame and even the tracks, in some instances.
Fortunately, that job is no more difficult than most any other you may encounter during the building of your airplane.
Although ready-made canopy tracks can be purchased, they are rather expensive and, furthermore, may not be exactly what you need for your particular installation. Some builders purchase, and successfully adapt, desk drawer sliding guides as canopy tracks. These desk drawer slides are used in some types of office furniture but are, for the most part, rather short and may not be exactly what you need either.
Making Your Own Canopy Tracks
The basic element for a canopy track is a length of steel or aluminum formed into a "C" cross section. This C channel material is not commonly available except in rare instances of a lucky junkyard find. You will, therefore, probably have to obtain square or rectangular tubing and modify into the appropriate C channel shape.
Square or rectangular steel tubing can be ordered from homebuilt suppliers. The commonly stocked dimensions are 3/4" x 3/4" and 3/4" x 11/4". Other sizes, smaller than these, are sometimes available also if preferred. However, after you get the tubing you will have to get it slotted or you will have to do that yourself.
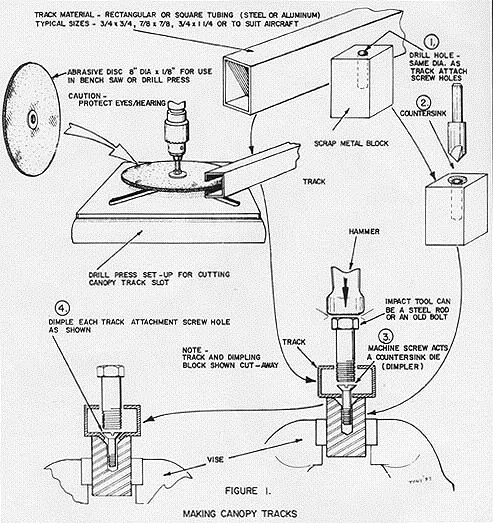
If you have access to a milling machine, you can cut the slots quickly and accurately. If not, don't charge out and buy one just to mill a couple of slots. You can still slot that square or rectangular track material yourself, more economically, on a bench saw or in a drill press. I warn you though, your neighbors will probably not appreciate your latest manifestation of creativity, as the operation will be noisy. So noisy, in fact, that you should protect your hearing with ear plugs or some sort of ear muffs . . . and use protective glasses, of course.
You will also need to obtain an abrasive disc for your bench saw or drill press to use as a cutting tool.
NOTE: These abrasive discs (about 8" in diameter x 1/8" thick) are made most commonly for the masonry trade to use as cut-off wheels. However, similar discs are made for use in cutting metals of all sorts, including steel. This is the type you want (check the label). These abrasive wheels are sold at hardware stores, some discount centers and, of course, at industrial supply outlets. (Caution: Do not exceed the recommended maximum rpm.)
Make the track slot wide enough for it to clear your canopy frame attachment hardware without rubbing. A slot 3/8" to 7/16" wide will be about right for most track installations.
The abrasive disc used in slotting the tubing is easiest to set up for a bench saw as it is simply a matter of adjust the fence to accurately locate the slot cut. A wide slot will require two passes through the abrasive disc. You can assure yourself of a centered slot by turning the track material end for end after making the first cut . . . or you can readjust the fence to obtain the same results.
The actual cutting (or grinding) will be a visually impressive operation complete with flying sparks and noise sound effects. But don't let all that intimidate you. It is a quick and safe alternative to a milling machine but you must wear protective eye pieces and ear defenders of some sort.
The procedure for cutting the track slots in a drill press is similar although you will have to erect a makeshift fence and adjust the table height or lower the chucked abrasive disc to the proper height. (See Figure 1). Feed the tubing into the spinning disc slowly. The rpm range at your disposal with a drill press is considerable so be sure that the maximum allowable rpm printed on the abrasive disc label is not exceeded.
NOTE: This abrasive wheel slotting technique can also be used for cutting end slots in round tubing. This is often done where a steel insert has to be slipped into the end of the tube and welded in as a reinforcement for an attachment point, as on a landing gear strut, wing strut or engine mount.
Track Installation
After the track slots have been cut and polished, the tracks may be cut to length and installed. Your track installation must be strong enough to withstand all inflight loads. A solid installation is assured only when the tracks are secured to the aircraft's primary structure . . . usually, the top longerons.
Tracks that are to be installed on a steel tube welded fuselage (and not on a wood or aluminum structure) are best welded to the top longerons. Long continuous welds along the top longeron are not necessary or desired. Short welds at intervals will adequately substitute for the attachment screws used in other types of installation. (See Figures 2 and 3)
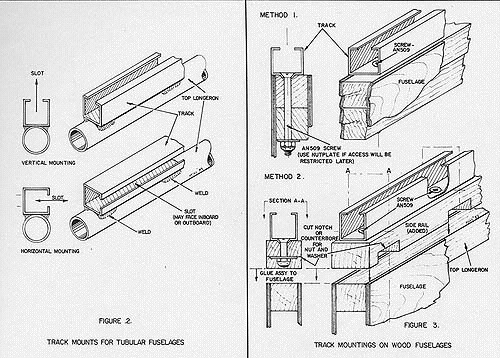
Installing canopy tracks on a wood or sheet metal fuselage requires the use of fasteners, preferably AN 509 machine screws.Figure 3 illustrates two methods employed on a wood structure although an all-metal structure can be handled in a similar fashion.
The track attachment holes should be match drilled on the fuselage before attempting any other track preparations. It will depend on your track length but, generally, 4 holes approximately 6" to 10" apart should be sufficient. Do not drill the front mounting hole (windshield bow end) closer than 2" from the end of the track, especially if your windshield frame is slanted aft, or you won't be able to insert the screw or put the screwdriver to the bolt head.
You simply cannot get a regular countersink tool past the narrow slot in your track to countersink the drilled attachment holes. Anyway, the track material being only .049" thick will not allow for much of a countersink without causing the hole to become excessively enlarged. The solution, of course, is to dimple the attachment holes. However, getting a dimpling tool through that narrow slot may also be impossible. You can get around this formidable obstacle by using an improvised dimpling set consisting of a metal block, a short rod (or bolt) and a machine screw having a countersink head. The method is graphically illustrated in Figure 1. In short, drill a hole in a scrap block of steel and countersink that hole somewhat more than you ordinarily would for the screw head diameter to be used. Clamp the metal block with the countersunk hole upright in a vise and place a canopy track on top of it. Slip a screw into one of the holes in the track and position it over the vise clamped block. Set an old bolt, or a steel rod, on the inserted screw and give the bolt several good whacks with a short handle sledge hammer (my favorite persuader). I guarantee that the hole in the track will acquire a nice perfectly fitting countersunk nest for the screw head. You can use the same screw as a die for countersinking all the other holes but I would not, later, use that particular screw in your final assembly.
Before attempting to secure the tracks to the fuselage, you should slightly countersink the fuselage mating holes to accommodate the slight bulges made in the bottom of the tracks by the original dimpling process.
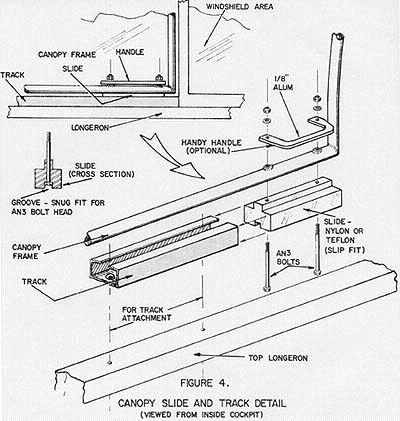
If you prefer, you can avoid the countersunk screw head dimpling process by using regular AN bolts to secure the tracks. However, that means that your track mechanism (slide) will have to be specially modified to clear the bolt heads. You could not, of course, use ball bearings or rollers with such an installation. A nylon slide could probably be made with a large slot in the bottom which would, in effect, straddle the bolt heads as the canopy is slid back. This may be difficult to do in a track made of small diameter tubing.
Other Notes
Be sure that both tracks are installed parallel to each other. Although canopy frames, particularly large ones, will have a little bit of spring and give in them, tracks that are not parallel introduce annoying friction and resistance anytime the opening or closing of the canopy is attempted.
Your tracks ought to be long enough to allow the canopy to slide back far enough to permit easy access to the cockpit. When fully slid back, the opening provided should be at least 23". You can probably get by with a little less but at the risk of making entry awkward and difficult for a passenger who may not be as nimble and supple as you.
Install positive stops in the tracks to prevent the canopy from opening too far. A positive stop gives the canopy a good solid feel. Besides, some types of canopy installations may allow the canopy to slide off the end of the tracks, if no restraint is built in.
You might also consider installing an intermediate stop or lock for a partially opened position. Ordinarily, two canopy positions are sufficient, fully opened and fully closed. If you wish to fly with your canopy partly open, or, because of some long forgotten deep seated military training you think you must open the canopy for landings, you had better build in that intermediate stop. A canopy will not, ordinarily, remain partially open in flight due to the aerodynamic lift forces developed over the airfoil-like enclosure. It will tend to slide shut automatically the minute you let go of it.
I think a sliding canopy is the most practical and most prestigious type of cockpit enclosure a homebuilder can install. For one thing, it is most unlike the current run of factory built cabin enclosures . . . and that difference makes a difference.
