Electrical Grounding
By Tony Bingelis (originally published in EAA Sport Aviation, May 1994)
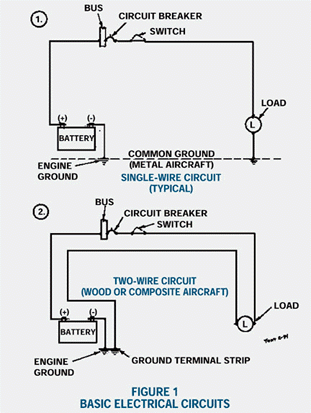
If yours is an all-metal homebuilt, its electrical system can be made up of single-wire circuits. That is, only one wire will be needed to magically connect each electrical unit or device to its electromotive force . . . the battery or alternator.
In other words, all electrical circuits can be completed through the aircraft’s metal structure, to the battery or alternator, without having to install separate current return cables.
Typically, single wire circuits rely on the aircraft’s metallic structure to serve as an electrical conductor (wire) or device when connected at any point to the metal structure is correctly referred to as being "grounded."
One-Wire Circuit vs. Two-Wire Circuits
Electrically, one system is no more effective than the other. It is only when you consider what is involved in installing the electrical system that you really see the differences.
The big advantage of a metal aircraft, as far as electrical installations is concerned, is that single-wire circuits are simpler and easier to install than the required two-wire circuits in wood and composite aircraft.
Naturally, this can result in a significant saving in money and weight for the metal aircraft builder, as well as a reduction in the amount of work and installation complexity.
However, it is not so lopsided a comparison when you consider the fact that most of your single-wire circuits will still require a terminal connection to ground. So, unless a unit is automatically grounded through its case on installation, at least a short connector cable will be required to the nearest ground terminal block or stud.
Even so, that is still much better than having to run long duplicate wires from, let’s say a tail light, all the way forward to the nearest ground terminal block.
Establish A Good Engine Ground
The first electrical connection to make as soon as the engine is mounted is the one to establish a good engine ground.
In most aircraft, you do this by connecting one end of a heavy cable, or metal grounding strap, to some conveniently located bolt on the engine crankcase. The other end of the grounding strap should terminate on some solid part of the aircraft’s firewall structure.
Note - This cable/grounding strap must bridge across the engine mount’s non-conducting rubber shock mounts . . . rubber, as you know, makes a lousy electrical conductor.
This engine ground strap, in a metal homebuilt, serves to tie the engine and the entire aircraft structure together into a single common electrical ground.
In a wood or composite aircraft, however, you will have only thus far established the engine and firewall as grounding points.
For this reason, and for your own convenience, you should run additional conductors to establish additional grounding points.
I would suggest one of these to be the instrument panel. In addition, one or two conveniently located ground terminal blocks should be sufficient to complete the ground return circuit in a wood or composite aircraft.
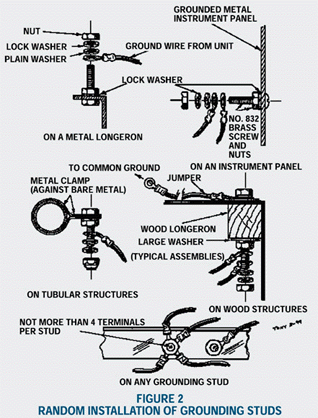
For A Good Ground . . .
Before making any kind of an electrical connection, all paint, primer and, yes, anodized surface film, must be scraped off, or otherwise removed, to provide a smooth, resistance free, bare metal surface.
Be sure each connection is properly assembled with washers and is tight and secure.
Common Grounding Faults
Here are the most common troublemakers:
1. A missing, disconnected or corroded engine ground strap.
2. A connection made to a high resistance surface; that is, the presence of paint, corrosion, primer or anodizing film prevents making and establishing an effective ground.
3. An electrical unit is not grounded. Some electrical devices (solenoids, relays, senders, etc.) are grounded through their cases. If the unit is not attached to a metal grounding surface, a separate grounding connector must be installed to the nearest electrical grounding point.
4. A loose or poor connection at the battery negative terminal or starter terminal can be the cause of engine starting problems.
5. A plus (+) cable becomes disconnected and drops down making contact with a metal grounding surface. If you’re lucky, a fuse will blow, or a circuit breaker will pop. The worst case scenario? Wires get hot and burn, smoke fills the cockpit, and avionics self-destruct.
7. A voltmeter with a poor connection to ground experiences a resistance which will give the gauge a false low reading.
8. Electrical senders (oil pressure, fuel pressure) with poor ground connections will give false low readings.
That Notorious Magneto "P" Lead
When you first install the engine, your magnetos will be "hot," and ready to fire the plugs with the slightest movement of the crankshaft (propeller).
They will stay that way (hot) until you connect the P-leads to the magnetos, thereby, electrically grounding them through the ignition switch.
Some builders have trouble remembering that when the magneto switch is ON, the P-lead is ungrounded (in effect, "separated" from the magneto) and the magneto is "hot."
Therefore, anytime the P-lead (wire) becomes disconnected, or is broken, the magneto becomes hot! And it makes no difference whether the ignition switch is ON or OFF.
The breakage of a P-lead in service can take place most any time due to the effects of ordinary vibration and/or clumsy maintenance. So . . . unthinkingly turning the propeller, even a little bit, without assuring yourself that the mags are grounded, can turn the act into a lethal event.
Incidentally, one clue that you may have a broken P-lead would be a zero rpm drop on one magneto during your engine runup (magneto check).
Shielding
The purpose of the shielding is to cause HF voltages to be induced in the shield rather than in nearby, or adjacent, units where they would cause electrical interference . . . like noise in your radios.
A shielded cable is one whose entire length is encased in a metal braid.
Some folks believe only one end of a shielded cable needs to be grounded but just as many, if not more, believe both ends should be grounded for maximum effectiveness. Who’s right?
Well, it could be that both factions are right, sometimes.
The shielding on your magneto wires should be terminated (grounded) at both ends to keep cables from emitting radio frequency noise.
On the other hand, the shielded interconnecting cable used between a strobe light unit and its power supply normally is terminated (grounded) at one end only to reduce to a minimum potential radio noise due to RF radiation. Usually, it is more practical to ground or terminate the shield at the power supply end. However, do not terminate both ends. At least, that is the advice offered by the manufacturer of Whelen strobe light equipment.
In homebuilts, when we speak of shielding, we are, more than likely, referring to the metal mesh encasing the P-leads (wires) connecting the magnetos.
The wires used to connect the magneto should be shielded type cables. (I hate to use the word "cable" because in my mind it conjures the image of the heavy stranded cables used in cranes or to support structures like the Golden Gate Bridge.)
At any rate, the ignition cables can be very small as they will be carrying very little current. For the most part, #18 or #20 shielded wire is all you need to use.
The magneto P-lead cables and most of the other wiring in a homebuilt are seldom more than 5 feet in length so voltage drop in a cable is not usually a factor to worry about. Actually, most homebuilders are prone to using larger cables than necessary in their electrical system. For that matter, they try to get by with a minimum of different wire sizes.
It would simplify future maintenance and trouble shooting if you could install cables with black colored insulation for all the ground wires.
About Those Electrical Wiring Diagrams
They do serve an important purpose for most of us.
Without a good wiring diagram the average builder would have difficulty in deciding where to begin or how to go about wiring his airplane.
Unfortunately, most aircraft wiring diagrams fail to show some rather important details, apparently on the assumption that everybody is familiar with certain basic electrical essentials.
The biggest fault I find with some electrical diagrams is that all essential ground connections are not always depicted.
For example:
1. The voltage regulator and overvoltage relay must be grounded but the schematics often fail to show the ground. Without a good ground neither the voltage regulator nor the relay can work.
2. The alternator and starter are assumed to be grounded by their installation to the engine, yet the schematic may not show them to be grounded.
3. As previously mentioned, electrical sender units for instruments are often grounded by their installation to metal structure. Nevertheless, it is important that the grounding notation is illustrated.
4. Magneto wires often don’t show that they are to be shielded type cables with the shield terminating to ground at both ends.
5. The alternator to/from wires should show them as being shielded and grounded.
6. Strobe wiring is seldom shown in most wiring diagrams, and yet, at least one manufacturer (Whelen) emphasizes the importance of grounding the conductor’s shielding at one end only.
The foregoing review should serve to stress the importance of a good electrical ground for every device and every circuit.
In some instances a unit simply will not work without being grounded . . . even though there is no terminal for a ground wire connection. Keep that in mind when you are trouble shooting an electrical problem . . . and check the simple and obvious things first.
Just One More Thing . . .
Always disconnect the battery ground cable first and replace it last to avoid causing accidental short circuits and a startling pyrotechnics display
