How About An Aluminum Fuel Tank?
By Tony Bingelis (originally published in EAA Sport Aviation, December 1986)
Most builders cannot weld aluminum or, to put it more accurately, have never tried to weld aluminum. If so, why should any of them even consider making an aluminum fuel tank? After all, almost anyone can make a serviceable fiberglass or composite fuel tank.
Actually, many a current builder may have no choice when the tank is designed as an integral part of the composite structure in the airplane he is building. However, not everyone is building a plastic airplane and there are many, many homebuilt designs which allow the builder to exercise his individuality and give him the option of making and installing whatever type fuel tank he prefers. I don't consider the choice of fuel tank construction to be a matter of aluminum tanks vs. fiberglass tanks . . . not at all.
Each type of fuel tank construction has its own unique qualities that may make one type better suited to a particular aircraft than the other. Since this article is about metal tanks, let's let them occupy the spotlight.
Metal Tanks, Their Attributes and Shortcomings
A metal fuel tank will almost always be lighter than a fiberglass tank of like capacity. A weight savings of three or more pounds can often be realized in a larger tank.
Aluminum is a clean, stable, easy to work material that always yields predictable results. On the other hand, for those of us who have not had the opportunity to learn how, through expert instruction and plenty of practice, aluminum is difficult to weld. Then, too, most of us don't have the equipment . . .
Aluminum, unlike steel, does not change color as its temperature is increased to the melting point. Furthermore, its lower melting point is reached very suddenly due to its high thermal conductivity. Consequently, the metal will suddenly puddle and collapse leaving a gaping hole much to the unpracticed welder's dismay when he first tries his hand at welding aluminum.
Another characteristic of aluminum is sure to bedevil the inexperienced welder. Compared to steel, it has a much higher rate of expansion. This combined with its high thermal conductivity makes aluminum subject to considerable distortion and warpage during welding, and especially when a continuous seam has to be welded.
An aluminum tank (unlike a fiberglass tank), being a good conductor of electricity, can be easily grounded to the aircraft ground during refueling, thereby eliminating the risk of static electricity build-up. (Have the individual doing the refueling attach his grounding cable to your exhaust stack.)
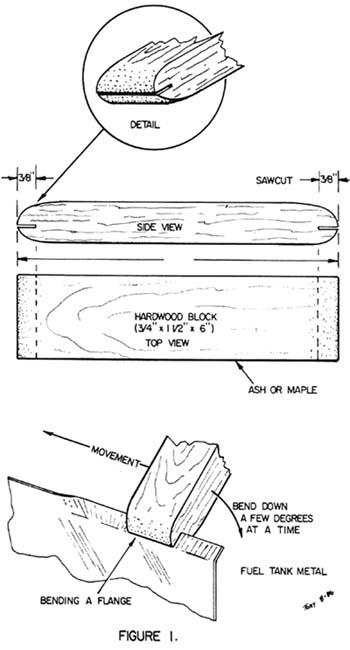
You don't have to be able to weld aluminum to make your own metal tank! And, contrary to what you may believe, it is not difficult, either. It is a relatively simple thing to completely fabricate a tank in your workshop without any special tools except for a homemade flange bending gadget (Figure 1). The external skins can be cut out with tinships, or on a bandsaw, and bent to shape. A flange is bent in one of the skins with a homemade flanging tool and then the skins are assembled by clamping the edges together so that you can haul the tank off to be heliarc welded. Of course, I've skipped a few details, but read on.
If you prefer, you can assemble your tank with aircraft rivets so that no welding is necessary. After all, integral wing tanks in metal aircraft are routinely fabricated in this manner, so why not any tank? The riveted seams and rivets must, of course, be sealed with a fuel proof compound.
Note: You may not be aware of it but Aircraft Spruce and Specialty Co. (and others) sells ready-made metal tanks for a variety of homebuilt designs. One of these tanks might be suitable for your aircraft.
What Materials To Use?
Make your tank(s) of .040" or .050" weldable aluminum. If the tank is to be completely riveted and no welding will be required, 2024 T3 grade aluminum alloy sheet may be used. However, 2024 T3, in addition to being not weldable, is not easily formed except when it is in its annealed (0) condition. Otherwise, use one of the commonly available weldable aluminum alloys like the 1100, 3003, 5052 or 6061 series of aluminum sheet.
I would not use the soft commercial 1100 aluminum as the strength simply is not there. If you use 6061 aluminum, it can be heat treated after welding although this is seldom done by homebuilders. All things considered, the recommended fuel tank material is 5052, either 1/4 or 1/2 hard aluminum. The 5052H32 designation is for the 1/4 hard, and the 5052H34 designation is for the 1/2 hard aluminum. The 5052H32 aluminum is very easy to form and is readily available from homebuilt suppliers.
You can make your baffles of a lighter weight than the .040" or .050" material used for the tank skins. This is because baffles are normally riveted in and do not require welding internally. For this reason, you could also use 2024 T3 if you prefer.
The rivets used for installing baffles must be of the soft (commercial) variety, if their heads must be welded over after installation. Use 1/8" diameter dome head rivets.
Tanks that are to be completely riveted (no welding) may be put together with aircraft rivets (AN470AD-4) closely spaced. A spacing of approximately 5/8" may be suitable in most instances depending on tank design and material thickness employed. A close spacing for rivets is important in obtaining good tight seams that will be leak-proof once sealed with a good fuel proof sealing compound.
Standard aluminum weldable flanges may be purchased from your favorite supplier, or you can machine your own from a hunk of weldable aluminum stock. The same holds true for the filler neck and filler cap. Flush caps mated to a solid aluminum mounting ring are quite popular with builders. These filler neck rings may be welded or riveted to the tank providing a flush, streamlined installation for the fuel cap.
Each tank must have a sump of some sort, even if it is no more than an exaggerated dent in the bottom of the tank. This depression, or sump, is for the purpose of providing a localized low spot in which water (if present) will settle and be easily drained during a preflight inspection.
Tank Design Considerations
A single large tank is less expensive to make and is more efficient than a couple of smaller tanks. The reason is obvious. Just as much work is required to build one small tank as it takes to build a larger one. Besides, you would have to make and install a filler neck and cap, vent line, sump and finger screen in each tank. In addition, there will be the requirement for installation straps, shut-off valve and duplicate plumbing. A multiple fuel tank installation always increases complexity and introduces fuel management problems. As you may have surmised, the weight increase and added cost will not be welcome either.
Obviously, if your need is for fast long range travel, you'll have to resign yourself to the drawbacks pointed out and go ahead with the building and installation of multiple tanks.
Should you decide on a single tank installation, you will probably experience an overwhelming desire to make that one tank as large as possible. Fine . . . but be careful not to make it so large that it will not fit into its allocated space.
If the tank is to be installed up front in the fuselage, remember that the tank bottom must clear your feet and the rudder pedals, too.
Try to avoid designing an odd shaped tank as that will only complicate its fabrication and perhaps its installation. Simplicity is the goal. Make your tank of as few separate pieces of metal as possible. This will reduce the number of welded seams and simplify assembly. It is possible to make a tank out of two large pieces of aluminum as is evident in the accompanying photos. Even a rectangular tank may be similarly fabricated if a good paper pattern is worked out first.
Of course, in either case there would have to be a separate piece for the sump, and perhaps a couple more pieces for the baffles. Nevertheless, the fewer the number of parts used in fabricating your tank, the less likely that you will have problems with it.
Baffles
The primary function of baffles is to minimize the sloshing surge of fuel in the tank during maneuvers. A secondary function is to strengthen the tank by increasing rigidity in the relatively thin metal.
There is an honest difference of opinion over whether baffles are needed in a homebuilt metal tank. I believe a large metal tank should have baffles . . . but what constitutes a large tank? How about 18 gallons? Certainly, the design of a tank can be a factor. Tanks having large flat areas are less likely to "oil can" when strengthened by the presence of baffles. However, you should also be aware that the sloshing fuel can also impose considerable loads on the baffles and rivets securing them. There is the possibility that the soft rivets used could fall and the loosened baffle would then become a liability, The rivet spacing for securing baffles should probably be no further than two inches apart.
Flanges and Seams
To facilitate the assembly of your tank you will have to form flanges in one or more of the tank skins (Figure 1). These flanges need only be about 1/8" wide for welding. However, a 1/8" flange is difficult to clamp so make yours about 1/4" to 3/8". About 1/18" of that will be melted away in welding. These flanges can be used in different ways as illustrated in Figure 2.
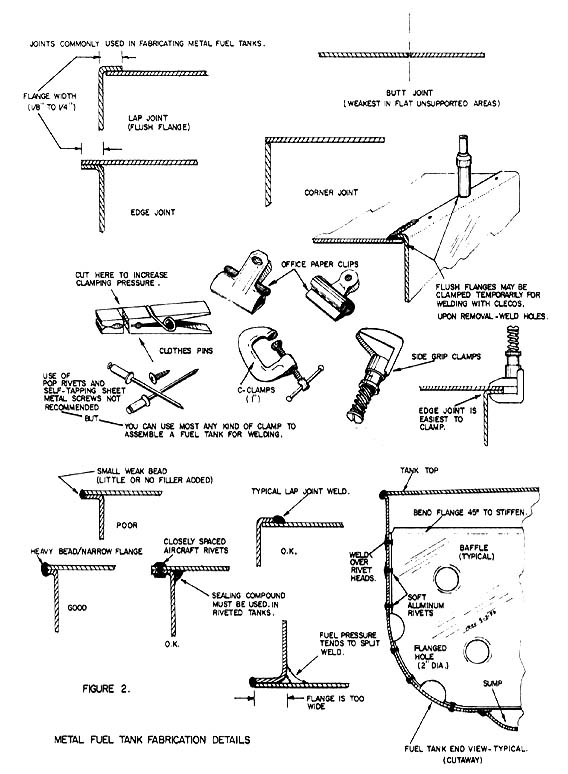
If you don't like the external lip type of welded flange, you might make the flush type. This type of flange poses an assembly problem, however. While the protruding flanges are readily clamped with Cleco side clamps, small C clamps or even large office stationery clamps, the flush type flange has to be clamped some other way. One way could be with pop rivets, but they are tricky to weld over. It could also mean more difficult work for the welder as he would have to weld around each of these assembly rivets. For this reason, the use of pop rivets as an assembly aid is not recommended. Neither is the use of sheet metal screws. Clecos can do a better job, and the small holes drilled for their temporary insertion are easily welded over.
A Note of Caution
This is not idle gossip. Many builders have experienced the trauma of cracked seams in welded aluminum tanks. Some of these were detected at an early stage and others not until the builder felt fuel dripping on his leg, or smelled it in the cockpit, suddenly realizing in a flash of panic that there were hot pulsating exhausts underneath. Terror? You bet!
Every instance of a cracked fuel tank seam (of those I have seen) happened because the seams were improperly welded. The welder had, in most instances, merely melted and fused the flange edges with little or no addition of filler rod. The welds generally looked beautiful with their small uniform beads. But if you have a tank that looks like that you better inspect it closely before every flight, or take it to the welding shop and have some more filler rod added to the welds.
Whoever does the welding on your tank should be aware that it is not a common container, By that I mean he should know that it is a fuel tank which will be subjected to vibration and to internal stresses from surging fuel.
Tell your welder that merely fusing the edges is not acceptable, and that beauty is not your prime concern. You want an extra heavy bead on all your seams. It doesn't matter whether the heavy bead is made on the initial pass or on a second. What is important is that plenty of filler rod be added to the seams.
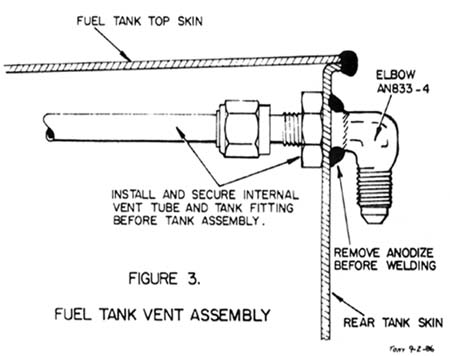
Standard AN aluminum fittings can be welded into the tank for connecting your tank vent (Figure 3) and/or for connecting interconnecting tanks. File or sand off the anodized coating before welding.
To my knowledge, I don't know of a single tank welding job that was completed without harboring at least a couple of pin hole leaks. So don't fault your welder if your tank has a few, too. The problem seems to stem from the need to first tack-weld the tank metal every two inches or so to keep it from distorting all out of alignment. Later, when the welder gets to the tack weld, there is a lot of localized metal present that sort of upsets the welding rhythm and the aforementioned pin holes sneak by the welder.
Sealing Riveted Tanks and Integral Tanks
Riveted tanks should be assembled by coating each rib, bulkhead, joint and surface with a light coating of a suitable fuel proof sealing compound. These sealing compounds are not generally available and must be special ordered. A couple are listed below.
Products Research and Chemical Corporation (PRC is a registered trademark of Monsanto Company) has a product long used by at least one of the major aircraft manufacturers of military aircraft, and by a good number of BD-4 builders. It is PR-1422 Class B, a filleting compound developed specifically for sealing integral fuel tanks. A related product, PRC 1005-L, is applied as a protective coating over synthetic rubber sealants such as the PR-1422. It is a thin substance and is apparently used in a manner not unlike other sloshing compounds.
The shelf life of most fuel tank sealants is rather short - approximately six months at room temperature. This means that you shouldn't order the sealant unless you can use it within that time frame.
It is essential that the metal tank surfaces to be coated with the sealant be squeaky clean. Clean the surfaces with methyl ethyl ketone (MEK) or Naptha, or whatever cleaner is stipulated in the instructions. Be absolutely certain that you do not touch the cleaned surfaces with your bare hands as the body oils will ruin your seal at each point of contact.
Applying the sealant is a very messy operation but a critical one for which there are no short cuts. After the rivets have been upset, run a 1/8" bead or fillet of sealant along every rib, seam, corner, joint and rivet. Do a thorough job of it and you won't be bothered with fuel seepage or leaks. Sealant is most effectively applied on the pressure side of the tank surfaces . . . that is, on the inside of the tank and not the outside.
What about a sloshing compound? Some say use it and others are a bit leary about using it in view of the additives oil companies are putting in auto gas. If you intend to use auto gas you might be wise in not sloshing your tank. The presence of methanol (alcohol) can soften and loosen the sloshing compound to the point where it could deteriorate sufficiently to clog your fuel system. The ultimate consequence? Engine failure due to fuel starvation. If your tank has been sloshed, the advice is to avoid the use of any fuel with additives unless you know that the additive doesn't include methanol or some equally incompatible substance. Check the inside of your tank(s) regularly if they are sloshed.
Testing the Tank For Leaks
There is an easy way to do this. Seal all tank openings and attach a low pressure gage to the tank sump. Add about 2 or 2 1/2 psi of air pressure . . . never more than 3 psi. Coat the external surfaces of the tank with soapy water and brush over all the seams with the soap suds. Examine every square inch carefully looking for air bubbles which indicate the presence of a pin hole leak. Repeat the process a couple of times until you have reassured yourself that you have found all the leak sources or have been unable to detect any.
If your welded tank has a pin hole leak, mark around the area with a black felt pen and take your tank back to the welder for corrective action.
On getting the tank back, check it for leaks again. Don't assume it will be O. K. just because you expect it to be. Be absolutely sure that tank doesn't leak!
It takes a tremendous effort to remove and reinstall a fuel tank after you get the airplane flying. In some instances you may have to remove the entire instrument panel and most of the electrical wiring to get it out.
Building a metal tank is a satisfying experience for anyone, but even more so for the builder who feels that his aluminum tank will free him of that nagging concern that he might someday have to use fuel that could adversely affect a fiberglass tank.
Useful Fuel Tank References
SPORT AVIATION -
"The Fuel Management Problem", Oct. 1979
"Fuel Tanks", Aug., Sept., Oct., Nov., Dec. 1982
