Worktables
By Bob Waldmiller with Russ Erb (originally published in EAA Sport Aviation, February 2001)
Before the airplane parts arrive, before the tools begin to fill up your workshop, even before the big brown truck delivers the plans for your custom-built airplane, consider the ubiquitous workbench. It’s the one common and indispensable tool that every workshop must have, regardless of the airplane you’re building or the materials used in its construction.
When Norm Howell and I talked about building workbenches for EAA Chapter 1,000 at Edwards Air Force Base, California, the synergy of our discussions resulted in a standardized, general-purpose worktable. Because many aircraft call for a workbench of specific dimensions, we figured that if we built our worktables with the same dimensions we could use them for many different projects by combining them to create a workbench with the required dimensions.
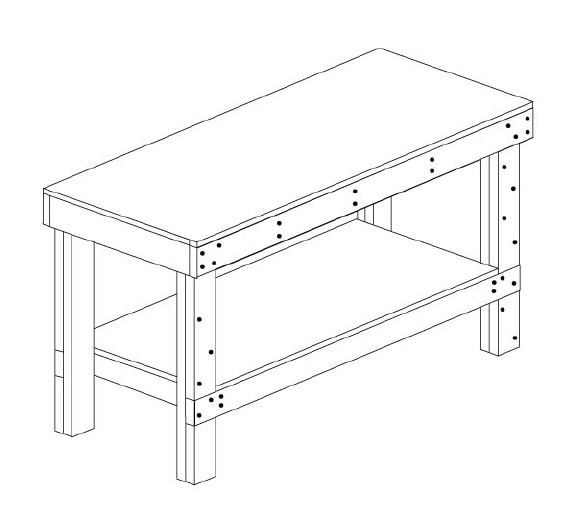
Our tables are a relatively short 5 feet in length, 2 feet deep, and 33.75 inches high, which means you can use them for almost anything and put them almost anywhere. You can use them separately to build parts, such as wing ribs, and bolt or clamp several tables together to create longer tables. And the tables are sturdy enough to climb on without fear of disturbing jig or fixture alignments. Flexibility and multiple uses are the worktables’ strong suit.
Fully assembled worktable (workbench).
For example, for an item like the wing spar I’m working on, which is about 14 feet long, I’ll clamp three tables together to create a 2-foot-by-15-foot surface. When it’s time to assemble the wings, I’ll move the tables out of the way and set up the wing jigs.
To build the fuselage I’ll clamp three or four tables together and attach one or two pieces of 7/16-inch flat chipboard across the tables to get the required width. As an added benefit, I won’t care if the chipboard gets some burn spots while I’m tack welding the fuselage.
We also protect our tabletops with butcher paper held down by masking tape around the edges. The paper takes the bulk of the abuse, and the tables stay relatively clean. When the paper gets really messed up, or we run out of room to write notes or measurements, we just replace it.
Building the Standardized Worktable
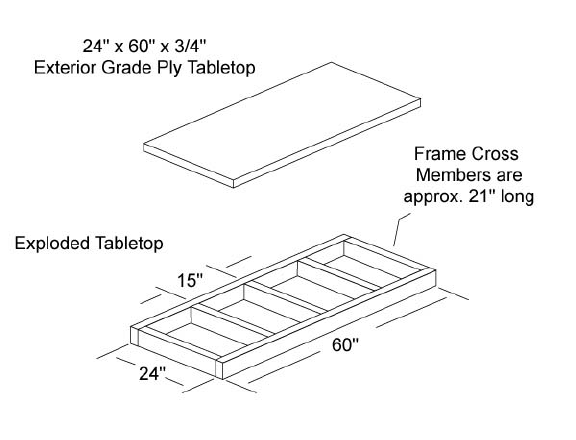
Step 1: After buying all your materials per the shopping list in the box, cut the plywood to size. You’ll probably want to cut across the 4-foot dimension first, leaving a 3-foot-by-4-foot piece. Be careful on your next cut-the saw kerf will use up 1/8 inch or more, so the 24-inch dimension of the plywood for the tabletop and shelf will be a little undersized.
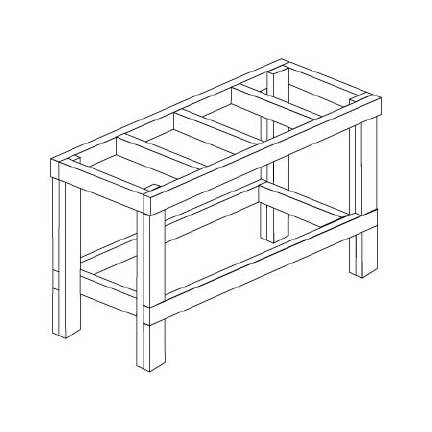
Step 2: To make the table flat and square you build it from the top down. To construct the top frame, connect the two-by-fours with wood glue and 3-inch #10 wood screws. Then cover one side of the frame with the 3/4-inch plywood, attaching it with wood glue and the 1.5-inch #8 construction screws.
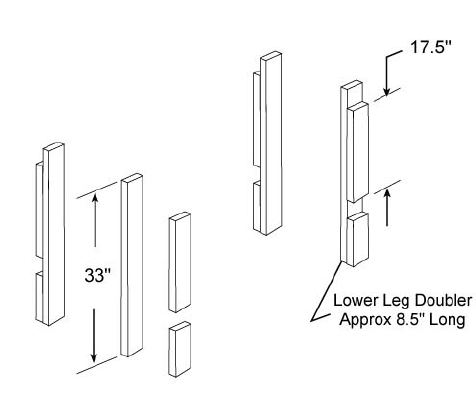
Step 3: Turn the top frame over and attach the four legs with wood glue and 3-inch wood screws. Make sure everything is as square as possible, and then fasten the 17.5-inch leg doublers on the outside of each leg with glue and 2.5-inch wood screws.
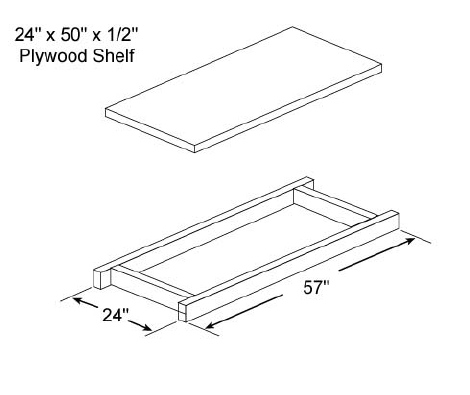
Step 4: Build the lower two-by-four shelf frame, again using glue and 3-inch #10 wood screws. With the table upside down, put the shelf frame on the table legs with the glue and screws and add the remaining 8.5-inch leg doublers. Because the lumber dimensions vary, mark the 8.5-inch doublers in place before cutting them to length. That way you’ll get a custom fit on the doublers.
Step 5: Turn the table upright and fasten the lower shelf plywood in place with the 1.5-inch construction screws. Finally, to give your table a professional, finished appearance (and to keep from filling your hands with slivers), glue and nail the edge molding in place with 3d finishing nails.
That’s all there is to it! If you take your time and do a good job, these tables will last forever, which is exactly the kind of worktable you want.
Material List
The following list of materials will build two worktables. Don’t skimp and get cheap wood. Better quality lumber is worth the investment because it creates a more level, square table. Power drive screws work really well for fastening the plywood to the two-by-fours, but use flat head Phillips wood screws for fastening the two-by-fours together. You might want to consider a #10 countersink bit for your drill.
|
Qty |
Item |
|
|
1 |
3/4-inch x 4-by-8-foot sanded exterior plywood |
|
|
1 |
1/2-inch x 4-by-8-foot plywood |
|
|
14 |
2-by-4-inch x 8-foot premium studs |
|
|
4 |
1/4-by-3/4-inch x 8-foot pine flat-screen molding |
|
|
80 |
#10 3-inch wood screws |
|
|
50 |
#10 2.5-inch wood screws |
|
|
50 |
#8 1.5-inch construction screws |
|
|
1 |
Box of 3d finishing nails |
|
|
1 |
Elmer’s Carpenter’s Wood Glue, 16 ounces |
|
2x4# |
Cut to length |
||||
|
1 |
60” |
33” |
|||
|
2 |
60” |
33” |
|||
|
3 |
60” |
33” |
|||
|
4 |
60” |
33” |
|||
|
5 |
57” |
33” |
|||
|
6 |
57” |
33” |
|||
|
7 |
57” |
33” |
|||
|
8 |
57” |
33” |
|||
|
9 |
17.5” |
17.5” |
17.5” |
17.5” |
17.5” |
|
10 |
17.5” |
17.5” |
17.5” |
21” |
21” |
|
11 |
21” |
21” |
21” |
21” |
8.5”* |
|
12 |
21” |
21” |
21” |
21” |
8.5”* |
|
13 |
21” |
21” |
21” |
21” |
8.5”* |
|
14 |
8.5”* |
8.5”* |
8.5”* |
8.5”* |
8.5”* |
*Cut to match lower legs
Editor’s Note: Since 1992 EAA Chapter 1,000 at Edwards Air Force Base, California, has built dozens of the workbenches described in this article, and hundreds of EAAers have benefited from the plans since they were first posted to Chapter 1,000’s website. Thanks to Bob Waldmiller and Russ Erb for passing along this information for the entire EAA family. Visit the Chapter 1,000 site at http://www.eaa1000.av.org/.
