Making a Nose Bowl
By Ron Covell (originally published in EAA Sport Aviation, August 1999)
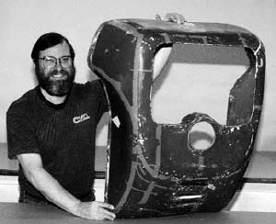
In the past two installments of this series, we looked at both hand and power tools used for working with sheet metal. In the next few installments, we’ll go through the process of making a rather complex part, a nose bowl, using very basic tools. The subject for our demonstration is a 1928 Curtiss Robin, owned by Alan Holloway of Holloway Engineering in Quincy, California. Al is a great enthusiast, flying a Stearman he restored himself, and his business specializes in rebuilding radial engines. (See his website at www.radialengine.com.) He is currently restoring the Curtiss Robin, and the nose bowl was missing. He was fortunate to meet another Curtiss Robin owner, Dick Fischer, and Dick graciously offered to let Al borrow his nose bowl for a pattern. These aircraft used the OX-5 V-8 engine, and the nose bowl has a unique shape to match the frontal outline of the engine.
|
|
|
|
The author, Ron Covell holds an original Curtiss-Robin nose bowl, graciously lent to us by Dick Fischer |
The first step is to examine the part closely, and decide on the approach to take - generally this will include making decisions about how many pieces to divide the part into, and where the joints will be placed.
The tools used for shaping the sheet metal have a lot to do with the decisions made at this point. For example, if the shaping will be done using hand tools, it is much easier to do stretching than shrinking.
On the other hand, if the metalworker has equipment that can do powerful shrinking deep into the panel, this is sometimes a faster means of creating shapes.
The joints might be made in different locations, depending on how the individual panels will be shaped. Sometimes fewer joints are required if powerful equipment is available which can shape larger panels.
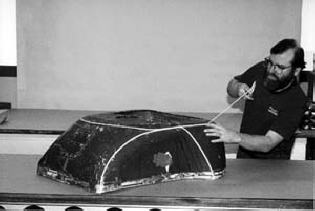
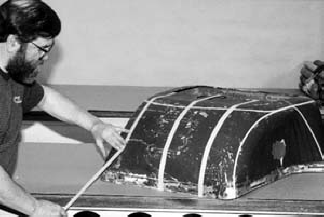
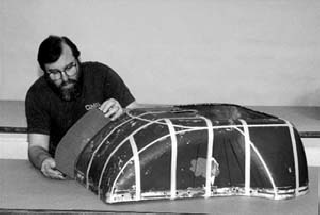
We're using 1/4" masking tape here to plot where the joints between panels will be placed. The process used for shaping the metal has a lot to do with where the joints are positioned (see text).
For our example, we will do primarily mallet and sandbag shaping, using a little assistance from an inexpensive shrinker to help pull the edges down.
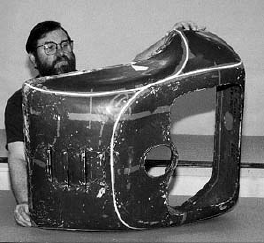
Working in this way, it is easiest to place the welded joints in the middle of the areas with greatest curvature. The approach we are taking breaks the nose bowl up into 6 major pieces, making each piece relatively simple to shape. We started by using 1/4" masking tape to lay out the location of the joints.
|
|
|
|
The photo gives you a general idea of the strategy we’re using for breaking the large, complex nose bowl up into simpler pieces. |
The next step in any metal shaping job of this magnitude is to make a wooden buck. The purpose of a buck is often misunderstood. Generally, a buck acts as a template which defines the contours of the panels being shaped, and is used for checking the contours of sheet metal panels shaped off the buck. Occasionally a buck will be reinforced in certain areas, so that some metal shaping can be done by hammering on the buck. This type of buck is known as a ‘working buck’, and we chose to create this type of buck for reasons that will become apparent shortly.
The perimeter of the nose bowl is traced onto a sheet of plywood. The piece cut to this line becomes the base for the buck.
The process of making a buck is greatly simplified if an original part is available. We traced the perimeter of the nose bowl onto a sheet of 3/4" plywood, and cut a piece out to form the base of our buck.
Decisions must be made about where the ‘stations’ or contoured elements of the buck will be placed. In general, stations are spaced closely in areas where the contours change rapidly, and can be spaced farther apart in areas where the contours change more slowly.
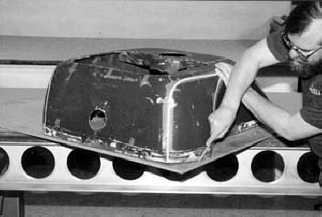
We laid out the locations of the stations on the original nose bowl using 3/4" masking tape. Next, a contour gauge is used to measure the curvature at each tape line. This contour gauge is used to lay out cut lines on a sheet of 3/4" plywood, the part is cut slightly oversize with a bandsaw (a saber saw would work as well), and the edge is carefully sanded to the trim line with a disk sander.
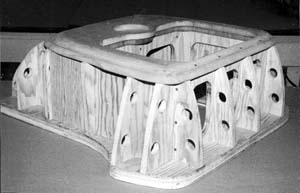
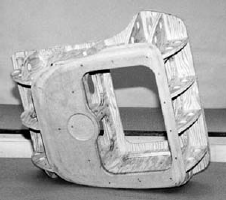
Once all the stations are cut and sanded to size, it’s time to assemble them on the base of the buck. We used drywall screws and glue to hold the pieces together. Minor adjustments of the edges of the stations are made at this point, to ensure the face angle will match the sheet metal panels, and that the contours defined by all the stations are smooth and continuous. You’ll notice in the photographs that our buck has lots of holes in it. These holes are there for several reasons. The smaller holes allow us to use small C-clamps to hold the edges of the panels we are shaping tight against the buck. Some of the larger holes allow a better view of the sheet metal panel from the backside. The holes around the openings for the radiator air inlet and propeller shaft allow us to form flanges in these areas, as a step toward creating the wired edges that reinforce these openings. An added bonus of all these holes is that they make the buck lighter, and easier to move around the shop.
You’ll notice that the front surface of the buck appears to be made of solid wood. It is actually made of MDF (medium density fiberboard) which is an ideal material to use as a base for hammering against. MDF doesn’t have voids in it like inexpensive plywood does, and it is much easier to cut, shape, and sand than particleboard. The edges of the MDF face were radiused to act as a form block to ease the shaping of the rounded edges on the perimeter of the front panel.
With the buck completed, the first panel we’ll deal with is the largest - the one comprising the top and face section of the nose bowl. We’re using .050" 3003 H-14 aluminum for this project, slightly thicker than the .040" original. The thicker metal is more forgiving to work with, and the slight additional weight is offset by its greater durability. A pattern was made from chip board, allowing about 1/2" extra material around the edges of the panel. This pattern was transferred to a sheet of aluminum, which was trimmed to the proper size. The bends on the top of the panel were created by freehand bending. When these contours matched the buck pretty well, 1/8" locating holes were drilled through the aluminum sheet and into the buck. A piece of 3/4" plywood was cut to sandwich the face of the panel against the buck, to hold it flat as the edges were contoured by hammering and shrinking.
|
|
|
|
¾” masking tape is used to mark the loacations |
A contour is used to measure the curvature needed for |
To ease the shaping of the metal in the tightest radius of the corner, a small ‘V’ shaped piece of metal was trimmed out, and the edges that required shaping were annealed. The annealing process is fairly simple - a light coating of soot from a pure acetylene flame is applied to the metal, then a neutral flame is used to heat the metal carefully to the point where the soot film just burns off. A rosebud welding tip helps with this process, but it is important not to over-heat the metal, since the annealing temperature is close to the melting temperature of aluminum. It is better not to anneal the whole panel in this case, since the flat section would most likely warp from heating, and the un-annealed portions of the panel will have more stiffness if they are left in the half-hard condition.
|
|
|
|
Here’s our completed buck. The small holes in the stations are to allow the use of C-clamps to hold the sheet metal panels temporarily in place while fitting to the buck. |
The front section of the buck is faced with MDF (medium density fiberboard) The large cutouts allow the forming of a flange, needed to start the wired edges used to strengthen these openings. The perimeter of this section is rounded to create a form block, used to help |
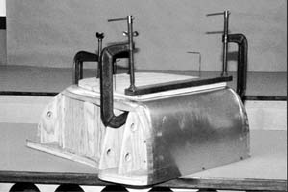
The first sheet metal panel is freehand bent to match the shape of the buck, located with alignment pins, and clamped into place on the buck.
|
|
|
|
With everything clamped tight, the metal is |
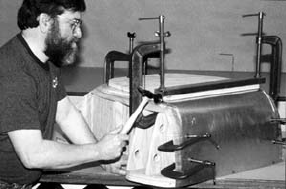
The metal is placed on the buck, positioned with pins placed through the alignment holes, and the clamping board is squeezed against the buck with clamps. Next, the edge of the aluminum panel is tapped gently down against the MDF portion of the buck.
The entire perimeter of the panel is shaped in this manner, but there is a small amount of spring back, leaving a gap between the aluminum and the MDF.
|
|
|
|
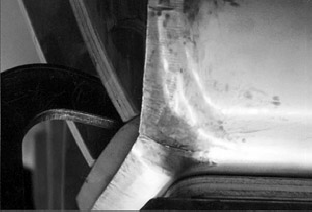
Here’s a close-up shot of the corner – the area where the greatest shrinking was required. Notice that a small relief was cut to ease the shaping in this area. |
A shrinker was used around the perimeter of |
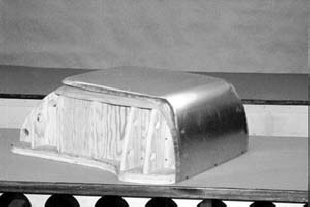
The easiest way to bring the metal down tight against the buck is to work it with a mechanical shrinker. After a few dozen carefully spaced shrinks and a little more tapping on the buck, our front panel is nicely shaped!
In the October issue, we’ll continue with shaping the side panels for the nose bowl, and start gas welding some panels together and metal finishing them.
About the Author
Ron Covell has been a professional metalworker for over 35 years. He operates a business named "Covell Creative Metalworking", offering a complete line of metalworking tools, books, and videotapes, as well as offering a series of metalworking workshops nationwide. You can reach him at 106 Airport Boulevard, #201, Freedom, CA 95019 831 768-0705, or you can send E-mail to covell@cruzio.com.
