Cockpit Standardizing For Homebuilts?
By Tony Bingelis (originally published in EAA Sport Aviation, September 1979)
NOBODY KNOWS OR will know how many thousands of pilots, at some time, operated the wrong control or moved the correct control in the wrong direction. Ah! You grin sheepishly. You did once? Twice? Undoubtedly PILOT ERROR. . . or was it? Could it be that you and I, and thousands of other pilots have been and continue to be tricked, lured and led into committing piloting errors because of confusion-inducing cockpit characteristics resulting from poor design and a lack of standardization?
Although the structural elements of most general aviation aircraft continue to be simplified and lightened . . . not so the cockpit area, however. Here, complexity is the norm, and the designer's cockpit standardization intentions usually lose out to economics, styling and expediency. Gadgets, gages, switches, instruments, controls, avionics, and warning devices have overflowed the panel and are inundating the cockpit floor, sides and overhead areas. All the more opportunity for the pilot to mess-up.
Anyone who has been around aviation for any length of time has heard about, or seen accidents of the type usually attributed to pilots. You know the kind . . . landing with gear up, or pulling it up after making a nice landing . . . using the wrong engine control . . . monitoring the wrong fuel tank while some other tank runs dry . . . misreading fuel gages . . . running out of fuel . . . taking-off with the trim tab improperly set . . . canopy and cabin doors flying open on take-off, and the activation of trims and shutters and other devices in the wrong direction because the pilot guessed wrong. I am sure you could cite other examples, too.
People are creatures of habit and, particularly in time of stress or danger, react instinctively and in a conditioned manner. For example, have you ever switched to a car with automatic transmission from one equipped with a stick-shift? Remember how many times you groped around for the gear shift lever when it wasn't even there? And, how about the stupid thumping of your left foot where the clutch pedal would have been?
The same sort of human response happens in cockpits, too. When everything is O.K. and there is no sense of urgency, everything is usually fine, but should a distraction occur or a tense situation develop . . . trouble. The pilot instinctively reaches for the controls which may or may not be arranged in the same location and manner he is conditioned to. This particular habit problem affects pilots of any aircraft, be it a homebuilt or a production-line copy. As a result, a possible wrong action may be taken by the pilot which could result in another so called PILOT ERROR related accident.
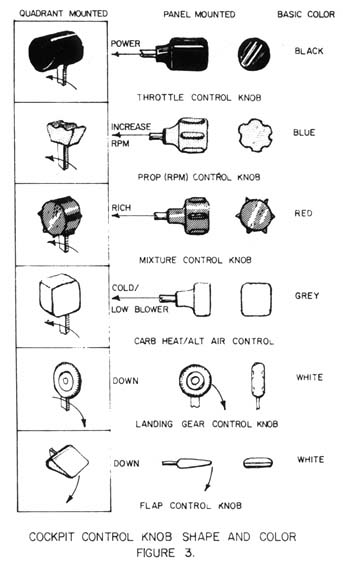
There is a widespread belief that the best remedy for this dilemma is to standardize the arrangement of flight instruments; standardize the general location and direction of operation for all controls; and standardize shape-coding of critical knobs to improve sensory recognition.
Cockpit Standardization for Homebuilts? . . . Are You Kidding?
As amateur builders, we can equip our homebuilt cockpit just about any way we want to as long as we install the minimum VFR instrumentation and the necessary basic controls for the operation of the aircraft. If so, why should we bother with cockpit standardization in a simple homebuilt? For one thing, quite a few homebuilts are not so simple anymore. For another, your personal safety would be reason enough. What has been said concerning cockpit design inducing confusion, and PILOT ERROR, is applicable also to homebuilts . . . perhaps more so.
Although most airplanes we fly do have a certain cockpit and control similarity, differences are quite apparent between aircraft of different manufacturers and for that matter even between designs from the same manufacturer. But, when you examine, or fly, several different homebuilts, you will find the variation to be far greater than among production aircraft. I think the absence of cockpit standardization in homebuilts is an unthinking oversight and we have ignored the need too long. We can, on our own initiative, strive for a higher degree of cockpit standardization.
Naturally, no reasoning individual would ever expect to see a single universal cockpit which would be perfectly suited for Pietenpols and VariEzes alike. There are just too many differences, not only in the complexity of homebuilt airplanes, but in a marked difference in their sizes and intended use. Still, there are basic concepts we can and should adapt to our present and future designs.
Flight Instrument Arrangement Recommended
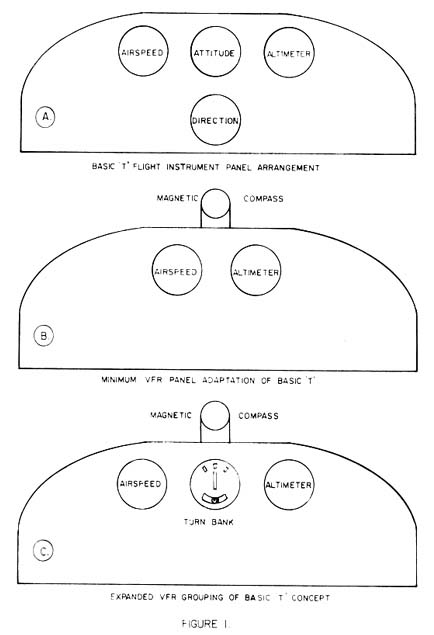
If your airplane weighs less than 6000 pounds, and hopefully it does, the FAA provides no regulatory standard for your flight instrument arrangement. I would, however, recommend you consider adopting the basic T arrangement for the essential flight instruments as has been required since 1957 for transport type aircraft and since 1973 for any aircraft weighing over 6000 pounds. This basic T arrangement concentrates vital flight information in the smallest practical visual field and is centered around the attitude instrument.
As you know, the only flight instruments needed for VFR flying are the airspeed indicator, altimeter and a magnetic direction indicator. The basic T arrangement can even be used for minimum VFR aircraft. See Figure 1. In some designs, homebuilders have learned that a panel-installed compass is less reliable than one installed over the instrument panel where it is less affected by magnetic influences of the aircraft's structure and equipment.
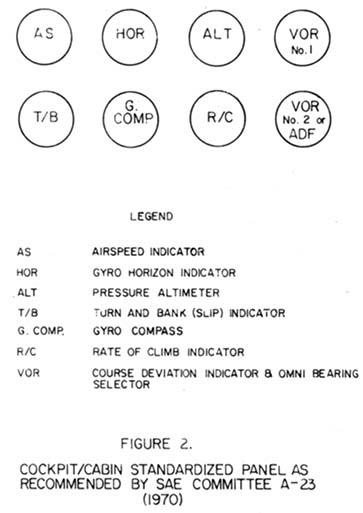
With the addition of the turn/slip (turn-bank) and a vertical speed (VSI), as found in more fully equipped panels, a revised basic-six arrangement has become standard. This arrangement is common to late model production aircraft and it would be nice to see more of the same in homebuilts planned or built for extensive cross-country flying.
Powerplant Instruments
A great lack of cockpit standardization can be found in the arrangement and location of powerplant instruments on the panel. The lack of space remaining after positioning the essential flight instruments often forces the designer/builder to make the best use of space remaining.
Whatever their arrangement, the instruments should be grouped closely to minimize the cockpit workload and reduce the scanning effort. The pilot can then spend more time looking out for other aircraft and avoiding birds. There are other considerations.
The main powerplant instruments should not be reversed relative to the positions of the powerplant controls. In other words, the location and arrangement of the powerplant instruments, such as the manifold pressure, tachometer and fuel flow should be sequenced as are the throttle, propeller and mixture controls.
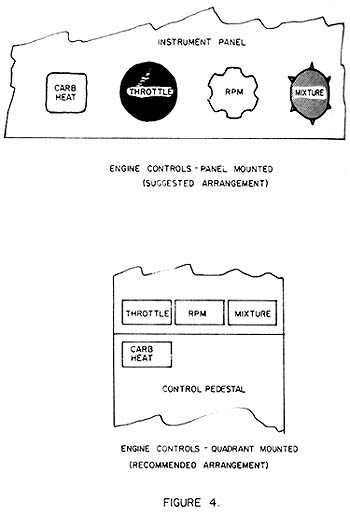
Sometimes, you will see in production aircraft, powerplant instruments that are positioned in a vertical line on the panel although the accepted standard is a horizontal orientation. Again, instrument panel space may be cited as the reason for the deviation. Of course, homebuilders too have the same space problem. Ideally, though, the manifold pressure gage should be located in the panel in line with and above the throttle, the tachometer in line with and above the propeller control and the fuel flow indicator, should you use one, in line with and above the mixture control. I realize that only a few homebuilts have all of these instruments but the omission of one or more should not in any way degrade your effort to standardize whatever instruments and controls you will be using. Just remember that the establishment of the natural relationship of powerplant instruments to powerplant controls can eliminate pilot confusion.
Cockpit Control Details
NOTE: It is highly recommended that you design your cockpit controls so that they operate in accordance with the following concepts of movement and actuation (based on FAR Part 23):
Each cockpit control must be located and (except where its function is obvious) identified to provide convenient operation and to prevent confusion and inadvertent operation.
Locate and arrange the controls so that the pilot when seated has full and unrestricted movement of each control without interference from either clothing or cockpit structure.
Locate powerplant controls on a pedestal or near the centerline of the instrument panel. The location order from left to right is the throttle, propeller and mixture control. See Figure 4. The worst and most accident prone location of the carburetor heat control is any location close to the mixture control . . . particularly if there is no discriminating shape and/or color coding between the two knobs. If you cannot do anything to alter the shape of your mixture control knob, at least install some sort of guard to help prevent its inadvertent operation.
Aircraft with tandem seating and single place aircraft may better utilize control locations on the left side of the cockpit compartment. The location order then, from left to right, should be throttle, propeller and mixture.
Engine control knobs, color and shape should be in accordance with established standards. See Figure 3.
Controls of a variable nature using a rotary motion must move clockwise from the OFF position through an increasing range to the FULL-ON position.
The direction of movement of cockpit controls must be obvious. That is, wherever practicable, the sense of motion involved in the operation of other controls must correspond to the sense of the effect of the operation upon the airplane or upon the part operated. Here are specific examples:
|
THE CONTROLS |
DESIRED MOTION AND EFFECT |
|
Elevator/Stabilator |
Rearward for nose up. |
|
Ailerons |
Right (clockwise) for right wing down. |
|
Rudder |
Right pedal forward for nose right. |
|
Flaps (or auxiliary lift devices) |
Forward or up for flaps up or auxiliary device stowed; rearward or down or auxiliary device deployed. |
|
Trim Tabs (or equivalent) |
Actuate to produce similar rotation of the airplane about an axis parallel to the axis of the control. |
|
Throttle/Thrust |
Forward to increase forward thrust. |
|
Propellers |
Forward to increase rpm. |
|
Mixture |
Forward or upward for RICH. |
|
Fuel Condition |
Forward or upward for ON. |
|
Carburetor Air Heat or Alternate Air |
Forward or upward for cold. Forward or upward for low blower. |
|
Supercharger |
For turbo supercharger, forward, upward or clockwise to increase pressure. |
|
Cowl Flap |
Rearward or down for cowl flap open. |
|
Landing Gear |
Down to extend. |
The opportunities for getting involved in some mess resulting from cockpit confusion are many. It is bad enough to forget to activate the gear handle for landing, but it is possible in some aircraft to do so and land gear up. How? In some aircraft the pilot inadvertently moves the gear handle from the UP position to the NEUTRAL/OFF position rather than all the way from the UP to the DOWN position. Of course, you still have the warning horn-light and checklist to warn you. Is that what you think? Well, what about the pilot who sometimes carries so much power on final approach that the gear warning horn/light does not operate?
As for checklists, unfortunately, the demands for the pilot's increased attention and involved control manipulation is a set-up for PILOT ERROR even with checklists. It's true that most of these problems could be avoided through the proper use of a checklist but!!! No, the real solution is to make it difficult to impossible or unnecessary for the pilot to do things wrong . . . to receive the wrong impressions!


