Why Tolerate Radio Noise
By Tony Bingelis (originally published in EAA Sport Aviation, April 1995)
When you install a radio in an engine-powered aircraft you will be subjecting it to an environment that can be quite hostile to good radio reception.
This hostility is manifest not only by the audible noises heard in the aircraft’s headsets and speakers but also by the effects such electrical disturbances have on the outputs of navigation receivers and other navigation equipment. In effect then, noises are there whether we can hear them or detect the visual effects in our navigation receivers. Of course, when they are audible to our ears that condition can become quite annoying and personally unacceptable.
Anyway, it might surprise you to learn that many of these troublesome radio noises often result from the poor wiring installations sometimes incorporated during the construction of an aircraft. In other words, the most troublesome noise is that caused by stray electromagnetic waves that emanate from installed electric equipment, such as magnetos, alternators, relays and the like, and are not necessarily the fault of the avionics equipment installed.
Contrary to hangar tales you may have heard, the elimination of radio noise has nothing to do with black magic. Nor is it only something a highly skilled radio technician can do.
Troubleshooting a Noise Problem
Before you go charging off to the nearest avionics shop with an armful of radios, why not try to do a little elementary troubleshooting of your own. Your success in eliminating a particular radio noise might even surprise you.
You can, for example, solve a fair share of the typical radio noise problems you encounter by first locating and isolating the source of the noise problem. Once this is done, the necessary corrective action often becomes obvious and is readily accomplished. Troubleshooting any kind of problem is based on common sense and logic.
Tracking down and curing an unwanted radio noise problem is no different. Begin by examining the obvious and the easiest to check potential trouble sources: poor ground connections, loose terminals, broken or frayed wires, inadequate shielding. Then, check the operation of the various electrical systems (lights, strobes, fuel pump, rotating beacon, intercom, etc.), one at a time, listening for noise. Do this with the radio(s) ON and with the engine running - then again with the engine shut down. After you pinpoint a noise producer, you can then try one "fix" at a time.
Always check the results of that effort before trying something else. Otherwise when you try several corrective actions before checking the results of each, you might never learn which of the "cures" really solved the problem.
Since radio noise can originate almost anywhere in the aircraft, it should come as no surprise to learn that a particular radio noise problem is most often traced to something no more mysterious than a poor battery ground connection or a loose accessory ground connection.
What To Do About Ignition Noise
Perhaps the most common contributor to aircraft radio noise is the ignition system. Naturally, if you do not intend to use an onboard radio, you don’t have to worry about ignition noise. And you don’t have to worry about installing a shielded ignition system complete with expensive aircraft type shielded spark plugs and harnesses. No radios . . . no radio noise problems!
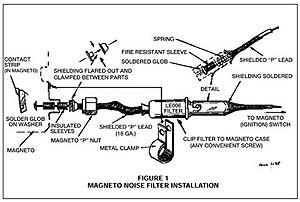
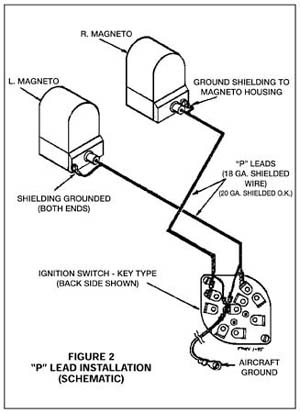
On the other hand, noise-free radio reception depends, in great measure, on a properly shielded ignition system. This means the entire magneto system, including the "p" leads (the wires connecting the ignition switch to each magneto), MUST be shielded type leads with the external shielding carefully grounded, both at the magneto and at the opposite end, at the ignition switch. In other words, in an ignition system the shielding is most effective when the shielding pigtails are grounded at both ends of the "p" leads.
It is equally important that the ignition harness be in good condition with no breaks in the shielding. If you made up your own ignition leads, keep in mind the possibility that the source of an aggravating engine noise in the headset might be traced to a poorly fabricated ignition lead. Of course, your spark plugs must be the standard shielded type and in good condition (I hope you didn’t drop one).
I have often found it unnecessary to install magneto filters on each magneto when shielded "p" leads are used - provided the shielding was properly grounded at both the magneto and ignition switch. This can be good news as the cost for two magneto filters now totals an astronomical $40 or so. My advice? Don’t install magneto filters in anticipation that they will be needed. They may not be! If, however, you do find that your shielded ignition system does not effectively reduce the ignition noise, you may have to install a filter between the magneto and magneto switch. Even so, it is just as easy to add a magneto filter later if you have to.
Incidentally, wouldn’t you expect ignition noise to disappear when the engine is shut down? If it doesn’t maybe it’s not ignition noise
Filter Out Alternator Noise
Among the other frequently encountered radio noise makers, I would consider alternator (generator) noise to be second only to ignition noise. Alternator noise is generally recognized by sort of a whining sound . . . a sound that rises and falls with changes in the throttle setting. Alternator noise is most frequently eliminated with the installation of a filter mounted directly to the alternator. The noise filter is connected in parallel to the alternator’s output lead and to the case-to-ground. The higher the output of the alternator, the larger the capacity of the filter may have to be to reduce RF interference and noise in the system. Most wiring diagrams show the alternator installation is to be made using shielded wire . . . does yours?
Strobe Lights As A Noise Source
Builders who experience radio interference from the operation of their strobe light system most likely have an installation problem and should not blame the strobes.
Here’s what you can do:
1. Install a reliable wingtip position/strobe light installation like Whelen’s A600-PG-PR installation kit. Be sure to follow the recommended installation instructions. Homemade installations may be somewhat less expensive but often fail to meet the regulation standards governing anti-collision lighting systems.
2. Install your strobe light circuit breaker at the end of the electrical buss closest to the battery using a 14 or 16 gauge wire.
3. Be sure to terminate the interconnecting cable shield to ground ONLY at one end or the other. Do not terminate both ends of the shield to ground. Usually the power supply end provides the quietest ground . . . but not always.
4. Check to see that your radios have a good central ground point.
Electric Fuel Pump A Noise Source?
In some electric fuel pump installations you might find it necessary to use shielded wire to connect the power lead to the unit. However, just as often the electric fuel pump doesn’t need to be installed with a shielded power lead. If the noise produced when the fuel pump is being operated is annoying, by all means, try replacing the power lead with a shielded wire. This usually corrects this type of noise problem. Even though your electric fuel pump may only be operated during takeoffs and landings, that duration of noise can be quite irritating and need not be tolerated, especially since the noise might also interfere with the operational accuracy of some of your electrical instrumentation.
Other Potential Radio Noise Sources
In addition to the more commonly encountered ignition, alternator, strobe and fuel pump noises are a number of other not to be overlooked potential noise troublemakers: regulators and relays, a rotating beacon, navigation and instrument lights, electrical instruments (like the turn/bank indicator), noises picked up by the microphone, landing gear and flap motors, landing/taxi lights, the radios and other avionics equipment. Any one of the foregoing, by itself or in concern with another accessory, may be capable of causing unwanted noise in your headset or speaker.
Intermittent Radio Noises
An intermittent radio noise problem is the most difficult kind to correct because it may not show up when you want it to . . . like when you haul the set off to your radio man for a bench check, for instance. If your radio man can’t verify the existence of the problem, how can he solve it?
That means you should make every effort to determine if the noise source might be in the aircraft’s electrical installation before blaming the radio and having someone tear into it.
This intermittent kind of noise problem is likely to occur because of a poor ground connection, frayed shielding, a corroded or loose connector, and possibly a poorly soldered (cold) joint . . . although soldered connections are more commonly encountered inside avionics equipment than in the aircraft’s electrical system installation.
Examine each shielded ring terminal to assure yourself that it is securely crimped to the wire.
Switch Controlled Noises
Fortunately, it is easy to pinpoint a faulty switch operated circuit as soon as you flip the switch on. However, it might be a little harder to eliminate the problem. Examples of this would include the radio interference which might accompany the operation of any switch controlled unit such as the electric fuel pump, rotating beacon, strobe lights, flaps, landing gear motor, etc.
As always, your best assurance for noise-free radio reception is a properly wired installation.
Especially important are good connections between the switch, unit (accessory), and the aircraft metal structure, to forestall the generation of noise and the pickup of the noise.
Some power cables (wires) may not be shielded at all when they really should be to minimize the noise potential. In other instances, additional shielding over that already provided might solve an otherwise vexing noise problem.
When radio noises start with the activation of a switch and continue as long as the unit is being operated, the noise source is obvious, isn’t it?
What About Noise Filters?
As for noise filters, there are all types that can be connected to your electrical supply leads for noise elimination. Radio Shack and Electronics Stores are good sources for filters. Some filters are as cheap as others are expensive. Wouldn’t you know it, the more expensive filters are usually much more effective. The filter installed between a magneto and magneto switch, generally consists of a single bypass capacitor or a combination of capacitors and choke coils. These are available from your homebuilt supply sources. Incidentally, as previously mentioned, I have seldom had to add noise filters to my magnetos. Nor have I ever found it necessary to install a noise filter with an electric fuel pump . . . lucky, I guess. More often than not, a noise problem may be due to something as simple as a poor ground connection between the unit and the aircraft metal structure (ground) . . . therefore, I always check for a poor ground connection first. You say you’ve heard that before? . . . I’m sure you have.
Squelch Control
The primary purpose of the squelch control is to cut out the hissing noise you normally hear in your receiver when no signal is being received. However, it can also cut out noise and other interference in the radio. Some radio equipment may have a separate "Squelch On/Off" switch. Others may have an adjustable control and still others (more expensive rigs) may have an automatic squelch adjustment. Ordinarily, most general aviation receivers, including intercom installations, will have the squelch control. Quite a few pilots don’t understand how the squelch control really functions so I better try to explain it. The squelch controls the strength at which a received signal must be before it is passed to the audio amplifier.
For maximum reception sensitivity you would ordinarily turn the squelch control all the way clockwise at which point you will hear a hissing sound from your receiver (also ignition and alternator noises, if present). This setting, with the squelch open, allows you to receive the weakest signals.
It also causes that hiss when no signal is being received . . . it is not an atmospheric noise being picked up by the antenna. As you turn the squelch control counter-clockwise, there will be a point where the hissing noise disappears. This is the correct setting for your squelch control. Turning the squelch any further than this will prevent the receiver from picking up weaker signals.
Microphone Noises
Your microphone will also pick up aircraft background noise . . . the rattle of metal, the rumbling of tires on the pavement and wind noise, not to mention the sound of labored breathing for whatever the reason. To correctly use the microphone it must be held very close to your mouth so that it is just touching the lips. If you move the microphone away from your lips it will not produce much of a signal and the modulation of the transmitter will be quite low.
And Finally . . .
Some of the noises you hear in flight may be due to somebody’s stuck microphone button. Incidentally, you might check your own mike button to see that you are not the offender.
Noise, who needs it? And that goes for unnecessary radio transmission, too.
