Homebuilt Aircraft Interiors, Part 3 - Seat Construction Details
By Tony Bingelis (originally published in EAA Sport Aviation, March 1985)
TAKE A PEEK inside the hundreds of airplanes on the Oshkosh flight lines and you will see cockpit interior treatments that seem to be as diverse as the expanses of the solar system. Look at one airplane and it will reflect that stark, fast completion, "let's go", appearance just about as exciting as viewing a still in an abandoned barn. Alongside it may be one featuring a beautiful custom appointed overstuffed interior professionally executed at a cost exceeding $5,000. Let me repeat that . . . 5,000 bucks!
Now that you have the proper range and perspective, what are your plans for the interior furbishment of your airplane? Have you given it much thought?
If maximum aircraft performance is your forte, you will probably strive for a minimum nice interior. Maybe you want something a little better than that and will opt for nice upholstery and matching vinyl trimmed side panels, Of course, you could always go for broke (ouch) and have the entire interior installed by professional aircraft interior craftsmen. Fortunately, you don't have to decide immediately as you can start at the bottom and work your way up.
Seat Design And . . .
A good many years ago, a Braniff captain wrote, with choked emotion, about the hard unyielding aluminum slab seats he and his fellow airline pilots were forced to sit in for hours on end (oops). This guy, Dick Cavin, a long time loyal EAAer, went further and even proposed an excellent seat design that homebuilders could adapt (SPORT AVIATION, July 1967, "A Discourse on Seats", page 15).
Some years later, I wrote of the numbing qualities of the simple plywood slab seat (SPORT AVIATION, January 1973, "Sitting Pretty", page 49). Though these many years have passed, I am sure that both Dick Cavin and I are still of the same mind and that slab seats, be they of metal or plywood, should be classified as antiques and be relegated to a place of honor in the EAA Museum, deep in its archives where they can best be used as benches by researches who like to ponder over such matters.
Since those two dated articles, precious little has been written about aircraft seat construction or about seats in general for that matter.
I have always considered Ladislao Pazmany, another true blue EAAer (designer of the PL-1, PL-2 and the PL-4), a pioneer in the design and construction of comfortable seating for homebuilders. His all-metal designs, dating back to 1960, incorporated contoured seat pans built into the structure. This should prove that the art of constructing comfortable seating in homebuilts has never been kept as a secret, just ignored by some builders.
Hopefully, henceforth, no new builders will ever again be lured into building slab seats simply because of their functional simplicity. Surely, we all deserve something better.
Among the most comfortable of homebuilt aircraft seats are the integral body contour couches in Burt Rutan's VariEze and Long-EZ designs. However, they are not for the average aircraft design. Here the pilot is forced to sit in a more upright seat because of structural limitations rather than for any other. It is here also that seating improvements can be made by any builder who cares to improve his accommodations.
First, I believe that seats should be made to be removable. It is a matter of convenience. Also a removable seat can often be made more comfortable than one built into the fuselage structure. In addition to that a removable seat can be taken to the upholstery shop where it may be endowed with the finest of fabrics and leathers.
A built-in seat pan design ordinarily has to be fitted with a removable upholstered seat cushion and a separate back cushion. Both of these are best upholstered professionally where the back cushion can be fitted with straps and snaps or some other means of securing it to the seat back.
Building Seat Frames
In one of the old T-18 Newsletters, Editor Dick Cavin described a seat constructed from a lawn chair. I tried to recall and expand on its basic details, These are shown in Figure 1. Most everyone has a couple of broken or marginally safe lawn chairs around the house, I'm sure. Since summer is over, you wouldn't need them anyway, so . . .
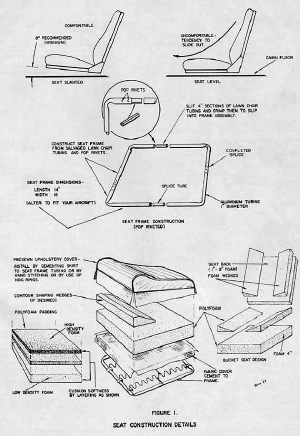
The one-inch tubing they are made of is an ideal lightweight material from which a comfortable seat frame may be assembled. Since the seat dimensions of a typical aircraft seat are smaller than a lawn chair, a bit of surgery will have to be performed, No problem here. Simply cut the tubing sections as shown with a tubing cutter or fine tooth hacksaw blade and reassemble the frame to the dimensions you need. Insert short pieces of scrap tubing inside each splice joint area and pop rivet the assembly together. You can use the same size tubing for the insert pieces if you slit them with a hacksaw and squeeze them together to fit inside the tubular frame.
Construct your seat back in the same manner as the seat bottom frame.
Installation of the seat bottom and back frame will depend, of course, on your aircraft structure in the area where the seat is to be installed. Essentially, you will have to design, make and rivet aluminum brackets to the seat frame. These can, in turn, be bolted to the aircraft structure providing an easy installation and removal capability. When making the brackets, keep in mind the need for the seat to be tilted somewhat to provide the most comfortable seat bottom angle. The closer the seat is mounted to the cockpit floor, the steeper this angle should be because with your knees elevated, a greater load is imposed on your derriere. A steeper seat cushion angle would allow the back of your upper leg area to take some of the body load. I'm sure that there have been occasions where you have had to sit in a seat with no tilt angle. Didn't you feel like you were on the verge of sliding forward out of the seat? A most uncomfortable hard feeling, wasn't it?
There is another way to get a good seat frame and that is to buy a salvage seat out of a Cessna, Grumman American or almost any other lightplane. As a matter of fact, used seats can often be found at airports that perform maintenance and repair functions.
All you really need is the framework but often you can get the fully upholstered seat for the same price. If its upholstery is in good condition, fine. Use it. If it is bad you can always redesign the seat, if you like, and have it reupholstered. If the seat is too wide for your airplane you can change that, too. I did.
I located and bought a couple of beautifully upholstered Cessna 172 seats for my Falco. When I tried them in the cockpit they looked like a million bucks, thanks to their soft leather-like upholstery but, alas, they were too wide for the airplane and would have interfered with the landing gear emergency crank. That problem didn't deter me for long as I was determined to use them.
I simply removed that magnificent upholstery and stripped the seats to their bare aluminum frames. Then I cut a 1/2" section out of the front and rear frame and spliced it back together. The two seats, now narrower, fit the airplane perfectly. Incidentally, I also had to cut off the chair legs and build in a provision for the sliding mechanism (see SPORT AVIATION, July 1983, "Sliding Seat Mechanisms", page 56).
Here is another, alas. When I tried to reinstall that beautiful upholstery it looked lousy because the seat coverings had to be pulled down on the sides of the narrower seats, ruining the design balance of the covering. A trip to the upholstery shop took care of that matter and now I have a couple of sharp looking custom-built seats designed specifically for my Falco. In retrospect, I could have saved money by buying almost any kind of salvage seat frames since I had to discard the upholstery anyway.
Some builders are installing fiberglass shell seats made for boaters and sold in sporting good shops. These are quite light and make reasonably good seats if properly mounted and upholstered. They are difficult to upholster attractively and equally difficult to mount correctly.
The correct way to mount these seats is not by screwing short legs to the bottoms as the load will be very localized. A hard landing could cause the seat legs to retract through the seat bottom and into your body with painful results. The seat mount loads should be distributed by attaching contoured blocks epoxied and/or screwed to the seat bottom. The attachment hardware could then be bolted to the newly installed base blocks.
More About Seat Bottoms
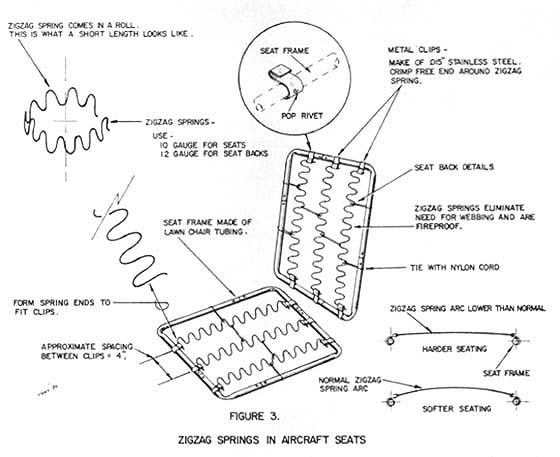
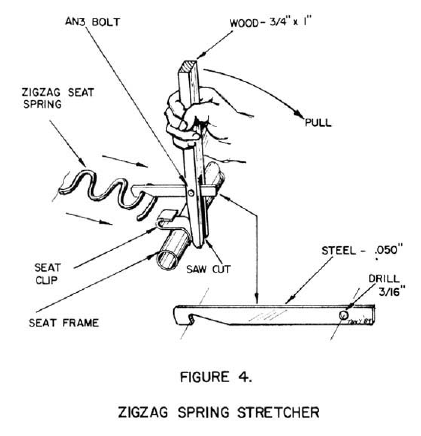
Once you have a seat frame built, you are ready to install its cushioning support base for the foam padding and upholstery cover. Perhaps the best support for the seat cushion would be zigzag springs. If your seat doesn't already have them you can purchase some at an upholstery shop. These spring steel zigzag springs must be slightly compressed so that they arc upward in the center about ¾" (See Figure 3 & Figure 4).
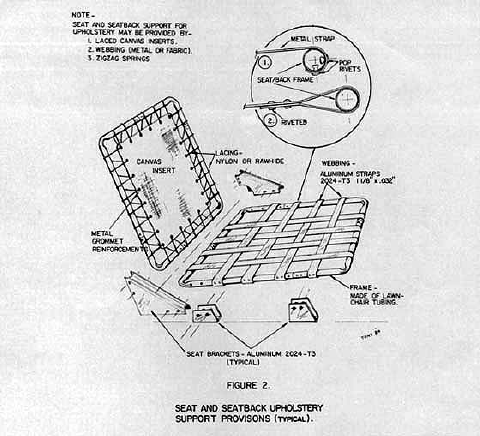
Another type of base support would be a simple canvas insert fitted with eyelets and laced in position around the seat frame with nylon cord or rawhide lacing. All fabric shops stock easily installed eyelet reinforcements.
A third way is by weaving strips of aluminum 1" or wider (about .032" 2024T3 would be fine) across the seat bottom and riveting the ends together after looping the strips around the frame. These various methods are shown in Figure 2.
Foam and Padding
As for the seat cushioning material, 4 inches of polyfoam is a good starting point. A four-inch thick block of foam might sound like a lot but it is really deceiving. What really counts is the resilience of the compressed foam and the amount of headroom you can afford. When your full weight is imposed on the foam pad it will compress to about ¼ of its original thickness, so it is really best to use high-density foam for a harder support. You could, for example use a 3" thick block of regular polyfoam and overlay that with of higher density foam.
Polyfoam is recommended as all-purpose filler because Latex foam rubber is much heavier and more expensive. So, why us it. The trouble with ordinary polyfoam is that it bottoms out, leaving very little reserve cushioning capability. It is possible, therefore, to hurt your spine in a hard landing, or even in a turbulent flight if the padding is then and lacks support. The zigzag springs previously mentioned can aid greatly in supporting your weight. The best cushioning and shock protection you can install is, however, Temperfoam.
Temperfoam has the capability of absorbing a tremendous amount of impact shock compared to common polyfoam and it is flame resistant. It is amazing stuff but costs considerable more than the ordinary polyurethane foam used by furniture upholsterers. Still, if you want the best, here is another aerospace spin-off that you can take advantage of.
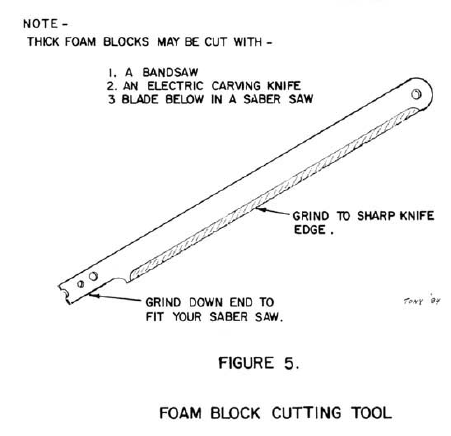
Cutting foam can be frustrating if you try to do it with a razor blade or with a pair of scissors if the material is very thick. A band saw does a beautiful job as will an electric carving knife.
You can make your own electric carving knife by sharpening a length of a hacksaw blade to a knife edge and grinding one end of the blade down so it can be chucked in your saber saw (Figure 5).
Adhesives
Adhesives and fasteners play a very important role in upholstery and trim work so a few advance comments might be helpful. I find that some of the well-known upholstery and trim adhesives work well someplace some of the time, but not always. All in all, I must confess that I’ve had the poorest results with the overrated, overpriced, spray adhesives. (Yes, I did read the instructions.) They seem to work great on large areas and on initial installation but, invariably, when I go back a week later I find that some areas of the glued fabric have pulled loose or have bridged across curved areas. Even though I am aware that trim adhesives all work best in shear and I don’t unnecessarily stretch my material because of this factor, the bond is often unreliable.
About once a year I have to go over my aircraft and reattach the trim and weather-stripping. I guess Texas climate makes a tough proving ground. At any rate, always follow the instructions for the particular product you are using and your success rate will be better than it would be otherwise. One sure way to reduce your adhesive problems is to avoid, as much as possible, stretching the fabric being attached with adhesive. This is particularly true of Naugahyde. Don’t stretch it if adhesive is all that will be holding it in place.
Contact cement is about as good as most of the trim adhesives on the market and it is much cheaper (by the can) than the other adhesives sold in tubes.
In my estimation the best all-purpose adhesive for upholstery and trim work is PLIOBOND (homebuilt suppliers stock it).
A good adhesive for fabric-to-fabric gluing is plain ol’ white carpenters glue (Borden, Weldwood, etc.). Surprised? It grabs fairly quickly and dries clear and doesn’t stain the fabric.
Since my trim is in black synthetic leather I was delighted to discover a black liquid neoprene rubber that gives truly magical results when working with black Naugahyde. I use the liquid rubber to fiar-in difficult corners and around raw cut edges that would otherwise show. It is a tenacious material that can also fill voids and it will blend in wherever I need a little cosmetic help with that black synthetic leather trim.
Clear Silicone adhesives also have their place in trim work as they will adhere to most anything.
More next month.
