Ventilation Options for Your Homebuilt
By Tony Bingelis (originally published in EAA Sport Aviation, January 1994)
The ultimate in aircraft ventilation has to be the open cockpit biplane. Its cockpit ventilation system is always ON and operating at maximum intensity. However, even an open cockpit fanatic will admit there are times when too much of a good thing is not always pleasurable.
That’s why we enclosed-cockpit types revel in our pilot-controlled environment . . . at least those of us who had the foresight and patience to install a good ventilation system.
And, pray tell, what is a good aircraft ventilation system? Well, in my opinion, it is one that can provide a generous flow of cool air, or warm air, when I want it. Furthermore, it is one that permits me to control the amount of heated or cooling air entering the cockpit. And, equally important, it is one that can be shut off completely any time I want.
After building an airplane, you would think adding an effective ventilation system should be simple. It would be if there were an efficient standardized installation that you could duplicate.
Unfortunately, the types of homebuilts we are building are quite diversified, so there has been virtually no interest in developing a standardized ventilation system that will work equally well in any aircraft.
The aircraft manufacturers found this out years ago. Consequently, a number of certificated aircraft still feature a variety of complex ventilation systems inferior to some of those to be found in the current crop of homebuilts.
Of course, the ventilation system in the typical homebuilt can be simpler to design and install because, for the most part, only a single seat or two passengers need to be considered.
Commercial aircraft, on the other hand, often must have provisions for 4 to 6 passengers. In addition, the systems are further complicated by the need to add windshield defrosting and multiple heating and cooling vents to serve each passenger station.
Ventilation On The Ground
Adequate ventilation on the ground is the biggest challenge, especially during those hot summer months.
The summer heat in the cockpit is generally intense until you can climb several thousand feet into the cooler air aloft.
Sometimes it seems the time between run-up, takeoff and climb takes forever.
In the interim, the degree to which the pilot and passenger suffers depends greatly on a homebuilt’s canopy and cockpit design which often limits the amount of cooling air you can get while on the ground.
For example, a single seater will have very limited panel and cockpit space for locating cooling vents. Here are other factors which may affect the aircraft’s ventilation potential:
1. The aircraft equipped with a sliding canopy is on a par with the open cockpit biplanes especially before takeoff and immediately after landing . . . plenty of fresh air.
2. A cabin type aircraft, with one or two doors, can provide some ventilation and relief only when the door is held partially open during ground operations. A crude but welcome proviso.
3. Aircraft fitted with large Plexiglas™ domes are the ones that afford the least amount of relief from their oppressive sauna-like heat generating bubbles.
These Plexiglas™ domes, being hinged (front end, rear end, or side), must also be held partially open (either physically or mechanically) while taxiing to provide some relief from the heat.
In any event, the amount of cooling air put out by the average ventilation system is quite ineffective on the ground. That’s why some lucky pilots can resort to an open sliding canopy, while others have to struggle with a partially open door or flip-over canopy held slightly ajar for their fresh air.
Cooling Air Sources
An aircraft’s ventilation system reaches its maximum flow of air only after the aircraft is airborne.
This is because the amount of ram air coming out of the cooling vents depends on airspeed and, in part, on the location of the air inlets.
The location, shape and size of the air inlet ports is therefore very important.
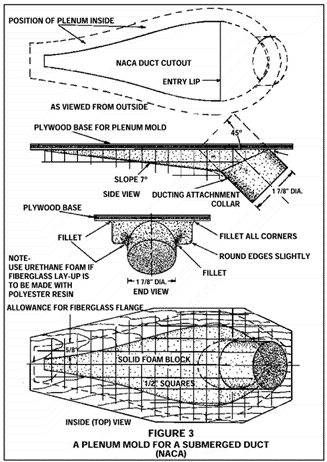
Homebuilders seem to prefer using low drag NACA inlets as a source for their ram cooling air. The NACA ducts are very efficient when located in an area of positive pressure but are dismal failures when poorly located on the fuselage sides.
The favored location for the NACA cockpit ventilation ducts is up front and rather high on the
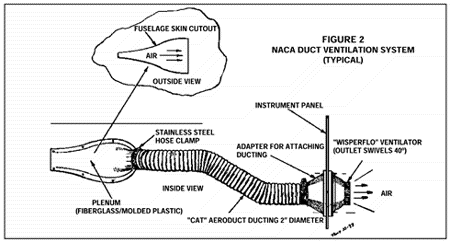
fuselage. Another effective location is just above any place under the wing.
Avoid locating the NACA duct low on the fuselage just above the wing as this is a rather low pressure area.
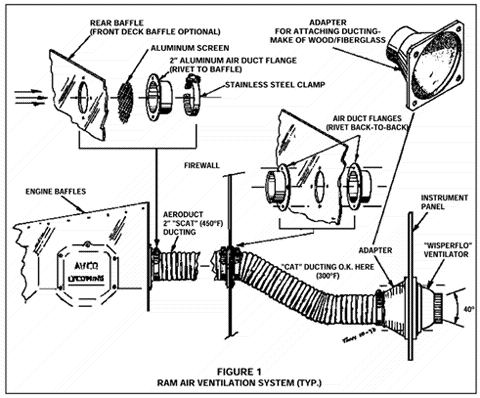
An ordinary ram air inlet can be installed inside the engine compartment on the front deck of the baffle or in the back baffle. Either of these locations will benefit from the propeller blast . . . even while taxiing about on the ground.
A few high performance aircraft also use a remote ram air inlet built into the vertical stabilizer’s
leading edge. Such a location is effective but requires a considerable length of very expensive ducting to conduct the cooling air up forward and into the cockpit.
In locating your ventilation system’s air inlets, be very careful not to install them where there is a risk of sucking in exhaust gases. This can happen because of the unpredictable turbulent slipstream effect around the fuselage/wing juncture.
The ram air pick up points in the engine compartment may introduce undesirable engine noises . . . especially if the ducting’s route to the cockpit is a rather short distance.
Equally undesirable are the clam shell doors or plastic vents poked into the side of the fuselage, windshield or canopy. In this case, wind noise may be more objectionable than a bit of engine noise.
And finally, I would hasten to add that locating a vent, port, or NACA duct on any upper surface may not be a good idea because of its susceptibility to water/rain ingestion.
Can The Air Get Out?
If your cockpit and baggage compartment areas are well sealed, you can improve the effect of the cooling air by providing an outlet for it somewhere behind you because the maximum benefit of a ventilation system is best realized when it permits the flow of air to be felt around your head.
So, Which Is The Best Installation?
You will have to decide that for yourself. Naturally, it should be the most cost effective and practical installation you can get for your particular homebuilt design. Here are a few of the more frequently used options you can consider:
1. The most economical and easiest to install vent system makes use of the so-called plastic "Snap Vents." These may be installed in either a plastic windshield (or canopy) or in the side of a metal cowling or fuselage. The Vents slip into 2" diameter holes. Although they can be rotated to control the amount of air entering the cockpit, there is no shut-off provisions. You merely rotate the plastic shell’s opening so no ram air enters. These vents are the source of some wind noise but they are very inexpensive. Approximately $4 for a pair of them.
2. The plastic "Vista-Vent" cabin vent can be installed in Plexiglas™ windshields and windows by cutting a 2-1/2" hole. Control over the air entering the cockpit is by means of a knob. Cost of each unit is approximately $11. Objectionable features include the anxiety experienced while cutting such a large hole in the Plexiglas™, and the wind noise.
3. The adjustable "NACA Air Scoop" is unique to homebuilts. Cost is about $22 (each) and it can be cockpit mounted directly in the side of a canopy or fuselage. This modified version of the NACA submerged duct features an infinite number of adjustments utilizing a small rotating control wheel. It can be tightly closed. To be effective, this NACA Air Scoop must be installed in a high pressure area in the fuselage side.
4. "Wisperflo" ventilators are large cockpit mounted plastic vents which can be swiveled as much as 40 degrees. Their large orifice (1-3/4") is about the largest you can find. Cost is about $14 each. However, you will also need a mounting adaptor and ducting to connect it to a source of ram air.
5. The airline style "Eyeball Air Vent" is similar to the "Wisperflo Vent" except that it has a smaller orifice outlet. It too swivels to direct the air where you want it. This elegant, aluminum unit has a knurled outlet collar which may be rotated to control the air volume entering the cockpit. Approximately $50 per unit. It, too, requires use of CAT ducting to connect it to a source of ram air . . . but it takes up less instrument panel space.
Other Considerations
By all means, do screen over all air inlets. Not necessarily where the screen can be seen but at some point before the air enters the ducting. The protective screen will keep out varmints and other unwelcome pests. A piece of aluminum screen wire can be cut to fit the opening and glued in place with an adhesive such as silicon adhesive, epoxy, or Pro-seal.
A means should be provided for shutting off the ventilation system when the cooling air is not needed . . . especially during cold weather. This is easily accomplished with the installation of a commercially available airline type eyeball air vent, a "Wisperflow" swivel vent, or an adjustable NACA air scoop. All of these units are available through homebuilt suppliers such as Aircraft Spruce & Specialty Co. and Wicks Aircraft Supply.
The ventilating air is generally conducted from its point of pick up to some strategically located cockpit vents using 2" diameter "SCAT" or "CAT" aeroduct ducting.
Somebody is sure to write and ask about air conditioning. Forget it. It is too heavy and bulky an installation for the average homebuilt, and it would cost you an arm and a leg . . . even if you were to salvage one from a "retired" Beechcraft. Besides, the air conditioner’s power demands would virtually cripple the rate of climb of most any low-to-medium powered putt-putt.
