Fabric Covering-Common Problems
By Ron Alexander (originally published in EAA Sport Aviation, October 1998)
Covering an aircraft with fabric can be a frightening prospect. The reason is very obvious, you have spent literally months and years building your prize-winning fabric covered airplane and now you are going to cover up all of that beautiful craftsmanship. The only part of the airplane most people will ever see is the outer layer of fabric. This can challenge any builder. Perhaps you have covered an airplane previously or maybe this will be the first time. You simply know that you must do the absolute best fabric covering that anyone has ever done. After all, the airplane is going to be judged largely by the outside finish. Not only is pride of workmanship involved, but also a lot of money and time will be spent on this part of the building process. Words of caution—do not try to save money at this point. Through the years I have listened to builders and restorers trying to find ways to cut costs on the only part of the airplane that really shows—the outer covering. This is not the time to economize. Resign yourself to spending the money necessary to complete the project with the same high quality with which you have completed the rest of the airplane. All of the materials to cover a J-3 Cub size airplane will cost around $2,500 to $3,000 regardless of the covering process. If someone gives you a quote much lower than that they are not including everything that you need. You will spend that much money when all is said and done. Look at it this way, you are going to save approximately $10,000 in labor costs by covering the airplane yourself. Yes, that’s correct, the price charged by most professionals to cover an airplane will range between $8,000-$12,000.
If you cover your airplane with fabric according to the instruction manual (this is important) the fabric and coatings will have a service life of about 15-20 years. The time variable is dependent upon how much time the airplane is exposed to the sun and elements. Most aircraft owners will want to inspect the inside of their aircraft at about the 20-year point regardless of the fabric condition.
If fabric covering is fairly easy to do why do you see so many problems with the fabric and coatings on aircraft? Surely there is more to this than meets the eye. I know you have seen airplanes with the coatings literally peeling off in sheets. We have all seen an Aeronca Champ or a J-3 Cub with wing tips that are bowed up (not a new type of high-lift device). What causes these problems and all of the other fabric problems so many people encounter? Is it dependent upon the type of covering process they are using? Rarely is that the case. Each type of fabric covering process has its own advantages. Again, if the instructions are followed to the letter you will usually not have problems. Well, if that is true why all of the problems? That is what I will address in this and subsequent articles—common fabric covering problems and more importantly, how to prevent them.
In writing this article I conferred with Jon Goldenbaum of Poly-Fiber, Inc. and asked him to list the most commonly asked problems he encounters regarding fabric covering. These problems not only involve the Poly-Fiber process but also encompass most of the other systems that are available. Whether you use urethane paints, nitrate and butyrate dopes, or Poly-Fiber products the basic problems remain the same. As a matter of fact, most of the basic steps of all processes are the same until you reach the chemical stages. One important point, regardless of the type of fabric covering process you select follow the instructions to the letter. Do not experiment with your own techniques or mix fabric covering systems. As an example, do not use Grade A tapes on Ceconite fabric or nitrate dope on Poly-Fiber fabric. These are common practices that cause problems.
If you are covering a production aircraft, you must strictly follow the fabric process instruction manual. A production airplane requires a covering process that has been approved by the FAA. It must have a Supplemental Type Certificate (STC) that defines the aircraft that the process may be used on as a direct replacement for the original fabric. The STC does not allow you to mix and match different fabric processes. It is interesting to note however, that the STC only applies through the silver coats of a process and does not specify what type of topcoat will be used. If you are building an experimental aircraft you can legally cover it with anything you would like. I will emphasize that even though this is true you should use an approved (STC) system for your airplane. This is common sense. Your experimental airplane flies through the same air as a production airplane carrying the same people. Just because you can legally mix and match systems and experiment you should avoid any temptation to do so. Otherwise, I can almost guarantee that you will be recovering your airplane within a very short period of time.
There are seven major problems encountered in covering aircraft. This list incorporates the most common reasons aircraft owners have to recover their airplanes prematurely. The problems are:
1. Inadequate preparation of surfaces
2. Selecting the wrong weight of fabric
3. Not following the procedure manual
4. Improper tautness of the fabric
5. The 1st chemical coat improperly applied
6. Inadequate protection from the UV rays of the sun
7. Topcoat problems
Prior to probing into these specific problem areas, it is important to note that there are a few general dos and don’ts to remember. The first is not to rush the covering process. Many builders push to complete an aircraft for an airshow or convention (I am sure you have never done this). Rushing through the fabric covering stage is not conducive to completing a trophy-winning airplane. Fabric covering involves the spraying of several coats of chemicals. Each coat must thoroughly dry before the next one can be applied. A good rule of thumb is to do one coat in the morning followed by one coat in the afternoon. Allow plenty of time for each coat to dry. Another mistake made by many first time coverers is to tackle a large surface initially. Do not start covering a wing or fuselage without practicing. Start with a practice panel and then proceed to a small control surface. Then, if you do make mistakes you are not going to have to spend a fortune on materials to correct the problem. I would also suggest you attend one of the EAA/ SportAir workshops on fabric covering. This 2-day workshop affords you the opportunity to learn and practice covering techniques on actual aircraft surfaces. After participating in the weekend course you will certainly feel confident to undertake the fabric covering of any aircraft.
Another generic problem area is found with temperature and humidity. The ideal temperature for fabric work is 77 degrees F with humidity between 0% and 70%. If the temperature is below 60 degrees and/or the humidity above 90% wait until a better day. If you are spraying nitrate or butyrate dope the problem is more acute. With dopes the temperature should not be below 65 degrees F or the relative humidity above 80%. Hot temperatures are not as critical. Retarders may be used to offset the problems encountered with high temperatures and humidities. More on this when we discuss final color coats.
Lets start with the fabric covering problem areas above and present their solutions.
Preparation of Surfaces for Fabric Cover
Often a builder or aircraft restorer will have the mistaken idea that fabric covering begins when you cement the fabric in place. This is far from reality. As a matter of fact, a lot of time and effort will be needed prior to ever cutting the fabric for placement on the aircraft. Anyone who has ever restored an airplane certainly knows that most of the total work involved is in the preparation phase. A few basics need to be presented concerning adequate preparation. First of all, if you are recovering your airplane take care in removing the old fabric. You can save yourself a lot of time and effort by carefully cutting the old fabric away leaving the inspection plates, drain grommets, reinforcement patches, and control cable cutouts in tact. This will help you with placement of these items on the new fabric. Secondly, always make sure you use epoxy primer on metal and fiberglass parts and epoxy varnish on wood parts. Why—because the majority of other primers and varnishes will be lifted from the aircraft surface by the chemicals found in covering processes. MEK and reducers found in covering process chemicals will not affect epoxy primers and varnishes. They will lift other paints and varnishes like a paint stripper allowing moisture to collect in the metal or wood with obvious consequences. If you have already primed or varnished with some other product test it before applying the fabric. Soak a rag with MEK and leave it on the surface for about 30 minutes. If it lifts the paint or varnish you need to redo the surface. Often you can simply spray epoxies over the existing finish without having to strip them. This too, can be tested. Spray the epoxy over the existing surface on a small area to be sure it does not act as a paint stripper prior to applying it to the entire piece.
Before priming or varnishing a surface be sure it is completely clean and free of all oil and other contaminants. Do not prime over rusted pieces. Remove the rust and immediately prime. A piece of bare steel will rust within hours if a primer is not in place. Make sure you fill all dents in leading edges, etc. I would recommend a product called SuperFil rather than Bondo. Bondo is a polyester filler that will shrink with age. I do not recommend using Bondo on aircraft surfaces unless you are prepared to redo the filled portion of the surface after it shrinks and cracks the topcoat. SuperFil is an epoxy filler. That means it will not shrink over time. It may be used on wood, fiberglass, or metal with equally good results. You may want to use a cloth padding on a really dented leading edge. Polyester padding is often used between the leading edge aluminum or plywood and the fabric itself.
All of the sharp edges that could potentially cut the fabric should be covered with anti-chafe tape. This usually involves rivet heads, metal seams, and sharp edges. Let your sense of touch be your guide. If you feel something sharp cover it with the anti-chafe tape. Do not use masking tape for this purpose. It will retain moisture and cause problems later on. Also, paper masking tape will turn brown with age and possibly show through a light colored paint.
On your wings you will want to ensure the ribs are parallel to each other and aligned properly prior to placement of the fabric. Inter-rib bracing tape is used for this purpose. It will keep the ribs straight up and down when the fabric is heat tightened over them. When complete, the inter-rib brace looks like a series of "Xs" in each rib bay.
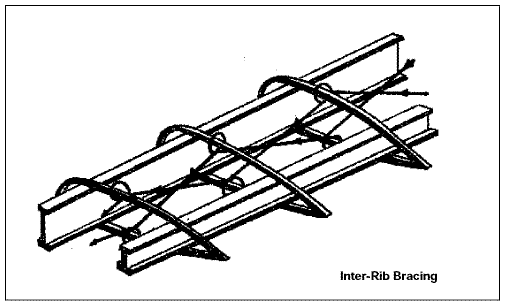
Figure 1.
Selecting Proper Fabric Weight
This decision has a major impact upon the life of the fabric on your aircraft. If you use a fabric too light in weight for your airplane you will certainly have associated problems. First of all, lets look at what fabrics are available. Grade A cotton was the fabric of choice until the 1960’s. It was replaced with polyester fabrics designed to be shrunk with heat. To my knowledge, Grade A fabric is virtually unavailable today. If you do find it make sure it meets the FAA standards required for production aircraft and test it prior to placing it on your airplane. You could get old fabric that has been exposed to sunlight and has lost its strength before you even put it on the airplane. My advice is to stay away from Grade A cotton today. Polyester fabric is much easier to apply.
Polyester fabric comes in different weights and strengths. The most common fabrics are light weight, medium weight, and heavy-duty. Light weight fabric weighs 1.7 ounces per square yard. That equates to a total fabric weight of about 9 pounds on a J-3 Cub size airplane. Medium weight fabric weighs 2.7 ounces per square yard bringing the total weight of fabric only for our J-3 to 14 pounds. Heavy-duty fabric weighs in at 3.4 ounces per square yard bringing our total comparative weight up to about 18 pounds for our J-3. Typically, the coatings will add 30-40 additional pounds to the overall weight. This is dependent upon the process applied. The strength of fabrics varies from a breaking strength of about 70 pounds per square inch up to about 130 pounds per square inch, light weight versus heavy-duty. Selection of fabric for your airplane is simple. If you are covering an ultralight, glider, or an airplane with a small horsepower engine (below 65 HP), you can safely use light weight fabric. If you are covering an aerobatic aircraft, large bi-plane, warbird or crop duster, in short any high wing loading aircraft operating under severe conditions, use heavy-duty fabric. All other airplanes (this constitutes the majority) should use the medium weight fabric. You cannot go wrong using a heavier weight fabric. Problems are much more likely to occur when you use a lighter weight fabric than the one recommended for your airplane. These problems surface in the form of damaged coatings on top of the fabric caused by movement of the fabric itself in the form of drumming or beating. So, if in doubt, add a few pounds and go with a heavier fabric.
By the way, Ceconite, Superflite, and Poly-Fiber fabrics are all basically the same. They are polyester fabrics woven at the same mill on the same looms. (Don’t forget the STC). They are all capable of being shrunk about 10% and the thread count is the same on the warp and fill. That means you do not have to worry about the orientation of the fabric. It can be placed on the surface in any direction.
Follow the Instructions
This is a key point. You must follow the instructions written by the fabric process manufacturer. Reviewing the STC’s mentioned earlier, on a production airplane you cannot mix fabric covering processes. Not only is this a legal issue regarding the airworthiness of your airplane but it also can result in having to recover your airplane prematurely. As an example, Poly-Fiber coatings are not compatible with nitrate and butyrate dopes. If you put Poly-Brush (the first chemical coat on the Poly-Fiber process) on fabric as your first coat of chemical and then switch to nitrate dope for subsequent coats you will have problems in the form of cracking and peeling. These problems usually do not appear right away but they wait until you finish the job and fly for a few months. Then they appear. What is the solution—recover the airplane. By the way, if you do have major fabric problems such as cracking and peeling of coatings, it is impractical to strip the coatings off the fabric. The best course of action is to recover the airplane. Even better, learn from other people’s mistakes and follow the instructions and you will not have to recover for 15+ years.
Another area of concern is experimenting with a proven system. Listening to so-called "experts" who provide you with a quick and easy way to short-circuit the covering process. I have encountered individuals who are experimenting with various steps of the covering process from the type of fabric cement they use to using latex house paint as a final topcoat. Let me say this very clearly, the fabric coating manufacturers have tested their products. To my knowledge none of the tests involved latex house paints. In other words, if it is not in the manual don’t do it unless you want to spend another $2,500 to recover the plane.
Fabric Tautness
How tight should the fabric be before you start putting on the coatings? This is a very good question and an additional problem area. If the fabric tautness is not correct you may have difficulties. If the fabric is too tight you may do damage to the structure itself. If too loose, you may have the coatings crack and peel due to too much movement. In any case, take the time to properly shrink the fabric. Remember, the fabric is capable of shrinking about 10%. Keep that in mind when you cement the fabric in place. You should initially put it on the surface so that it is snug—a technical term meaning neither too loose nor too tight. A good rule of thumb—on a surface such as a wing you should be able to lift the fabric about 1 inch above a rib prior to shrinking.
One thing is certain; you must use an iron to shrink fabric. If you have a heat gun hide it until you have covered the airplane. You cannot control the temperature emitted from a heat gun. It is absolutely essential that you shrink the fabric using an accurate temperature from the iron. This can only be achieved using an iron that is rated at 1100 watts or higher. You must calibrate this iron for accuracy. When you shrink the fabric it must be done at a precise temperature within + or – 10 degrees. The initial shrinking of the fabric is done at 250 degrees F. At this temperature the fabric will shrink about 5%. If you are using nitrate and butyrate dopes this is the final temperature that you will use. Nitrate and butyrate dope (yes, even non-tautening) will continue to shrink fabric over a long period of time. If you have an ultralight or smaller aircraft you may want to stop shrinking at 250 because of structural considerations. Fabric, when being shrunk, has incredible power to bend and twist. You should watch for evidence of this while using the iron.
Most aircraft structures require a final shrinking of 350 degrees. This ensures proper tautness of the fabric. Do not exceed 350 degrees. At 375 degrees the filaments of the fabric begin to thermo-soften and actually loosen on the structure. If this occurs the fabric will appear as though it has not been tightened enough. At 415 degrees the filaments begin to melt. For this reason it is absolutely imperative that you calibrate your iron using a glass thermometer. I do not recommend using the spring type thermometer. It is not as accurate as a bulb type. The Poly-Fiber manual has a very good explanation as to how to calibrate an iron. If you are covering an airplane I recommend you purchase this manual regardless of the type of covering process you are using. It is very well written and explains fabric covering in detail.
