Tear Repair: Fixing Common Damage to Fabric
By Ron Alexander (originally published in EAA Sport Aviation, September 2000)
In previous issues, "Aircraft Building" has outlined the proper techniques used to repair sheet metal and composite surfaces. What about fabric-covered airplanes? They, too, are damaged, and usually repairing this damage isn’t difficult. Often the damage is minor, a tear in the fabric. Major repairs include damage to the underlying structure, and they are another story.
Repairing fabric involves essentially the same steps, with the only differences depending on the fabric-covering system used. We’ll address the Poly-Fiber process this month and cover Ceconite fabric next month.
As always, the first step is making sure you can legally make the repair. If you own a production airplane and have the required knowledge and skill, you can make the repair under the supervision of an airframe and powerplant mechanic (A&P), who ensures that the repair is done correctly and endorses the airplane’s maintenance records.
If you own an amateur-built airplane, you may legally perform any repair-fabric damage included. If you haven’t done any fabric work before, you’ll want to find someone, such as an A&P mechanic, familiar with fabric techniques and have him or her inspect the area and recommend a repair.
Damage Assessment
If your airplane is covered with the Poly-Fiber system, repairs are simple. The Poly-Fiber manual has a complete discussion on fabric repair, and the techniques you use to repair damage must be in accordance with it. This is mandatory on a production airplane and highly recommended on a homebuilt, and there should not be any differences in repairing the two types of airplanes. They fly through the same airspace carrying the same people.
A small tear or rip is the most common form of fabric damage. It’s usually on the bottom of the fuselage or a fabric-covered gear leg, and it’s usually caused by rocks or debris kicked up by the prop blast to the wheels. As with all repairs, assessing the damage is your first step.
As you inspect the damage to the fabric, be aware that the underlying structure may have also been damaged. This damage is often hidden under what may appear to be minimal damage. Inspect the underlying structure closely to determine the extent of all the damage. If a component part is damaged, you may need to remove it to repair it. If you’re repairing a production airplane, you must be working under an A&P’s supervision.
If your inspection determines that the damage is to the fabric only, you next must ascertain the covering system and the type of color coat used. If you built the airplane, you already have this information. If you bought the airplane, this information should be in the airframe logbook. It the airplane is covered with the Poly-Fiber system, the color coating (or top coat) should be Poly-Tone or Aerothane. Each topcoat requires a different repair method.
When repairing Poly-Fiber, you don’t need to find a needle and thread; Poly-Tak fabric cement takes the place of sewing. In most cases, to repair a rip or tear, you cut out a patch from a new piece of fabric and cement it in place over the damaged area. When cutting your patch, use this simple rule of thumb. If the tear or damaged area is less than 8 inches in any one direction, the patch’s overlap on top of the old fabric must be at least 1 inch in all directions. If the damaged area is more than 8 inches, the patch’s overlap must be at least 2 inches.
Repairing Poly-Tone Surfaces
When Poly-Tone is the covering’s final topcoat, first decide whether you’ll make the repair on the airplane or whether you’ll need to remove the part. Naturally, you’ll repair any underlying damage to the structure before repairing the fabric. If you must replace wood or tubing, make sure you coat the new material with epoxy primer or epoxy varnish.
Next, trim the fabric around the damaged area to remove any loose or frayed fabric. Then measure and cut a patch with the required overlap from a piece of clean, un-shrunken fabric that matches the style of fabric used on the airplane. If the airplane is covered with medium-weight fabric, cut your patch from medium-weight fabric.
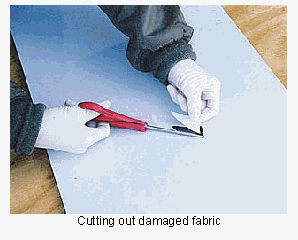
When cutting the patch, use pinking shears to keep the edges from fraying. You may want to cut the patch so that it is a square, rectangle, or circle. This gives the completed patch a more pleasing appearance. Sometimes you will be able to cut the patch to match the shape of the damaged area without it being unsightly.
Lay this patch over the damaged area and outline the patch on the existing fabric with a pencil. Do not use a pen because you cannot remove the ink from the fabric. With tape and paper, mask the area outside the patch. Leave a little extra space for working room. Use a good quality masking tape and butcher paper. Don’t use newspaper because the print may bleed through.
Wearing rubber gloves and eye protection, thoroughly clean the old fabric in the marked area with MEK. Clean it all the way down to bare fabric, removing all of the old coatings completely. Be as neat as possible; you do not want the MEK running into the undamaged area because it can create sloppy runs and makes a real mess on the good fabric.
With the fabric thoroughly cleaned, use Poly-Tak cement and a small glue brush and attach the patch to the existing fabric. Make sure you’ve got the required overlap. Apply a fairly liberal amount of Poly-Tak to one side at a time. Poly-Tak will dry rapidly on a warm day. Cement the patch in place by working the Poly-Tak up through the new fabric. Depending on the ambient temperature, let the Poly-Tak cement dry at least 30 minutes to one hour.
When the Poly-Tak is dry, heat smooth the cemented areas forming the overlap with a small iron calibrated at 225°F. Calibrating the iron is important. Heat in excess of 225°F weakens the Poly-Tak bond. Next, calibrate the iron for 350°F and iron the patch itself to heat shrink the new fabric. Be sure you stay away from the cemented edges with this temperature. Otherwise, you will loosen the cement. For added protection, shield the cemented areas with a piece of cardboard.
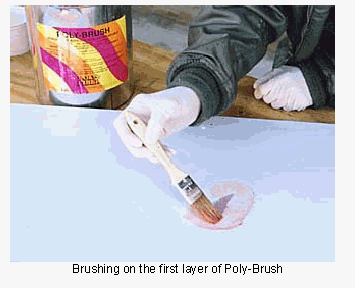
After shrinking the patch, apply three coats of Poly-Brush with a 2-inch brush and let the area dry. If your damaged area is larger than 8 inches, frame the patch with 2-inch finishing tape applied with Poly-Brush.
To protect the area from the sun’s ultraviolet rays, apply at least three coats of Poly-Spray using (borrowing or renting, if you don’t have one) a small spray gun. Let the Poly-Spray dry overnight, then match the airplane’s original color using Poly-Tone topcoat. Remove the masking tape and spray two or three coats of Poly-Tone over the area. Allow this to dry for a couple of days. Finally, using a white polishing compound, polish the blended areas for a better color match of the old area to the new.
Repairing Aerothane Surfaces
The main difference in repairing fabric coated with Aerothane is that MEK doesn’t remove the Aerothane, a polyurethane paint that resists most chemicals. You have two alternatives: repair the area from the inside of the structure or sand off all of the Aerothane coats.
If you can get to the back side of the damaged fabric, here are the steps for repairing the damage from the inside:
On the outside of the fabric mask around the damaged area, leaving at least 1 inch around the area. Apply the masking tape directly to the Aerothane surface.
Scribe around the inside edge of the masked area. You are trying to cut through the coatings-but not into the fabric itself. You must work carefully to do this correctly.
Apply MEK (using proper skin and eye protection) to the back side of the fabric in the damaged area. This will soften the Poly-Brush and Poly-Spray that is under the Aerothane, allowing you to pry up an edge of the damaged coatings on the outside and peel it away from the masked off area.

Carefully cut a patch that will fit exactly within the masked area.
Using Poly-Tak cement, apply the patch to the area.
Follow the sequence outlined for Poly-Tone repairs until you get to the final color coat and then match it using Aerothane topcoat.
If you cannot get to the back side of the fabric, mask the area needing repairs. Using dry 280-grit sandpaper, remove the Aerothane coats. Keep sanding until you reach the silver Poly-Spray layer. Once you reach silver, remove the remaining coatings with MEK. Once you reach bare fabric, follow the steps given above.
When you respray the color coats of Aerothane, blending the new coat with the old is more difficult. You may want to respray the entire panel area. For example, if the repair is on a control surface, mask out the area from rib to rib and spray new paint over that entire surface. You will then have a better match.
Repairing fabric dings isn’t a major deal. Like most repairs, obtaining the necessary tools and supplies before you begin, along with a little planning, makes the job easy.
Materials Needed for Fabric Repairs
Here are the tools and supplies you’ll need for typical fabric repairs:
• Small piece of fabric
• Masking tape and paper
• Small glue brush
• 2-inch brush
• Pinking shears
• Iron
• Thermometer to calibrate iron
• Pencil
• Small touch-up spray gun
• 280-grit sandpaper
• Rags
• Gloves
• Goggles
• Poly-Tak cement
• MEK
• Poly-Brush
• Poly-Spray
• Top Coat-Aerothane or Poly-Tone
