Covering Your Fuselage: It’s easy whether using an envelope or the blanket method
By Ron Alexander (originally published in EAA Sport Aviation, May 2000)
Many people with fabric -covering experience feel confident placing fabric on the wings and control surfaces, but the fuselage is a different matter. Its shape, curves, and other features are not as straightforward as a wing or control surface, and this makes them apprehensive. But covering a fuselage isn’t difficult.
Historically, when covering an airplane with fabric, cotton or linen was hand-sewn together over the fuselage frame. Later, machine-sewn envelopes were made using standard patterns developed for each make and model of airplane. In other words, the fabric was sewn together in the fuselage’s exact shape, creating a fabric "envelope." You simply slipped it over the structure like a loose-fitting sock and then shrank it to fit tightly.
Mass-produced machine-sewn envelopes became the standard fuselage covering method. Fabric envelopes are still produced today, but they are made of polyester instead of cotton or linen. Certified cotton and linen are not available for aircraft use today. Available for a wide range of homebuilt and production aircraft, Ceconite or Poly-Fiber fabric envelopes are a time-saving option for covering a fuselage.
Blanket Method
Another fuselage covering option is the blanket method. It involves unrolling fabric directly from the roll, cutting it into pieces that fit the frame, and attaching it to the frame with fabric cement. Because the separate pieces that cover the fuselage are not sewn, you need to cement them where the pieces join.
The "rules" for cementing fabric to a structure vary slightly depending on the covering system. Ceconite and Poly-Fiber have different overlap requirements, but both share the following rules:
Fabric may be cemented together only over a load-bearing structural part of the fuselage. This means longerons or cross-members of the frame. These parts may be made from wood or steel tubing, or, occasionally in older aircraft, an aluminum angle. You may not cement fabric together over an open area.
Fabric may not be joined and cemented over fuselage stringers. Usually made of wood or aluminum channel, stringers shape the fuselage but are not load-bearing components. They are not strong enough to support a cemented seam.
Step by Step
Preparation: Be sure all of the fuselage’s metal parts are properly primed; only use an epoxy primer. Varnish all wood only with an epoxy varnish. Do not use one-part varnishes and primers because the chemicals used in the covering process will lift these one-part varnishes and primers on contact. This includes zinc chromate primer.
Before you cover, install everything in the fuselage the fabric covering will prevent you from reaching. This includes hardware, pulleys, cables, headliners, etc. Some classic and antique aircraft use polyester fabric for the interior, and you must install it before you cover the fuselage. Don’t worry about upholstery panels and seats at this point.
To hold the fuselage while you’re covering it, make a "tick-tack-toe" jig. This turns the fuselage (on the roll axis) and makes it much easier to work on all of its sides. If you try to cover the fuselage while it’s on its landing gear, it will take longer and you’ll spend way too much time crawling around under it. This isn’t a lot of fun, especially when spraying. By using the jig, you get to stand comfortable all the time and you ensure that you will be spraying only flat surfaces. To avoid runs, you want to avoid spraying a vertical surface whenever possible.
Planning: Start with the premise that you will join fabric only over longerons or cross-tubes-not the wooden stringers that go down the center of many fuselages. (Remember, you cannot join the fabric over these stringers.) A tape measure is an essential tool.
All Ceconite or Poly-Fiber fabric is about 70 inches wide, and your goal is to make the 70-inch fabric span from one longeron to another. There is no set rule for doing this-it will vary from airplane to airplane according to the arrangement of the longerons. With this in mind, you must have a plan before you start cutting the fabric.
(There are several good explanations and illustrations for covering a fuselage in the Poly-Fiber manual and the Ceconite manual. Make sure you read and follow the directions for the process you will be using-even on experimental airplanes.)
Covering: On a J-3 Cub-type fuselage, you usually start by cutting and fitting the belly piece. Spanning the distance between the bottom longerons isn’t a problem, and at the belly’s widest point it takes less than half the fabric’s 70-inch width. Before attacking the fabric with scissors, remember the old carpenter’s maxim: Measure twice, cut once. When measuring and before cutting, make sure you allow extra fabric so that you have the overlap required by the covering system.
Once cut, drape the fabric over the bottom longerons and cement it in place. Start at the front and work your way to the tail. Make sure the fabric wraps around the tube at least 270 degrees. Because there will be no fabric overlap by the firewall, you’ll need a secure bond. The manuals for the covering systems tell how to create this bond, and you should follow the directions in the manual for all covering steps.
With the fabric cemented in place, you’re ready to do the initial shrink. Calibrate your iron to 250°F (the manuals tell how) and shrink the belly fabric to this temperature. (How much the polyester fabric shrinks depends entirely on the temperature.) You want the fabric to be partially shrunk, not totally. This gives you a tight base on which to overlap the next piece of fabric.
A side piece is next, and it overlaps the belly piece by at least one inch. After neatly trimming the overlap, cement it in place. Remember, cement about 12 inches at a time, applying the cement first to the fabric that is in place on the fuselage and then working the new piece into the cement. An illustration of the overlap appears in Figure 1.

Extend this sidepiece to cover the side of the fuselage, wrap it around the top longeron, trim it as necessary, and cement it in place. Neatness is important to provide a tight base for overlapping yet another piece of fabric on this longeron. If you have angles where the fabric will not cement to the longeron smoothly, you can use a 250°F iron to heat-form the fabric for a smooth fit.
Keep repeating this process as you span from longeron to longeron, piecing the fabric together with one-inch overlaps. One side of each piece you install overlaps a previously cemented piece, with the remaining side being wrapped around the next longeron.
When you get to openings for windows and doors, simply trim the fabric and then heat-form and cement it inside the window or door frame as far as you can manage. As you get to the front of the fuselage, wrap and cement around the cross-tubes by the boot cowl or firewall. Again, neatness is important for proper appearance.
It will often take four or five pieces of fabric overlapped to complete a fuselage structure. With proper planning, it’s not as difficult as it sounds. You can minimize waste by using pieces of fabric that remain from your fuselage pieces for the tail feathers and flight controls if they cover the parts completely. Spend time laying this out on a piece of paper before you begin cutting. You may even want to cut patterns out of heavy paper and clamp them together to ensure a proper fit; then cut the fabric.
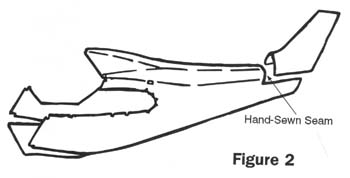
When you cover the tail fin you may have to hand-sew a seam. Most airplanes do not have cross-tubes underneath the area where the vertical fin joins the fuselage. Because you can only cement seams over structural parts, you’ll have to pin the fabric together and then stitch it using a baseball stitch. Nothing fancy is required. Just make sure you use approved hand-sewing thread-not something from the local sewing shop. There is precise guidance on how to do this in the Poly-Fiber manual. Figure 2 is an illustration of the hand-sewn area. (Fig 2a, Fig 2b)
As you can see, covering a fuselage using the blanket method is not difficult, given proper planning. Now let’s look at the envelope method of covering.
Envelope Covering
Covering a fuselage with a fabric envelope will save you time. The envelope is a pre-sewn slipcover that you pull over the fuselage structure and cement in place. How well the envelope fits depends upon how true to the original your fuselage structure is. If you have a bent, repaired, or modified fuselage, the fit may not be good.
Most fuselage envelopes have a separate belly piece that you must install first. Instead of a separate piece, the envelope may be sewn so that the belly portion is open on one side, requiring it to be closed and cemented like a box top.
To install a fabric envelope, turn the entire envelope inside out so the sewn seams are on the inside, next to the structure. Slip the envelope in place and then clamp it in position with clothespins or spring clamps. You may want to “spot weld” the envelope to hold it in place on the longerons, using small dabs of thinned cement applied through the fabric.
After you’ve made sure the envelope is in the correct position, wrap it around the appropriate tubing, window frames, and door frames and then cement it in place. Don’t cement the envelope to the longerons; only cement it at the front of the fuselage and any other areas where the envelope is not sewn (belly area on some envelopes). You don’t need to cement it to the longerons because the fabric will be tight enough and will not move from its position once it has been heat shrunk.
Use care when heat-shrinking an envelope. You need to keep the seams along a longeron. Start shrinking over the seam itself and work incrementally on each side of the seam to keep it straight. If you shrink one side of the fuselage area before the other, you will cause the seams to curve and have a snakelike appearance.
Whether you use the blanket method or a fabric envelope, you must cover all sewn or cemented seams with finishing tape. It’s also a good idea to apply finishing tape over all underlying tubes or stringers that touch the fabric to preclude the fabric from chafing or the paint from cracking.
As you can see, covering your fuselage is not a difficult task, given proper planning. Choose the method of covering you desire. The envelope method will cost more money, but will save you time.
