Swinging The Compass
By Tony Bingelis (originally published in EAA Experimenter, March 1996)
With a loran and handheld GPS onboard, who needs something as old fashioned as the "whiskey compass"? Who? Why, you do, of course, amigo.
Sorry to downplay the awesome accuracy of your new miracle nav-aids but our omnipotent FAA, in effect, mandates through its FAR 91.33 that you have a functioning magnetic direction indicator (compass) onboard for VFR flying. Even for plain ol’ VFR flying? Yup! Regardless of any other fancy directional equipment you may have.
Not only that, but your compass must be accurate enough that it won’t lead you astray because of misleading or excessive deviation errors.
This means in level flight your compass deviation error must not be greater than 10 degrees on any heading. I guess even the FAA concedes that holding a compass heading within 10 degrees in rough air is a challenging enough accomplishment for most pilots.
Anyway, your compass is a mandatory and useful instrument. For one thing, the compass will always be working for you - which is more than you should ever expect of any of your hi-tech electronic gadgets . . . like the loran or GPS.
Electrical systems do fail . . . not often maybe, but they do fail while the earth’s magnetic field never does.
So, if you have to have a compass, you might as well become better acquainted with it and give it a bit more of your attention and a lot more of your trust.
Sure, that simple inexpensive "whiskey compass" may act dizzy at times or behave oddly when flying over localized areas of magnetic disturbance, but the actual failure of a compass is rare . . . very rare indeed.
About That Compass In Your Cockpit
That small liquid, or vertical card, compass most of us have in our cockpit can be temperamental. It is affected magnetically by the proximity of steel objects, including the engine, electrical wiring, welded steel tubular structure and, in particular, most similar metallic objects you might absentmindedly lay on the glareshield in the windshield area.
The most effective cockpit location for a compass is in the open areas of the windshield . . . as far removed as possible from steel parts and other disturbing influences. That’s why you ordinarily see the compass mounted up front where its presence will be, hopefully, at least as practical as it is obnoxious.
Sometimes, but not as often, a compass can be successfully installed in an aluminum instrument panel provided the structure behind and around it is not likely to be a source of magnetic or electrical disturbances.
Trying to find a magnetically neutral location in a welded steel fuselage is a difficult, often impossible, task for homebuilders as well as for owners of some older certificated aircraft.
Sometimes the latent magnetism is so bad that getting rid of it completely is often unsuccessful in spite of the best aircraft degaussing efforts a builder might attempt. That is why in some small biplanes the compass if installed in the upper wing cut-out directly above the cockpit.
Anyhow, sooner or later your airplane will be flying around with a compass onboard, somewhere.
To obtain the greatest accuracy from that compass you should determine the extent of its deviation errors and eliminate, or at least minimize, them by swinging the compass.
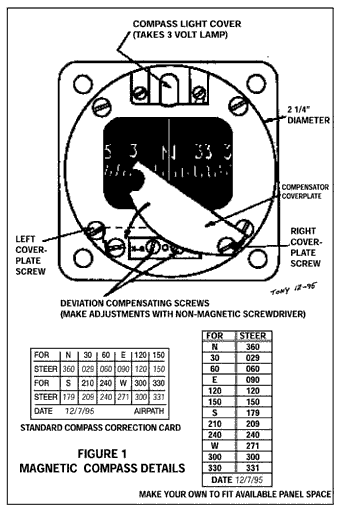
It is not a difficult task at all. All you need is access to the airport’s Compass Rose, and to a small non-magnetic screwdriver with which to make corrective screw adjustments. These adjusting brass screws are located in the top or bottom of the compass face and are the means used to correct the magnetic alignment of the two small built-in compensating magnets . . . should this be necessary.
In essence, this simple ritual is called "swinging the compass."
When and Why You Do It
Your first encounter with a newly installed compass will probably be to check its operation prior to the initial aircraft certification. Thereafter, the compass should be checked during its Annual Condition Inspection or at anytime new electrical equipment is installed in the panel or cockpit area.
Before you attempt to determine the accuracy of your compass you should check its fluid level. The fluid level is important as it helps damp out oscillations of the internal compass card and lubricates the pivot bearings. If necessary you can add Compass fluid (Mil-C-7020, not alcohol or kerosene) by removing the large top plug.
If your compass is mounted on top of your glareshield, you can refill it without removing it from the airplane. Otherwise, you will have to pull it from the panel for the job. For obvious reasons you should use brass mounting screws to install the compass.
As you already know, this so-called swinging the compass procedure is necessary to determine how to compensate the compass in the event that its location in the cockpit is affected by the proximity of steel or iron components or by the effects of current flowing in nearby electrical circuits.
Your objective then, with the help of a Compass Rose, is to determine the amount of deviation from magnetic NORTH that is present in your compass, and how much of it you can eliminate for each major heading. These results are then entered on a compass correction card.
The Compass Rose
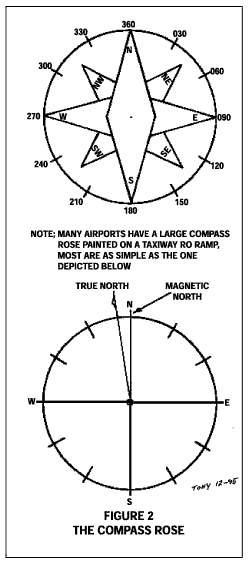
Many airports will have a Compass Rose or something that will pass for it, painted somewhere on the ramp or taxiway. It is usually located away from the possible metal interference of hangars, fuel pumps and anything else which could affect a compass.
The simplest Compass Rose most often seen at a small airport is not usually a very impressive display. It will probably have four intersecting lines painted on the taxiway or ramp to designate the four cardinal magnetic directions (N, S, E, and W). These directions are laid out with the aid of a master compass.
A more elaborate version of a Compass Rose may have additional lines painted and labeled to designate intermediate 30 degree headings.
The most elaborate Compass Rose I have ever seen is the one recently completed at the municipal airport at Burnet, TX by Carol Foy. She is one of the talented members of the Austin, TX Chapter of the 99s.
It is worth the flight out to Burnet’s fine airport just to see and use this Compass Rose . . . besides, the folks are friendly and the 100LL Avgas is currently dispensed for only $1.65 per gallon
Here's How You Do It
To be accurately accomplished, the compass should be swung under conditions similar to those encountered in flight. In other words, the engine should be running, the radios should be on, and the aircraft in a level flight attitude.
The reason for the simulated level flight attitude is because the magnetic bars on the compass card attempt to parallel the earth’s magnetic lines of force.
Note: For example, when a taildragger is on the ground, the nose of the aircraft points skyward causing magnetic bars and the compass card to tilt in an attempt to remain aligned in the same direction as the earth’s magnetic lines of force. The resulting magnetically induced dip causes the compass card to swing slightly, giving an erroneous indication. A taildragger, therefore, should be chocked with the tail raised to approximate level flight attitude . . . the job is much easier when two people are involved.
Here’s the basic procedure:
1. Taxi the airplane into position onto the Compass Rose with the nose aligned with the NORTH magnetic reference line of the Compass Rose. Adjust the N-S screw with a non-magnetic screwdriver so that the compass reads exactly NORTH (0 degrees).
2. Next, realign the aircraft on the Compass Rose with the nose pointing in a magnetic EAST direction. Adjust the E-W screw until the compass reads EAST (090 degrees) exactly.
3. Turn the aircraft to a magnetic SOUTH direction and note the resulting SOUTH error . . . if any. Readjust the N-S screw until you have removed one-half of the error.
4. Next, head the aircraft so it points to a magnetic WEST direction. Readjust the E-W to remove one-half of the E-W error.
5. Finally, turn the aircraft to successive 30 degree headings and record the resultant readings on your compass correction (deviation) card.
The Compass Correction Card
A Compass Correction Card is normally affixed to the instrument panel adjacent to the compass. In the past, FAA inspectors seldom missed the opportunity to point out to the anxious builder, during his certification inspection, that he still lacked a Compass Correction Card. Although the inspector rarely withheld the issuance of the Airworthiness Certificate, for that reason alone he would point out the need for the builder to swing his compass before he would be ready to test fly his airplane. Embarrassing though it may have been, it was generally conceded to be an easy thing for the first-time builder to forget and overlook.
A blank standard Compass Corrections Card may ordinarily be obtained free-of-charge from an instrument shop or more often at one of the major fly-ins (Oshkosh, Sun ’n Fun, etc.).
If you can’t obtain a regular Compass Correction Card, make your own. Actually, making your own can be advantageous because you can arrange it so it can be mounted horizontally or vertically. This depends, of course, on the space available for posting it near your compass.
It is well to remember to keep metal objects such as key chains, tools, fingernail clippers, etc. off your glareshield - and away from the compass as they, too, can contribute to erroneous compass readings.
The Final Results
How did we make out? Pretty good. That RV-6A compass was off only 3 degrees on N, and just about zeroed in on the S heading . . . well within the allowable 10 degree margin acceptable to the FAA.
Now, that blank compass card on the panel can be filled out with good conscience, and with the added assurance of knowing that my compass is far more accurate than I hoped it would be.


